
Kaineng Overlook

The encounter will begin when Minister Li is attacked once on the lower platform. Once hit, he will leap to the upper platform. Players must use the Zip Line to follow him, however, note that a Jade Bot is not required to utilize the Zip Lines in this encounter.
Minister Li: 100% – 66%
Minister Li follows a strict attack pattern in each phase, slowly layering on mechanics as the fight progresses. In the first phase, he will start with a Cleave, followed by a Dash to the corner, a Cleave from the corner, a Dash to the center, and a Number attack, then will repeat his pattern.
In addition to Li’s large attacks, he sometimes will fixate on one player and auto-attack in-between his major attacks; this is a good time to focus on damaging the boss as these auto-attacks do negligible damage.
Cleave
Minister Li’s Cleave will damage and launch players backward in an almost 180° arc in front of him.
The AoE is telegraphed by a large cone shortly before the actual attack.
If you’re in the danger zone, you can  Dodge
Dodge
Note: While the rest of Li’s attacks have fixed directions, when in the center, he will fixate on a player while charging his Cleave for a while before locking in place.
Dash
After the first Cleave, the boss will face a corner of the arena and charge his Dash. An arrow will appear and he will Dash to the corner.

This attack will do extreme damage to players in his path: do not get hit! The Dash’s damage can be avoided by dodging or blocking, but the best defence will always be to position behind Minister Li as he charges it up.
Numbers
Li will mark three players with roman numerals above their heads. Targeted players will also see a yellow border on their screen.
After 12 seconds, Li will send a wave toward each marked player in ascending order. Once these come into contact with any player, they will explode.
These explosions are not very threatening but will deal high damage if an unmarked player is hit. The explosion inflicts
While charging up his Numbers attack, Minister Li is not attacking, and will only ever attack (after he’s done charging) in the direction of the marked players.

If Numbers are assigned from the center, the group should stack in one place (commanders will often mark the entrance for the squad to stack) while marked players should spread on the other side of the boss.
In the final phase of the encounter, Minister Li assigns Numbers while in a corner, so the group should stack in the corner and marked players should spread in front of the boss.

Each of Minister Li’s attacks comes out relatively quickly but has long charge times. Players should watch to see which direction he is facing to determine the direction of his next attack. This is most relevant for his Dash. Make sure to watch for an arrow under his feet that telegraphs his orientation!
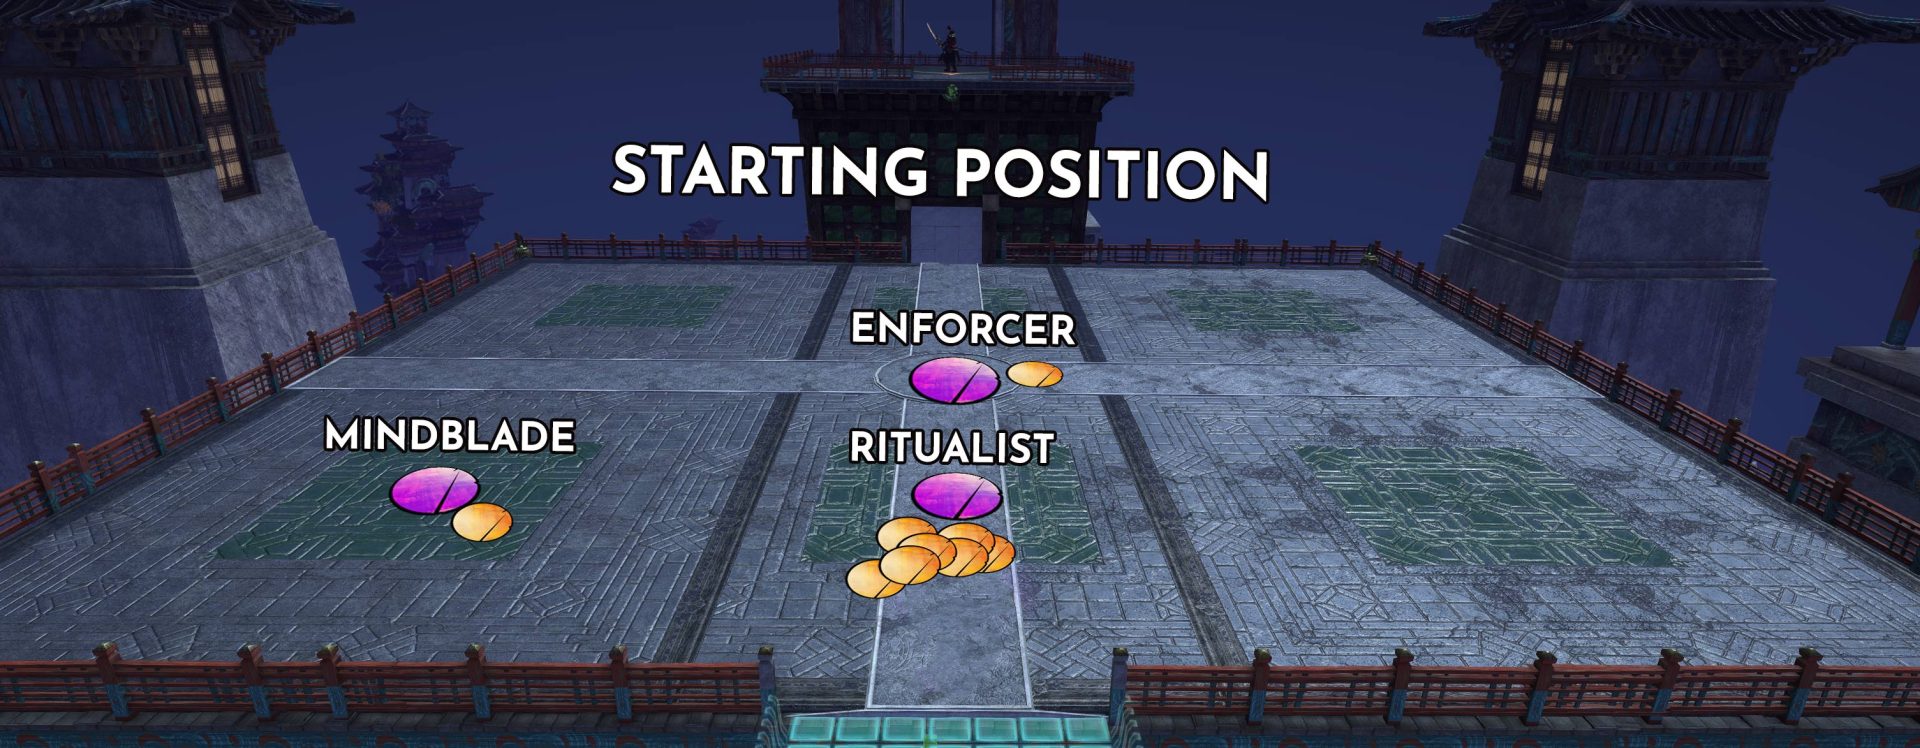
The Enforcer, Ritualist, and Mindblade
Upon reaching 66% health, Minister Li will become invulnerable, knocking the squad to the lower platform to face the three mini-bosses of the first split phase. Proper positioning and target priority can speed up this phase significantly.
The Enforcer and The Mindblade both have the
Stronger Together effect, which grants
Players fixated by those mini-bosses should keep them apart at all times.
When one of the two linked bosses dies,
Enforcer
The tankiest and most mobile of the three, the Enforcer will start the fight by teleporting to the center and Dashing around in predefined directions, creating fiery lines on the platform in an hourglass pattern. The Enforcer’s dash pattern will change as the fight progresses, but the fire always ends up in some variation of an hourglass and is easily avoided.
Bladestorm (Known as: Spin)
After Dashing around, the Enforcer will spawn a red AoE that applies many stacks of
The Boss will always fixate on the closest player after finishing this attack.
Heaven’s Palm (Known as: Slam)
Occasionally, the Enforcer will spawn spiritual hands (similar to  Heaven's Palm
These area attacks do moderate damage when on their own and, unlike most other spread mechanics, can be blocked or dodged.
The targeted players should move away from the stack as the hands will damage the squad and will apply
Mindblade
The Mindblade has a few hard-hitting cleave attacks. When under the ![]() Lethal Inspiration effect with the Enforcer, this boss can pile on a lot of damage quickly. Killing Mindblade first will make this phase much easier to handle.
Lethal Inspiration effect with the Enforcer, this boss can pile on a lot of damage quickly. Killing Mindblade first will make this phase much easier to handle.
Unstable Bladestorms
The Mindblade will periodically spawn three or six AoEs around herself, telegraphing her Unstable Bladestorms. These travel outwards in a straight line and deal heavy damage while applying Dodge
Ritualist
The Ritualist is the only stationary mini-boss in this phase. He will cast ranged attacks from one of three spots: his spawn location, the middle of the arena, and close to the main Zip Line.
Lightning Storm
The Ritualist starts the fight by spawning small damaging lightning fields. These also will strip your boons, so make sure to step out of these AoEs.
Healers should be prepared to start this phase with large heals.
Ghosts
After the Enforcer finishes his second Dash sequence and Bladestorm, The Ritualist will teleport to the center, summoning Ghosts that will cover most of the platform with large AoE crowd control attacks.
The Ritualist will alternate between summoning four Ghosts that launch players or two Ghosts that pull in players. Each of these variations has its own safe zones, so stand in those before each attack goes off. After each of these attacks, the Ritualist will then teleport to the other side of the platform.
Strategy
 The Mindblade and The Enforcer will fixate on the nearest players to them, marking their tanks with purple diamond icons and applying the
 ![]() Fixated effect. The Mindblade will refixate every 30 seconds, while The Enforcer will refixate after each of his Bladestorm attacks.
Fixated effect. The Mindblade will refixate every 30 seconds, while The Enforcer will refixate after each of his Bladestorm attacks.
As the Enforcer and the Ritualist pose little threat together, the squad should focus on killing the Mindblade first, while the Enforcer’s tank moves him away from the Mindblade and the rest of the group.
Groups will often do this phase more efficiently by stacking near the Ritualist, while Mindblade’s tank will pull her on top of the Ritualist to cleave her while focusing on Mindblade.
After the Mindblade dies, the Enforcer can be brought on top of the Ritualist in much the same fashion.

Minister Li: 66% – 33%
Once all three mini-bosses have been defeated, the squad can take the Zip Line again to return to Minister Li’s platform who in this phase retains all of his previous attacks and gains a new Spread mechanic.
Li’s overall attack pattern will change in this phase. He will start by Dashing to the far-left corner (relative to the Zip Line), perform a Cleave + Spread combo, and then he’ll Dash to the next corner and repeat the same combo. Once he’s done an attack in all four corners, he will Dash to the center and do his Numbers mechanic. He will then repeat this pattern until phased at 33% health.

Spread
Li will spawn AoEs on the 5 closest players, which explode when they fully expand. If a player is in two or more circles, they will immediately go downstate. Further complicating matters, Minister Li will always use Cleave in tandem with Spread.
Since he will always do the Cleave first, and the Spreads will explode afterward, you can time your blocks or Dodge
A clean way to mitigate this combo is to have the 5 affected players spread out in front of the boss, Dodge
The Spread AoEs take 5 seconds to explode, and Cleave happens 1-2 seconds before Spread detonation, which gives a lot of time to position yourself properly.
Note: If you are not confident with your
timing, you can bring a good source of Dodge
or blocks such as to counter the Cleave. Additionally, you can enter the instance alone and practice dodging his Cleave (and his Dash) as long as you wish.
The Mech Rider and Sniper
Upon reaching 33% health, Li will again knock you back to the lower platform, where the final two mini-bosses will spawn: The Sniper and The Mech Rider.
The two bosses in this phase have a semi-shared health pool, signified by the
If a boss gets over 20
If equalization occurs, both bosses will also gain the
Squads should aim to avoid equalization by keeping difference between the HP of the mini-bosses below 20%, however keep in mind that The Sniper has less maximum HP than The Mech Rider, so her health percentage will go down faster as a result, assuming equal damage is being applied to each boss.
Mech Rider
The Mech Rider spawns in the center of the platform and is stationary for the majority of the fight.
It will target the closest player that is both in melee range and in its line of sight with a two-hit combo. Each punch has a conal AoE that can be sidestepped; the second is larger.
Mech will continue this attack as long at least one person satisfies both of the above fixation conditions, if no one will be in range and in front of the Mech, it will do the Barrage attack, usually targeting the previous tank.
As the tank, try to face The Mech Rider away from the rest of the group, although the melee attacks do not do much damage on Normal Mode regardless.
Note: If the tank is ending up with a lot of Barrages occurring even though they’re in melee range and in front, they’re likely moving too far at an angle when sidestepping the punches.
Try and only barely sidestep each cone and results should be much more consistent; being further in the hitbox can help with keeping the aggro.
Barrage
The Mech Rider will shoot four sets of projectiles around the platform at his target. These deal relatively high damage and should be avoided or dodged.
This attack will only occur if The Mech Rider does not have a valid tank (player in melee range and in front) at the start of the fight or at the end of his two-hit melee combo.
If The Mech Rider was able to finish Barrage and there are still no viable tanks, it will start firing Jade Lobs, which leave a single highly damaging and lingering AoE on the ground for each shot.
Pushback and Mines
At the start of the fight, and periodically afterward, the Mech Rider will spin in the center of the platform, pushing players away and throwing mines around the platform in a pattern.
If a player is far enough away from The Mech Rider as the Pushback occurs, they will not be pushed back at all for the entire duration of the animation.
The Mines deal heavy damage but can (and should) be cleared during downtime by players with blocks, or with Dodge
The biggest threat this mechanic poses is that the Mech Rider’s tank will likely be pushed back as well, which can cause Barrages to start if the tank doesn’t make it back into melee range in time.
Numbers
Occasionally the Mech Rider will mark four players with roman numerals above their heads, they will also have a red border on their screen.
The Mech Rider will dash toward the targeted players and punch in a small arc, dealing moderate damage and floating the player in the air.
This attack can be mitigated with Dodge
This is the only time that the Mech Rider will leave the center of the arena, and after attacking the fourth marked player, he will turn to face the center of the arena and walk back in a straight line; the tank should be aware of this and position themselves accordingly.
Laser
The Mech Rider will start charging up a laser attack, which is indicated by a wide rectangular AoE in front of him. This attack deals extreme damage and will likely outright defeat any player in its range.
Be careful, as this attack has a large hitbox – it is very easy to get clipped by the edge of the attack and die. Stand behind the boss at max melee range to avoid getting fried!
Sniper
The Sniper will appear in a random spot on the platform; she does not move except to teleport to and from the arena. Her auto-attacks deal low damage and can be easily ignored.
Her only threatening attacks are her Ricochet and Snipe. Periodically, the Sniper will teleport to one of the seven perches around the platform and will target one player with one of the two, alternating between them throughout the phase.
Ricochet
The targeted player will have an orange targeting line trained on them, and will also have a large, thin red circle surrounding them.
Any players in this AoE will be downed by the Sniper’s shot unless the shot is absorbed or reflected.
Whenever the Sniper teleports to her perches for Ricochet, she will also spawn a Spread mechanic on most players on the platform, which work the same as the mechanic during the Minister Li phases: don’t be in two at once!
Snipe
The targeted player will have a faint green targeting line trained on them.
The Sniper must be interrupted (by breaking her defiance bar) by any players who take the Zip Line up to her perch, or all players in the range of the target will be downed by the Sniper’s shot. This shot cannot be absorbed or reflected.
Whenever the Sniper teleports to her perches for Snipe, she will also spawn a Stacking Green mechanic on a player. If less than three players are inside the Green circle when it closes, the squad will take heavy damage.
Most groups forgo breaking the defiance bar during Snipe, as the downed player(s) can be easily resurrected and so damage uptime can be maintained on The Mech Rider until The Sniper returns to the main platform.
Note: With a decent amount of soft crowd control effects like
, , , , , , and , the group can automatically break the Sniper’s breakbar, cancelling her Snipe without sending anyone to her rooftop. Assign players with good sources of these conditions to focus on the Sniper.
If players decide to break her defiance bar, one or two players with good access to Crowd Control should take the appropriate Zip Line (indicated by a ![]() marker) to travel to the Sniper, and once it’s broken, use the teleporter on top of the rooftop to quickly get back to the main platform.
marker) to travel to the Sniper, and once it’s broken, use the teleporter on top of the rooftop to quickly get back to the main platform.
If the breakbar has failed, the teleport will not be accessible – in this case, players should glide back to the main arena.
Note: Travelling to the Sniper will remove Spirits, Banners, and Minions from the field. Try to assign players to break the Sniper’s breakbar that do not have these summons.
Strategy
To efficiently handle this phase, squads can choose to either swap between targets or split the group to focus on both mini-bosses simultaneously.
If the group decides to swap, keep an eye out for stacks of ![]() Equalization Matrix. Typically, as the Sniper is teleporting on and off the platform the Mech Rider will be killed faster – be ready to swap quickly to the Sniper when she reappears!
Equalization Matrix. Typically, as the Sniper is teleporting on and off the platform the Mech Rider will be killed faster – be ready to swap quickly to the Sniper when she reappears!
If you decide to split, split the squad into groups of 7-3, 6-4, or 5-5, where the larger group of players focuses The Mech Rider. The group attacking the Sniper should have multiple sources of soft crowd controlling conditions, if possible.
Minister Li: 33% – 0%

The final phase adds a Green mechanic to the Cleave+Spread combo, which always centers on one of the players not targeted by the Spread. This Green behaves the same as the one in the previous phase: at least three players need to be in the circle when it closes.
While the Green adds chaos the first time you see it, it does not change how you handle the combo. The Spread players should continue to move in front of Minister Li, Dodge
Minister Li’s pattern will change for a final time in this phase.
He will again start by Dashing to the far-left corner, but this time he will do the Numbers mechanic there. After Numbers concludes, he will Dash to the next corner and do the triple Cleave+Spread+Green.
He’ll Dash to the other two corners, alternating the mechanics again, before Dashing to the middle to do a final Cleave+Spread+Green (where the Cleave follows a random player for up to 2 seconds before the attack) before repeating the pattern.
Overall, phase 3 is easier than phase 2 as Minister Li will have more Numbers mechanics. These attacks allow for free DPS uptime on the boss (as the charge time is extremely generous), as long as the targeted players position off of the stack.


