
Conquest: Maps, Roles and How to Win

This guide serves as an introduction to the fundamentals of the Conquest PvP game mode. You will learn how squad compositions work, what roles each class can fill, the different map mechanics, and how to win more overall. If you are not familiar with how PvP, in general, is operated and the what are the differences between PvP, PvE, and WvW, please make sure to check out our Introduction to PvP guide.
Conquest Objectives
First and foremost, we should recap the main objective of Conquest.
2 teams of 5 players will be competing to be the first to reach 500 points in 15 minutes. The main method of gaining points is to capture the 3 capture zones on the map. Each zone captured will reward 1 point every second.
You can also gain points by killing an enemy player, awarding 5 points immediately to the team who got the kill. Once a person is killed in conquest, they have to wait 15 seconds to respawn in their home base.
The third method of point gain is to complete secondary objectives that are unique to each conquest map, although some of these objectives don’t award points when completed. If the 15-minute timer ends before a team has reached 500 points, the team with the most points wins.
Maps and Secondary Objectives

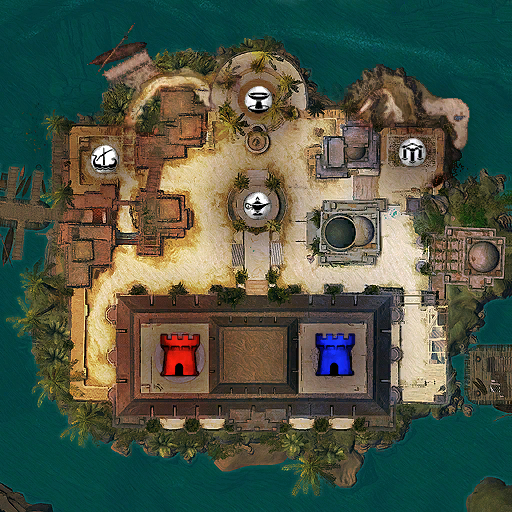
Revenge of the Capricorn
Every 3 minutes, a 4th capture point called the Bell will appear at the north-middle side of the map. Whichever team captures this point first makes it disappear and generates a flat amount of points for the team.
The first time this is captured by a team, they gain 25 points, and every subsequent capture will increase the points rewarded by 25.
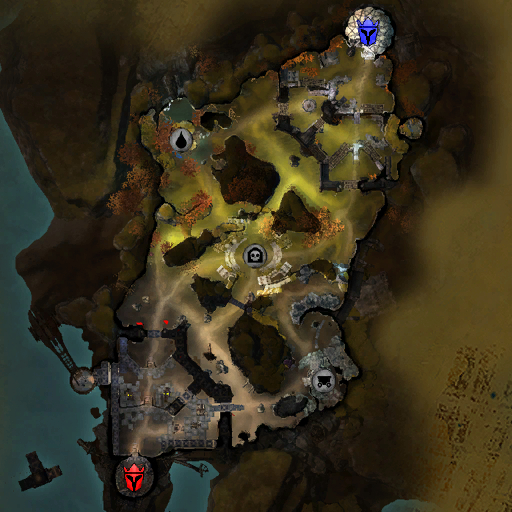
Djinn’s Dominion
Every 2 minutes, a 4th capture point called the Lamp will appear in a closed-off area of the map. To get to this capture point, a lamp in the center balcony of the arena can be interacted with to teleport there. If a team captures this zone, every member of their team that is alive will receive a 1-time use special action key ability.
This can either be summoning a meteor to fall on a location after a few seconds to damage enemies, summoning a bubble that removes all conditions from your allies and boons from your enemies or a targeted projectile that deals 20% of the enemy’s maximum health in damage and leaves a stacking debuff on the target for 10 seconds that will increase the damage dealt to the opponent by an additional 20% of their max health per stack. If a player dies with a special action key, they lose it.
Note: Most teams never go for this capture point because it does not give a significant enough advantage to your team. In addition, once the lamp is captured, the section on the south side of the map gets closed off, meaning you have fewer opportunities to rotate around the map effectively without getting spotted.
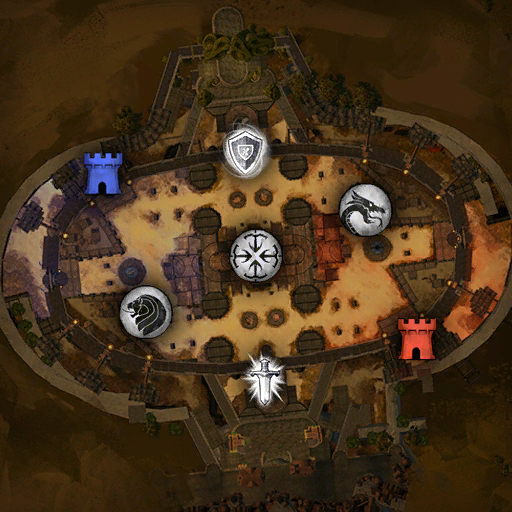
Legacy of the Foefire
Throughout the entire game, both teams have the opportunity to deviate from point control and invade the enemy base by destroying 1 of 2 gates. After a gate is broken, they can head to the enemy team’s lord and minions. If the enemy team’s lord is slain, the killing team scores a flat 150 points.

Temple of the Silent Storm
There are two secondary objectives available on the map at different intervals: Stillness and Tranquillity. Stillness is available at 11:30, 8:30, 5:30, and 2:30 on the timer, and can be obtained at the north-central crossroads of the map by channelling. Note that this channel can be interrupted by any CC or damage. If obtained, for the next 60 seconds, every point generated by controlling zones by that team is doubled (1 zone controlled counts as 2, 2 zones count as 4, and 3 zones count as 6).
Tranquillity is available at 8:30 and 2:30 on the timer and can be obtained by either falling down the pits by the stillness buff or going down the stairs at the central control zone. This has a long channel time, as whichever team captures stillness will gain immediate control over every single capture zone on the map. In addition, any enemy standing on a control zone when this is captured will be launched off of it.

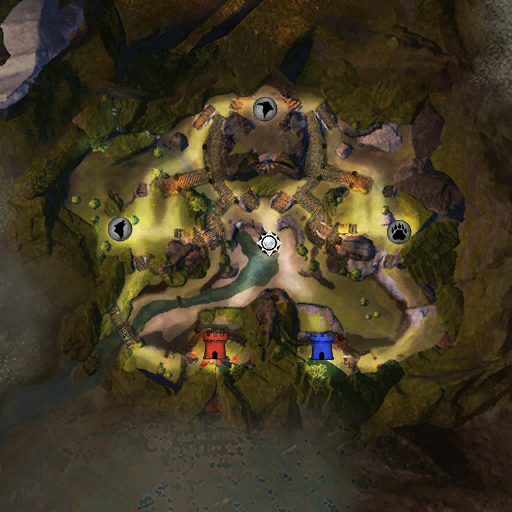
Forest of Niflhel
At the 1st minute and every 3 minutes after death, 2 large neutral NPCs named Chieftan and Svanir will spawn at the northeast and northwest corners of the map. When a team kills one of these NPCs, they gain 25 points and a buff that increases all team members’ stats by 50 for 90 seconds. Both buffs can be stacked at the same time.

Battle of Kyhlo
On each team’s corners of the map, they have access to a trebuchet. One person can use this trebuchet to launch a large ground-targeted projectile that will heavily damage and knock down anyone caught in the area. This has a very far range, but the enemy team can respond to this by either killing the player operating the trebuchet or destroying the machine.
If the trebuchet is destroyed, a repair kit will spawn after a few minutes. The kit can be taken to the trebuchet and make it active again. Be careful though, as you do not have access to your weapons skills while carrying the repair kit.

Skyhammer
Every 3rd minute, a portal will open in the open middle section of the map that will teleport you to a 4th capture zone called the Skyhammer. If your team captures it first, the Skyhammer will fire a massive laser at all 3 capture zones on the map. If any of these three points are in control of the other team, they are neutralized. Any enemy standing in either impact of these lasers will take heavy damage.
Eternal Coliseum
Every 3 minutes, two buffs will spawn at separate chambers on the far north and south areas of the map. Capturing the sword buff gives the player and all teammates a 20% increase in power and condition damage for 90 seconds. In addition, if the sword carrier helps in downing a player, a reaper will automatically execute the downed body after a few seconds (this can be negated if timed correctly by a resurrection utility, getting manually resurrected by your team, and the downed skill 2 on Elementalists).
Capturing the shield gives the player and all teammates a 5000 increase to their maximum health and a bonus of 100 toughness for 90 seconds. If the player with the shield goes into the downed state and is not killed within a few seconds, they will automatically be resurrected. This revive function can only happen once.
Spirit Watch (unranked conquest only)
An orb will spawn in the middle of the map. Picking this orb up will replace your weapon abilities with 3 new ones as well as drastically reduce your movement speed and prevent you from receiving stealth or swiftness. If the orb carrier gets onto any capture zone, they will score 25 points if brought to a neutralized or enemy captured zone and 50 points if brought to a friendly captured zone.
After bringing the orb to a capture zone, it will respawn at the altar 2 minutes later.
PvP Slang
Another thing to understand for winning more PvP matches is the language/list of terms people use in the match. If you don’t know what something means, and it is vitally important for your team to fulfill that request, then it reduces your chances of victory by a significant amount. Here is a list of common terms used in an average Conquest match:
- Home/close: the capture zone that is closest to your team’s respawn base
- Mid: the capture zone that is equally distant between your team’s respawn and the enemy team’s respawn base
- Far: the capture zone that is furthest from your team’s respawn base
- Decap: the action of neutralizing a capture zone but not fully capturing it, preventing the enemy team from gaining any points from it. This tactic serves as a distraction for enemies to spread out from their team, potentially giving you a window to win an important fight or secondary objectives (for example, if someone tells you to “decap far”, they want you to neutralize the far capture zone but not to fully capture it for your team).
- Rotate: moving from one area of the map to another
- Stomp: manually interacting with an enemy in the downstate to execute them
- Cleaving Downs: using damage from skills and utilities to finish off a down-state enemy instead of executing them manually
- Bleed Out: letting the enemy sit in the downstate for a longer duration and not killing them so that they respawn slower
- Kite: focusing on surviving when being pressured by the enemy team by going on hard to access spots on the map which make it hard for the enemy to follow you. It makes the enemy team waste their cooldowns and enables your team to turn the situation around on the enemy team.
- Peel: providing counter pressure, interruption, or protection from certain abilities to allow someone else on your team to survive
- Plus 1/+1 fights: Making an even fight (1v1, 2v2, etc.) into uneven fights in your favor (2v1, 3v2, etc.)
Roles of a Conquest Squad
While anyone can just make a build and go kill, claim objectives, and capture zones, a good 5-person team has roles assigned to people for fulfilling these tasks in a better way. In conquest, the community has designated 4 essential roles for a standard composition: Teamfighters, Supports, Roamers, and Duelists.
Teamfighters
This role of PvP is the easiest to adapt by new players: stay with your team, and kill your opponents before they kill you. You always want to stick by your support if you have one, as your build does not survive one on one situations well let alone an uneven fight.
The most important decision a team fighter can make is who to apply their burst damage to and when it is safe to do so. You and your teammates can mark a target for death before a team fight starts, so you know you want that person out of the fight due to what they bring for their team.
Recommended Specializations:
 Guardian
 Guardian
 Revenant
 Warrior
 Thief
Thief Ranger
 Engineer
 Mesmer
 Elementalist
 Necromancer
Pros and Cons of Teamfighters:
- Pro: Lots of burst damage
- Pro: Lots of cleave damage/area-of-effect abilities
- Pro: Best friends of your supports
- Pro: Considered to be the easiest type of build of the 4
- Con: Tend to be very squishy
- Con: Less defensive traits than other builds
- Con: Most of the time has lower than average mobility
Supports
These builds are not only seen as healers but as boon givers, CC providers, etc. Your job is to make sure your team stays alive in larger fights, get clutch resurrections of your fallen allies, and help your team without needing to kill. While excellent at keeping your team alive, being alone as support only worsens your chance to win.
Recommended Specializations:
Pros and Cons of Support Builds:
- Pro: Allows your main damage dealers to survive
- Pro: Great access to boon generation
- Pro: Can usually resurrect your allies mid-combat
- Con: Can not play alone because the role is to help others
- Con: Is most likely the 1st target of a teamfight
Roamers
Roamers are those who prefer to help their team via assassinations, neutralizing capture zones, and overall be a general annoyance. Their high mobility options via weapons and utilities mean they can be across the entire map in a very short amount of time. When it is time for them to kill, they let loose hard and fast but carefully.
A roamer usually helps out their team when trying to create an uneven fight (example: roamers like to make a 1v1 into a 2v1 in their favor, a 2v2 into a 3v2, etc). With their mobility as their main survival tactic and general lack of AoE’s, this makes them incredibly susceptible to group focus.
Recommended Specializations:
Pros and Cons of Roamer Builds:
- Pro: High mobility
- Pro: High single target burst
- Pro: Best for neutralizing points fast
- Con: Extremely squishy
- Con: Not a lot of group utility
- Con: Considered to be the hardest role out of the 4
Duelists
Duelist is the most popular type of build. Everyone wants to be able to face someone 1v1 for honor or to gloat. Duelists make this their sole objective. They either remain in a 1v1 to stall so that a roamer can assist in a kill, stay on one specific point so that the enemy duelist doesn’t cap it and stay there for the rest of the game, or even simply to just neutralize a point and keep it that way so that the enemy team doesn’t gain points. While taking 1v1s can be an easy task, duelists can struggle when faced with outnumbered situations like 1v2s or even 1v3s, however good duelists will be able to survive and kite away from those without dying and then win the capture point back when the enemy rotates away.
Side note: There are certain builds that the community has given nicknames to such as bunker builds or decap builds. These are sub-categories of duelists, and they specialize in either permanently staying on a single point the majority of the game (bunkers) and CCing your opponent off of a point so you can neutralize it but not focusing on killing them (decappers).
If you wish to play these builds, do note that they are even less flexible than normal duelists for positioning and team play.
Specialization Recommendations for Duelist Builds:
Pros and Cons of Duelist Builds:
- Pro: Can stall for a while and potentially bait out other enemy team members from a position
- Pro: Best at surviving 1v1s and can even survive outnumbered situations with the help of kiting
- Pro: Decent mobility, sustain, and CC
- Con: Less useful in teamfights compared to other 4 roles
- Con: Higher likelihood to bad mouth you if you lose against them
Team Compositions and Potential Problems
The recommended team composition for a game of conquest is 2 team fighters, 1 support, 1 roamer, and 1 duelist. Another viable option is to go 3 team fighters and remove your roamer if you feel like going for various decaps would be detrimental.
Eventually, as you play more conquest, you will start to notice how most teams don’t have a perfect composition. There can sometimes be teams with no support, 3 duelists, etc. If this ever happens, the most obvious thing to do to fix this would be to change into another build or another class entirely.
This, however, is done extremely rarely in casual games and ranked, as people designate their main class they don’t want to swap off of, or they simply don’t have another role filled on another character. If you are forced to adapt your build so that you can help the team in what you all are lacking, here are a few tips:
- Lack of team fight damage: include more AoE’s into your burst, play more aggressively if possible, and add a little more CC to your skills.
- Lack of support: include more AoE boon generation and healing (even if it is a small amount), use group-oriented utility skills like stealth, projectile blockers, etc.
- Lack of stalling/personal survivability: swap out your amulet, runes, weapons, and utility skills for tankier options, practice kiting the enemy, do not take fights you repeatedly lose to, and go somewhere else where the enemy team isn’t.
- Lack of map disruption: add mobility skills and/or swiftness generation, add stealth access to confuse the enemy on where you might be going.
Daily/Monthly Automated Tournaments (ATs and MATs)
While most people are generally intimidated by the word “Tournaments” in “Automated Tournaments”, these are definitely a great way to improve your skill and team communication. Additionally, ATs and MATs are a great way to earn gold as you get around 10 gold for less than 1 hour of playing on average. Higher level players can earn up to 50 gold for an AT which takes around 1h30m with the elimination brackets towards the end of the tournament. For MATs you need to have 100 qualifying points to participate (earned for playing daily ATs) however the potential for gold earning is even higher, at 25g for 2h of play on average and 100g to 500g for the top of their class gamers.
ATs happen every 3 hours and you can reliably find some groups that want to play it, listed in the game LFG under PvP Tournaments. MATs happen on 4th Saturday of every month at 21:15 CEST (12:15pm PST) with the 15 minutes before it being the registration period. There is a lot of LFG groups listed for MAT therefore you will definitely be able to find one. However do keep in mind that people will want to win and ask for a rating requirement to try and get as much rewards as possible, so make sure to join only groups you qualify for, make your own, or join a permanent PvP Team!
To sign up for an AT, you must form a party of 5 people and be able to stay in one zone for a long period of time, as you are not recommended to be moving around different instances for the entire duration of the tournament including the sign-up period. Once your team has signed up and the registration period has ended, the match selection process will begin.
Unlike random matchmaking in unranked/ranked play, ATs have a round-robin-style team selection system in which, after the first match, you will be put against other teams that have the same or similar win-loss record as you. If there are an odd number of teams registered, there is a chance your team will receive a bye round, giving your team more time to discuss what you could do better or prep for the next match. At the end of your guaranteed 3-4 matches, if you have a high enough win record, you will be put into final elimination matches to see what place you will come in while everyone else will simply receive their participation rewards which decrease in value with match placement.
Final Thoughts
Here is a final list of tips to help anyone playing whatever type of build in Conquest:
The number one recommendation that we give to every player when they ask how can they be better in PvP: DON’T DIE! Simply being alive and progressing with nothing in your favor is better than dying when trying but failing to help your team. If you are unaware of what certain builds do for helping the enemy team and hurting your team, focus on purely surviving for a time, but don’t spend the entire match doing this. At some point, you will need to commit to a fight to help your team put pressure on the map. When in doubt, run away and use your defensive skills wisely.
If you are ever confused about where to go and what to do at any point in a conquest match, go wherever the enemy isn’t. In most situations, capturing or decapping a point where the enemy doesn’t have any presence can be a really good way to give the rest of your team time to do what they are doing. In an ideal situation, the enemy team won’t even notice that you did something to hurt them until you’ve already done it. This tip also applies when you die to a really good player in a 1v1. If you know you can’t kill them after 2 to 3 tries, don’t go back to fight them again, or else they will simply just farm you for points.
Make even fights into uneven fights in your team’s favor. Even if you are not a roamer, you can help a fight by just simply being there to give a number advantage. There are very few skills in the game that do more damage the more enemies are present in a fight, so you are not always going to be punished for increasing a team fight’s success by going to a contested location.


