
Xunlai Jade Junkyard (CM)
Enrage: ~6 minutes per phase. When Enraged, Ankka’s outgoing damage increases progressively over time the squad is unable to sustain and is defeated.
Required:, crowd control, condition cleanse, ranged healing and/or revival skills Upon entering this Strike Mission, the time of day is locked to whatever it was at instance creation.
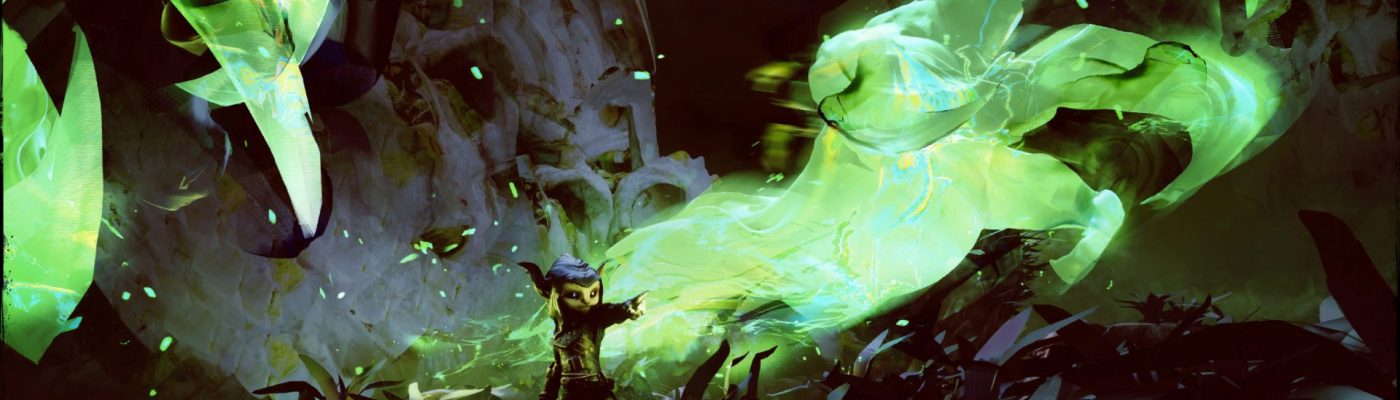
Xunlai Jade Junkyard’s Challenge Mode, with a few mechanical remixes and additions to Ankka’s arsenal, introduces even more chaos to an already hectic encounter. While there are no instawipe mechanics to contend with, players without good awareness of the battlefield, good movement, and quick reactions will be handily put in their place by Ankka’s deadly Hallucinations. In this way, personal responsibility is tested quite heavily over the course of the fight; it’s very important for all ten players in the squad to understand the proper response for each mechanic (especially the three Hallucinations). You should be intimately familiar with the encounter on Normal Mode before attempting to take on Ankka at her most powerful.
The Inevitability of Death bar, visible in your map objectives, is the enrage timer for this encounter. It is filled as Ankka’s attack sequence progresses, and will reset when you phase her and force her to move to the next section of the Junkyard. It typically takes around 5-6 minutes for the bar to fill.
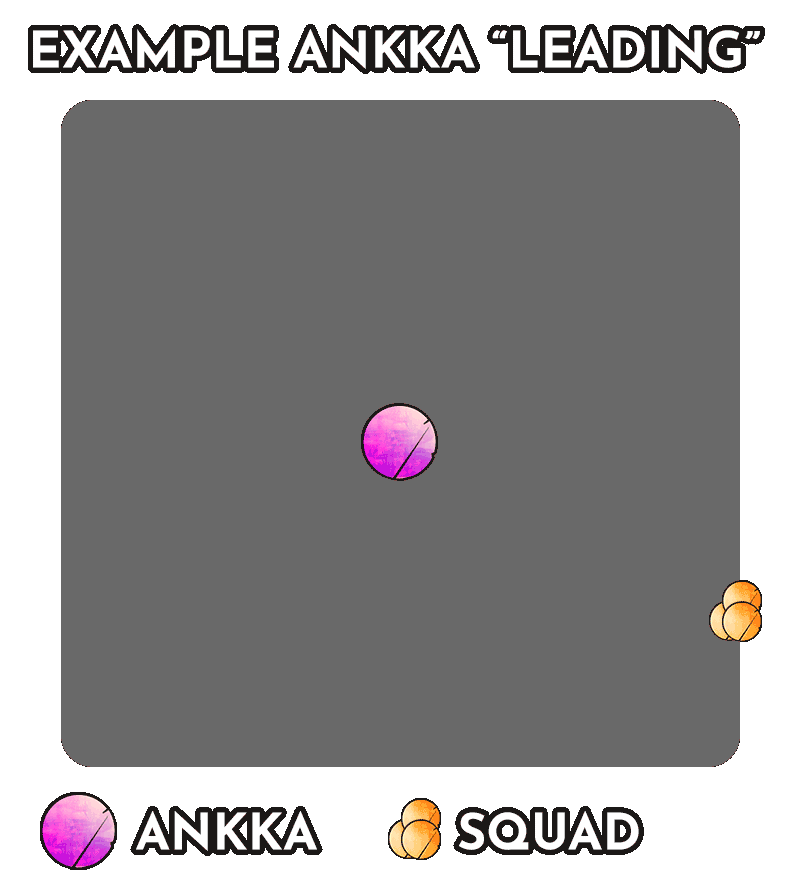
The most important things to take away from this guide and apply to your strategy in-game are how one properly stacks, how to follow the commander, and how to “lead” the boss, as knowing how she moves and how to position her away from disadvantageous spots in the arena is absolutely crucial to obtain all the achievements, including the coveted Gazed in to the Void title.
Attack Changes
While the overall fight will be similar to Normal Mode, most attacks are buffed to the point they one-shot you. It is crucial that everyone avoids any and all area attacks throughout the whole fight. Healers will have a hard enough time outhealing
Similarly to the Normal Mode, Ankka has two interchangeable attacks (Death’s Reach and Hallucinations) and two fixed attacks (Pull and Necrotic Ritual) that she will perform in a predefined sequence.
The only attack that is unchanged from the Normal Mode is the Pull.
Death’s Reach
All three versions of this attack were buffed in damage, size, or quantity.
Grasping Horror (Known as Small Hands) spawns more AoEs in the Challenge Mode, making positioning and awareness very important, especially during the final phase.
The squad should aim to stay in the melee range of the boss, as Ankka will spawn additional AoEs for any player outside the range of the first three AoEs placed.
Death’s Hand (Known as Timed Hands) still one-shots players, just as in the Normal Mode. In the Challenge Mode these AoEs are bigger and also explode when fully charged (placed), meaning they can’t be stacked anymore.
Targeted players should place them somewhat close to the group to the edges of the arena and quickly return to the squad to properly position the boss.
Each individual Snakehead is not buffed much in the Challenge Mode, but the number of the heads is increased, reducing the safe zones in the area.
Due to deadly combination of being knocked down into one-shot AoE fields dropped by players or Hallucinations fields, the Snakes nearby the group should be killed as soon as possible.
The squad should consider taking  Virtuoso
 Scourge
 Epidemic
Hallucinations
The Krait and Lich hallucinations have increased damage in the Challenge Mode, making them even more threatening. However their size, speed, and number is the same as in the Normal Mode.
Remember to not stand in the ordinal corners of the arena, as the Lich will spawn there and will instantly kill you.
Quaggan hallucinations are much bigger in the Challenge Mode, but with slightly slower explosions. It is no longer possible to outheal, mitigate, dodge, or block this attack, and standing inside will instantly down you. You can still invuln or distort the explosion.
It is crucial that everyone moves away from the Quaggans while avoiding other mechanics. For example, getting knocked down by remaining Snakeheads may prove deadly.
Note: While the Quaggan explosions will send you to downstate, downed players don’t get hit for the same damage, making it possible to resurrect them after the attack if they survive. Be careful if you are using any type of downstate manipulation on downed players during this attack, as it will sometimes be a better choice to wait for the Quaggans to finish instead of teleporting downed players into a new explosion.
Necrotic Ritual
This attack, commonly referred to as the “CC” or “Split Phase”, is the mechanic that has changed the most in Challenge Mode.
While the gameplay is roughly the same, Ankka will get a stacking ![]() Power of the Void buff for every Reanimated Spite that is not CC’d in time.
Power of the Void buff for every Reanimated Spite that is not CC’d in time.
![]() Power of the Void will last until the end of the current phase and will increase Ankka’s outgoing damage and decrease her incoming damage by 25% per stack (multiplicative). At six stacks she will be extremely tanky, taking ~83% reduced damage from you and dealing ~381% increased damage to you.
Power of the Void will last until the end of the current phase and will increase Ankka’s outgoing damage and decrease her incoming damage by 25% per stack (multiplicative). At six stacks she will be extremely tanky, taking ~83% reduced damage from you and dealing ~381% increased damage to you.
What were previously barely noticeable scratches from her pistol auto attacks will start to become serious healing pressure after a few stacks. The Gaze into the Void achievement (and title) from this strike requires you to kill Ankka when she has 6 or more stacks, making it one of the hardest instanced content achievements to earn. Check how to get it!
On top of the stacking damage and defense increase, Ankka under the effect of ![]() Power of the Void will apply a Debilitating Void debuff that reduces players’ incoming healing by 50%. This reduction does not apply to barriers, making healers like Scourge and Mechanist very good picks if you expect to build up stacks of Debilitating Void.
Power of the Void will apply a Debilitating Void debuff that reduces players’ incoming healing by 50%. This reduction does not apply to barriers, making healers like Scourge and Mechanist very good picks if you expect to build up stacks of Debilitating Void.

Attack Sequence
In all three phases, the sequence and priority of Ankka’s attacks will remain exactly the same as in the Normal Mode.
Phase 1:
- Death’s Reach (Small Hands will be first)
- Death’s Reach (Timed Hands will be second, then will choose randomly)
- Hallucination
- Death’s Reach
- Pull
- Hallucination
- Death’s Reach
Phase 2:
- Death’s Reach (after the first Necrotic Ritual this will always be the Snakehead version)
- Hallucinations
- Pull
- Hallucinations
- Necrotic Ritual
- Hallucinations
- Death’s Reach
Phase 3:
- Death’s Reach (Small Hands)
- Hallucinations
- Necrotic Ritual
- Hallucinations
- Pull
- Hallucinations
- Death’s Reach
Strategy
Phase 1 & 2
The first two phases of the Challenge Mode are relatively similar to the Normal Mode. The main difference is that the Quaggans have larger AoEs and more of the damaging areas will instantly down you.
In terms of gameplay, prioritize avoiding getting hit by any mechanic to avoid burdening your healers. In this Challenge Mode your healers simply can’t keep up.
In terms of positioning, Snakeheads will introduce the most chaos to the encounter by overlapping with other mechanics and knocking you into death zones. You should aim to passively kill the Snakeheads closest to you to give your squad some space. Large AoEs, Epidemic
Due to heavy AoE damage present throughout the encounter, downstate manipulation and pulls of downstate players are extremely useful, allowing more room for mistakes, Plaguedoctor or Heal Scourges, or even Condition Scourges with Blood traitline will shine in this fight.
Necrotic Ritual requires more Crowd Control compared to Normal Mode, and failing the CC is heavily punishing. Every player needs to contribute to breaking the defiance bar by bringing as many CC skills as possible.
Remember to watch out for Reanimated Hatred, because it will start spawning during the first Necrotic Ritual, if it will fixate on players low on health, it can be problematic, drop some AoEs on it while handling the Spites.
If you fail to CC one or two Spites during Phase 1 or 2 it is not a disaster, as Ankka will lose her stacks of ![]() Power of the Void during the intermission phases at 75% and 40%. However, the inability to successfully CC the rituals in Phases 1 an 2 may be an indication of insufficient Crowd Control capabilities, and it may be a good choice to just /gg to bring more CC skills.
Power of the Void during the intermission phases at 75% and 40%. However, the inability to successfully CC the rituals in Phases 1 an 2 may be an indication of insufficient Crowd Control capabilities, and it may be a good choice to just /gg to bring more CC skills.
Phase 3

The final part of the fight is where the real changes start. All players will be affected by a Devouring Void debuff that ticks every second, dealing ramping damage. After a few seconds this damage will be too high to outheal.
The only way to protect yourself from the Devouring Void is by standing inside one of four Sanctuaries that spawn in cardinal directions around the platform.
Entering one of these protective areas applies a short Sanctuary buff that temporarily shields you from the Devouring Void damage. This mechanic works much like the Ley-Energy Buildup effect from Path of Fire bounties, but with significantly higher damage.
During this phase, aim to minimize your time away from the group.
For example, similarly to the Normal Mode a Lich Hallucination will spawn and fixate on a player. Don’t move instantly when you are fixated by the Hallucination, instead try to kite it near the group, staying in range of heals and boons. The Lich will always spawn in corners of the arena, so treat these as designated unsafe areas; place the Timed Hands AoEs in the corners to minimize unusable areas on the platform. Additionally you can fit two Timed Hands in one corner.
Krait Hallucinations always spawn at the North during this phase, so stack on the South, West, or East with Ankka.

The Devouring Void alone would be easy to handle and even outheal, but during the Necrotic Ritual a new enemy resembling an Eye of Zhaitan, the Reanimated Antipathy, will spawn on the Western Sanctuary and start to slowly devour the Sanctuary. Once a Sanctuary is destroyed the Antipathy will teleport clockwise to start consuming the next one.
During the second Necrotic Ritual the Antipathy will spawn on whichever Sanctuary it was killed on, destroy it, and continue to rotate clockwise.
As the Reanimated Antipathy spawns during the Necrotic Ritual, you will have 5 enemies to worry about in a short period of time: three Spites with break bars that must be broken to avoid adding stacks of ![]() Power of the Void to Ankka, one Antipathy that is destroying Sanctuaries, and mobs of Reanimated Malice casting
Power of the Void to Ankka, one Antipathy that is destroying Sanctuaries, and mobs of Reanimated Malice casting
While the Malice is your smallest problem watch out for members of your squad suffering from
To handle the Antipathy and Spites correctly, it’s best to plan ahead with your team and select proper classes and CC skills. This fight has no place for classes or players that do not provide good CC.
Overall losing one or two Sanctuaries during this phase will hurt your group much less in comparison to Ankka gaining stacks of ![]() Power of the Void. Prioritize breaking the Spites’ defiance bars.
Power of the Void. Prioritize breaking the Spites’ defiance bars.
Ideally players should quickly unload all their hard CC skills and drop slow ticking Area of Effect Crowd Control skills (like  Sanctuary
“Leading” the boss
While the encounter does not have any formal tanking, the squad can “lead” the boss in desired directions with proper positioning. This is absolutely crucial to learn for the Gaze into the Void achievement, and will make the Challenge Mode overall and especially the Sanctuary mechanics much easier to handle.
Throughout the fight, Ankka will jump over one of the players. Pets and Mechs are included. If the entire squad stacks tightly in one place you can “lead” her to desired spots.
Leading the boss allows you to maximize DPS uptime by keeping the stack close to a Sanctuary.
To note, if Ankka is too close to the wall she will teleport back to the center of the platform and cast a Grasping Horror (Small Hands). Remember that this attack spams additional AoEs under anyone not in her immediate proximity; if she spawns Small Hands due to the squad being too close to the wall the squad will mostly be far enough away to flood the arena with Small Hands.
In the first two phases, you simply want to position her away from damaging fields, like the ones dropped by Death’s Hand (Timed Hands). The third phase is when positioning really matters.
Phase 3 Opener
For the convenience of being close to the Antipathy that spawns on the Western Sanctuary, you should start at that side, and wait for Sanctuary to appear.
After receiving the Sanctuary buff, stand between Ankka and the Sanctuary in her melee range to force her to jump over the squad into the Sanctuary, denying spawns of excessive Small Hands by being close to the boss.
Starting phase 3 with positioning is relatively easy, but as the phase continues you must adapt. She may choose to jump over a mech, pet, a player running from Lich, or simply a player that is failing to stack diligently. Remember to not panic! Find your commander, stack tightly near a Sanctuary, and prioritize CC.
Gaze into the Void
This achievement is one of the hardest in instanced content. It requires you to kill Ankka while she has six or more stacks of ![]() Power of the Void. While the achievement description suggests she can get more than six stacks, six is actually the maximum number of stacks due to how her attack pattern lines up with the enrage timer.
Power of the Void. While the achievement description suggests she can get more than six stacks, six is actually the maximum number of stacks due to how her attack pattern lines up with the enrage timer.
In phases 1 and 2 you’ll want to quickly phase Ankka and prevent her from getting ![]() Power of the Void. In phase 3 however, you need to fail both Necrotic Rituals by not breaking the defiance bar of any Spite.
Power of the Void. In phase 3 however, you need to fail both Necrotic Rituals by not breaking the defiance bar of any Spite.
Note: Before entering the corridor leading to final platform, your commander should start a ready check and wait for everyone to indicate they have all their cooldowns, as you will need the highest damage opener possible.
At the start of phase 3 you will be able to DPS the boss down for 30-40 seconds. Aim to burst Ankka down to 25-30% health. The more DPS you do now, the shorter the last phase will be.
When the first Necrotic Ritual starts, quickly kill the Antipathy that spawns on Western Sanctuary ignoring the Spites (they need to finish casting the ritual).
Ankka will now have 3 stacks of ![]() Power of the Void and she will deal ~195% of her base damage and receive ~42% less damage while applying a 50% healing reduction debuff to you. This makes the fight much harder but you should be able to get her down to ~10% before the second Ritual with decent DPS.
Power of the Void and she will deal ~195% of her base damage and receive ~42% less damage while applying a 50% healing reduction debuff to you. This makes the fight much harder but you should be able to get her down to ~10% before the second Ritual with decent DPS.
During the second Ritual, you need to again quickly kill the Antipathy, continuing to ignore the Spites, bringing Ankka’s stacks of ![]() Power of the Void to six. This results in Ankka having ~381% increase to outgoing damage and ~83% damage reduction in addition to your 50% healing reduction.
Power of the Void to six. This results in Ankka having ~381% increase to outgoing damage and ~83% damage reduction in addition to your 50% healing reduction.
During this phase prioritize breaking Ankka’s defiance bars as often and as quickly as possible to leverage her
If any of your team members die before phase 3 it’s typically best to just /gg and restart, as the DPS check is relatively tight and it will be difficult to finish the encounter before the Inevitability of Death bar fills.
Note: If your group deals ~170k DPS (as a bare minimum) after a minute of the encounter start (in phase 1), you should be able to meet the DPS check. But you should aim for ~200k squad-wide DPS opener as the random nature of the encounter can decrease DPS uptime.
When fighting Ankka with six stacks it’s crucial to correctly execute all the mechanics. Above all else the squad should always stack properly to lead Ankka into position and prevent her from teleporting to the middle, as the following attack has the potential to wipe the squad.
Separating from the group when attempting the Gaze into the Void can very easily result in your death. Always move together when avoiding Quaggans and delay kiting the Lich so you can stay closer to the group while keeping him away.
When it comes to team composition, you are looking for:
- Good barrier generation: Debilitating Void’s incoming healing reduction does not affect barrier application.
- Life Steal: As Life Steal is not categorized as incoming healing, Debilitating Void does not affect it. This can be obtained with ascended food, skills like
 Soulcleave's Summit
 - Decent CC: Gaze into the Void only requires not breaking the Ritual in phase 3. You still need to break the Spites in phases 1 and 2, as well as Ankka’s breakbar through the entire fight.
- Ranged damage: Maintaining DPS uptime while avoiding Pull or other mechanics is made easier with the option of ranged damage when necessary.
- Piercing, bouncing, or AoE damage: Cleaving Snakeheads passively adds to safety.
: No joke, this is a requirement for the Challenge Mode full stop. Between dodging mechanics and recovering from something going wrong, is a huge help. - Condition cleanses: This encounter has a ton of incoming conditions. Very good, ideally semi-passive cleanses like
and to lessen pressure on healers.
 Soulcleave's Summit
 Signet of Vampirism
 Battle Scarred
 Purging Flames


