
Meta Event Train: The Compendium
Meta Event Train is a chain of Open World Meta events players are doing back-to-back-to-back daily for profit. Depending on events, a single 6-hour long Meta Train can reward you with over 100![]() , leaving you with around 15
, leaving you with around 15![]() –20
–20![]() per hour; excluding any medium or high RNG-roll.
per hour; excluding any medium or high RNG-roll.
This is Hardstuck’s take on Meta Train, our Megatrain is organized almost every day both on EU and NA servers. The goal of the Megatrain is to have minimum downtime while maximizing profit, and doing the majjority of events that can provide highly valuable rare items such as cosmetic infusions. The train focuses on having a variety of events while learning relevant combat mechanics to new players!
Here is an exhaustive list of all the events included in our Megatrain, as well as a concise guide for each of them.
And if you are interested in joining us in Open Word farming, make sure to check out events and join our discord.
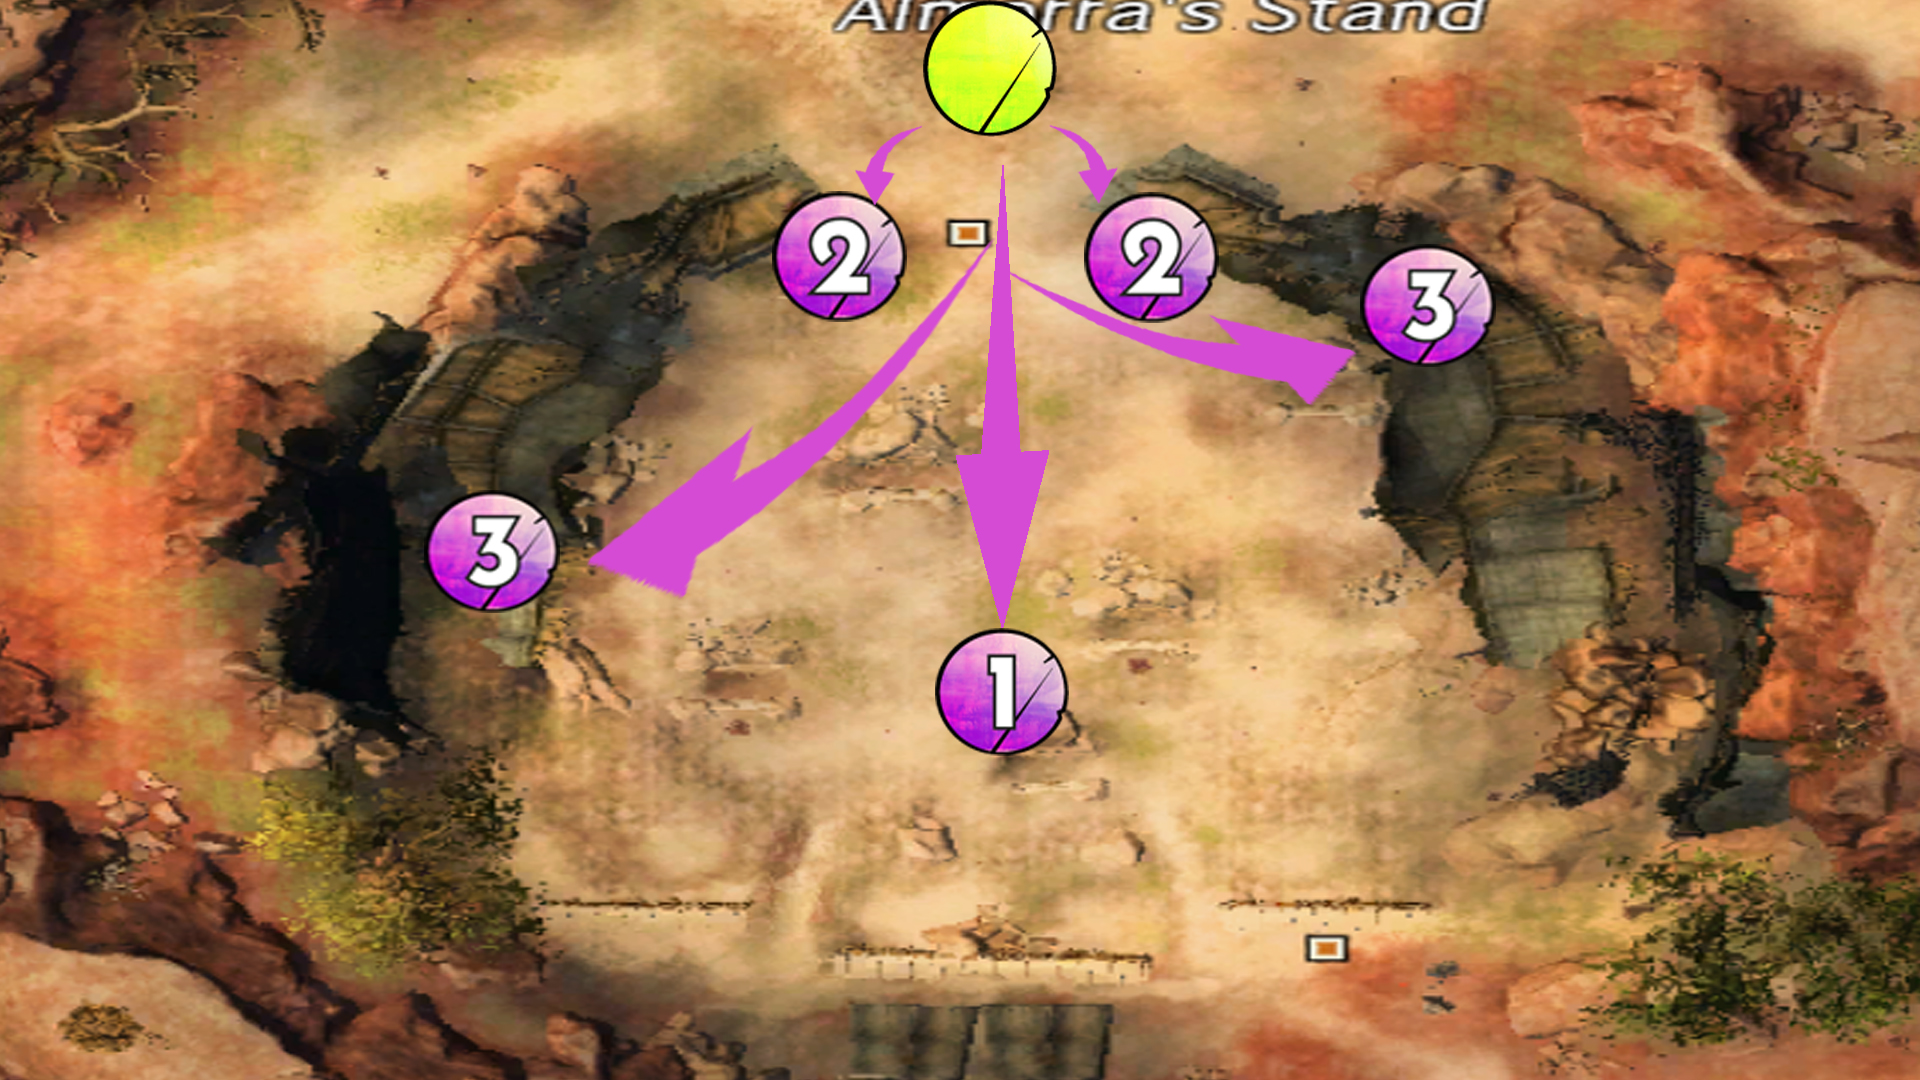
Breaking the Claw of Jormag
Map: Frostgorge Sound
Split yourselves into 4 groups and go to the crystal’s spawn location (1) to damage them fast, after they are destroyed, quickly gather yourselves on the last crystal that will spawn (2).
Damage the boss to at least 50% and go to the other cliff to wait for the boss, if you haven’t done enough damage, you will have to repeat the previous phase again.
The boss will fly away to the other cliff and you will have to damage it, if you damaged the boss enough in the first phase, you would just have to damage the claws of the boss. If not, stack together on the right-hand side of the cliff and attack the boss’ head with range attacks until it dies.

- Destroy the dragon crystals
- Lure out the Claw of Jormag by destroying the final dragon crystal
- (4. & 5.) Defeat the Claw of Jormag
Tequatl the Sunless
Map: Sparkfly Fen
Divide the squad roughly into 4 groups for each area. (West should have the most players, while Middle can have less since it is easier.)
Each battery and the Megalaser have different mechanics that make defending them significantly easier if these are done:

- Hylek Turrets
- Tequatl’s stacking location for the first 25%
- Defend the Batteries and the Vigil Megalaser
- Tequatl’s stacking location for the remaining 75%
Stack on Tequatl’s left paw and damage it for the first 25%. Then, do these steps three times:
- Defend the batteries and the Megalaser.
- Megalaser (3C): Focus on the champions and pull mobs together.
- North: Stomp the Wurm nodes so you don’t get more risen Grubs.
- East: Pull and push away the bloated creepers so they don’t explode on the batteries.
- West: Focus Tequatl’s fingers or reflects on their attacks.
- Stack on Tequatl’s right paw and damage for 25%.
Make sure some people are using the Hylek Turrets, the first skill is used to remove stacks of protection from Tequatl, otherwise, once it reaches 20 stacks Tequatl will become invulnerable and a bone wall will need to be destroyed for Tequatl to be vulnerable again. The third skill is used to remove the orange damaging areas of effect that spawn on players.
- Use the 2nd skill off cooldown.
- Use the 3rd skill to clean the poison areas as soon as they appear.
Karka Queen
Map: The Legendary Karka Queen spawns in 1 of 4 locations:
- Pride Point Waypoint
- Kiel’s Outpost Waypoint
- Camp Karka Waypoint
- Steampipe Steading
Spread out and secure the 4 settlements, once all 4 settlements are secured, the Karka Queen will spawn close to one of them.

- Capture the settlements by doing their respective event and defend them until the Karka Queen spawns
- Possible spawn locations of the Karka Queen
The Karka Queen’s roll attack can deal a lot of damage and chain knockdowns, make sure to evade it.
Once the Karka Queen’s health reaches 0% for the first time, it will re-fill to 50%, just take down its second health pool to defeat it.
Triple Trouble
Map: Bloodtide Coast
Gather at Firthside Vigil Waypoint to organize 3 different squads with 3 specific commanders, 1 for each Wurm Head. Each squad should have at least 30 players and the Amber squad should have the most players.
Once the event starts, complete the Escort Events and engage the Great Jungle Wurm head until around 25% of health.
Players on every Wurm Head will do its specific mechanic until they are ready to finish their respective Wurm Heads at the same time (which is the requirement for this event to succeed).
Accord a time with the other commanders and call out when people assigned to the Amber Wurm Head are killing the Plague Carrier Abomination, when you are stacking to get eaten and when you are in the Wurm Head.
When people assigned to the Amber Wurm Head are devoured, other commanders will start doing their Wurm Head mechanics so the Wurm Head kills are synchronized.
The Wurms Heads can only take damage once the preparation phase is complete. The explanations for each Wurm Head are as follows:

Amber
- Kill the Plague Carrier Abomination and get devoured by the Amber Wurm Head, then grab the Unfortunate Adventurer’s harpoon
- Use your harpoon after being spat out by the Wurm Head and damage it
For the boss to become vulnerable, you will have to get yourself, and your squad eaten. To do this you must kill a Plague Carrier Abomination in order to get the buff that its death provides, this will make you edible by the Wurm Head.
When that’s completed, you must go to the Red Arrow and stack there to be consumed by the Wurm Head.
When inside, grab the Unfortunate Adventurer’s harpoon and throw it into the Wurm Head’s mouth to damage it. When the mouth is around 20% call “hold!” informing people to save their harpoon to damage the Wurm Head when outside.
The Wurm Head will spit you out, be careful not to use the harpoon yet and that any other creature is not in the way of the harpoon and the Wurm Head. Call “fire!” (you can wait for the Wurm Head to start its attack animation to get even more damage uptime) and everyone should then get into its hitbox to damage it. Repeat until you have one damage phase left.
If you kill the Plague Carrier Abomination by mistake and you still have the debuff to not be able to get eaten or you are not ready, you will have to wait for the next Plague Carrier Abomination to spawn in around 30 seconds.

Cobalt
- Pick up a Powder Keg
- Place the Powder Kegs on the marker using skill #1
In order to make the boss vulnerable, you will have to drop 20 Powder Kegs using skill #1 while holding the keg onto the arrow marked by the event. This will make the boss eat the Power Kegs and be vulnerable. Every 2 minutes the spot where you can get the Power Kegs switches between 3 possible spots. If you mount while holding the keg, you will keep it, making it much faster to go to the Keg deposit location.
You will want to stack your squad where the Powder Keg acquisition spot is and tell your squad to take & drop Kegs all at the same time. This way everyone will place the Powder Kegs in the shortest window possible, this will be important later.
When a Powder Keg gets placed on the red arrow, an internal timer will start ticking that will remove a random Powder Keg after 2 minutes. For this reason, you must always remember when the first and last bombs were placed, because 2 minutes after that, Powder Kegs will start being removed.
When you know that you, will be able to kill it within your next damaging phase, tell the other commanders that you are ready. If everyone is ready you will have to tell the other commanders when they should damage their assigned Wurm Head. This decision should be made considering the last Powder Keg placement and it should be 2 minutes after the last Powder keg was placed.

Crimson
Red, Blue & Yellow markers are Phytotoxin Extractors.
In order to make the boss vulnerable, you need to walk into Phytotoxin Clouds in order to gather Phytotoxin.
There are 3 different types of clouds, Yellow, Red, and Blue, each giving its own type of Phytotoxin. Once you gathered Phytotoxin, walk into the color-associated Phytotoxin Extractors in order to fill them, once all 3 are filled, the Crimson Wurm becomes vulnerable. You can both acquire and deposit Phytotoxin while on a mount in order to make the process much faster.
Do this until you can kill it with one more damaging phase, when this happens, tell everyone to kill wandering creatures and fill Yellow & Red extractors but not Blue, that way when everyone is ready you will only have to gather blue and be able to damage the Wurm Head faster.
Twisted Marionette
Map: Private instance entered from the Eye of the North

Players will have to split up into groups of 10 (2 subgroups) per lane from I to V.
Ideally, your squad composition should be only damage and hybrid damage, as taking the bosses down quickly takes a priority over staying alive.
One after the other, the Energy Field of a lane will be accessible for players to go through and fight a champion boss and destroy a power regulator, each group of 10 players being separated into 5 groups of 2 players per platform.
If players on a lane aren’t going into its Energy Field, they will have to defeat Scarlet Briar’s army members to prevent them from getting into the Energy Field. If a member of Scarlet’s army reaches the Energy Field, the bar indicating the charge of the Aetherblade Megalaser will go up slightly, once it reaches 100%, the event will fail and all players in the instance will be defeated.
Once you defeated your assigned champion Mini-Boss, you can help groups on adjacent platforms by hitting through the walls. You will also gain a special action key that gives boons to every player fighting their Boss as well as reviving them if they are downstate.
Each lane will have a boss with different mechanics, and if a lane fails to kill its 5 Bosses and Power Regulators, the Aetherblade Megalaser will gain 25% of its charge, and the next lane will get to fight the boss that the previous lane was not able to defeat. Due to some of Scarlet’s Army usually reaching the Energy Field, up to 2 lanes failing their boss would cause a total failure.
Here are the mechanics for every boss encountered after going through the Energy Field:
Boss 1: One player should have to tank the boss while another player hits it from behind.
Boss 2: Lure the champion onto the mines it left to break its defiance bar, then damage it.
Boss 3: Dodge the areas of effect, break the defiance bar, and then kill the boss.
Boss 4: Avoid areas of effect, Don’t stand in the gray-looking zone, and defeat the boss.
Boss 5: The boss will split in 2 each time after being killed, use AoE/blinds and stay alive, smaller ones deal enormous damage.
Note: After killing each boss, don’t forget to destroy power regulator or your lane will fail!
Players can help adjacent platforms by hitting through the walls. A Special Action skill gives boons to players still fighting their boss and revives them in downstate.
Night and the Enemy
Map: Verdant Brink

This Verdant Brink Meta Event occurs during the night and involves securing Pact rally points, it involves killing multiple bosses.
To succeed at the event, killing only 1 of the 5 possible bosses is necessary. Here are Bosses ordered from fastest to kill to slowest.
1. Wyvern Matriarch, Pact Encampment Waypoint
Break its break bar and damage it.
2 and 3. Axemaster Gwyllion & Tetrad of Mordrem champions, Megallon´s valor Waypoint
For both of these bosses, break their defiance bar and damage them. Breaking the defiance bar of these bosses can prevent them from pushing players off the platform.
4. Cotoni and Huetzi, Jaka Itzel Waypoint
Attack the bosses until one teleports to a fountain. Break the defiance bar of the boss in the fountain once it appears to prevent it from healing. Repeat until both are dead.
5. Wyvern Patriarch, Shipwreck Peak Waypoint
This boss fight is longer and not recommended unless it is the only remaining alive. Damage the boss until it becomes invulnerable. When invulnerable, the platform will start dealing heavy damage to anyone standing on it. To remove the invulnerability stacks, throw eggs at the boss while gliding. Look for the eggs around and under the platform.
Battle in Tarir
Map: Auric Basin , , ,

- Entrance to Tarir
- Destroy the Vines blocking the gate to Tarir
- Slay the Octovine
- Tarir’s Undeground Chambers
The 4 Octovines must be defeated within 2 minutes after the first defeat in order for the event to succeed.
Divide the squad equally between North, West, and South and leave East with fewer players. Players from other lanes can assist East once the other Octovines are defeated.
A few players should take control of the Exalted Armors to kill Breachers and Elite Hyleks as soon as possible.
Here are the mechanics in order to make each lane’s Octovine vulnerable:
South
Players in Exalted Armors should stun Bonebreakers and push Triggerblossoms out of the way of the Exalted Explosive.
Players not in Exalted Armors should be using push or pull skills to move the explosive into the Octovine in order to remove 5 of the “Covered in Slime” effect stacks at a time. Continue until there are no stacks left.
West
Transform yourself into a Mushroom by moving into the green area of effect. Run along the right side of the room, passing through the Speed Boost Mushroom. Climb the stairs, use the 2nd skill to jump, then glide to the Octovine. Once there, use the 1rst skill and spread poison spores to remove slime stacks. Continue until there are no stacks.
North
Grab a turret and place it inside the Octovine circle using the 2nd skill. Use the 1rst skill on the turret to remove slime stacks. Continue until there are no stacks.
East
Grab a bomb and use the updraft to glide towards the Octovine. At the highest point, throw the bombs to remove stacks. Continue until there are no stacks.
Chak Gerent
Map: Tangled Depths

Divide the squad roughly between the 4 lanes. Nuhoch lane should have the most players to ensure the pre-event is successful.
Pre-events for each lane are:
Ogre lane needs to destroy nearby Chak eggs to progress the pre-event.
Nuhoch lane needs to stomp nodules.
Rata Novus lane needs to destroy ley-line energy collectors and throw ley-line energy to the Rata Novus golem.
Scar lane needs to defend the charr at the Megathumper.
Progress the pre-events of each lane as much as possible to have a greater chance of killing the Chak Gerents without them becoming invulnerable. Once the pre-event is complete, break the Chak Gerent’s defiance bar as much as possible and avoid the purple expanding AoEs that deal enormous damage. Once all 4 lanes have defeated their Chak Gerent, the meta-event is complete.
Loot the chest appearing at the Ley-Line Confluence Waypoint once all 4 Chak Gerents die. The wall opens to access more loot a few minutes later revealing a few additional chests, although most of the profit does not come from these extra chests.
Ley-line Anomaly
Map (depending on the hour): Timberline Falls , Iron Marches , Gendarran Fields
Chase the Anomaly and break its defiance bar to stop it from running. Kill all Elite and Champion Coalescences around the Anomaly. Then damage the boss. The Anomaly should die in a single damaging phase. Use condition damage to damage its remaining health or break its defiance bar again to repeat the process.
Choya Piñata

Casino Coins will be scattered throughout Amnoon. Players must work together to collect coins to reach the goal. Using mounts makes gathering coins much quicker. Once the time limit for the round is up the event will proceed to the next round if the quota was met, or restart the current round if the quota was not met.
- First Casino Coin Collection Event
- Second Casino Coin Collection Event
- Third Casino Coin Collection Event
Mischievous Children can be found on the roofs; they will attack players with their Balloon Launcher, slowing players down. Enemy Troublemakers from the nearby events will also spawn and attack players, slowing players down.
Once all 3 coin-gathering rounds have been completed, a Choya Piñata near the Amnoon Waypoint will need to be taken down in order to complete the meta-event.
The defiance bar of the Choya Piñata will need to be broken as soon as possible so that it becomes immobile and can be defeated.
The Path to Ascension
Map: Elon Riverlands

- Help Kaidenna acquire Forgotten magic
- Stop the Branded attacking the camp
- Help Kaidenna bring Forgotten magics to the Augury teleporter
- Defeat Branded Josso Essher in the Ascension Chamber
Complete the 2 escort events of Follower Kaidenna.
Once inside Augury Rock, kill the 4 Branded Elementals. This removes the barrier protecting Champion Branded Josso Essher. Break the boss’ defiance bar when it appears. Every time an additional Branded Elemental spawns, the barrier reforms, and the boss becomes invulnerable. Kill the Elemental to continue attacking the boss until it is defeated.
10 minutes after branded Josso Esher has been defeated, the Branded take back Augury Rock, and the area becomes inaccessible.
Disperse the Wild Magical Energy as fast as possible by collecting orbs of Wild Magical Energy on the ground around Augury Rock.

- Sand Jackal Portal leading to Marker 2
- Spot to ideally intercept the Doppelganger
- Doppelganger Spawn Location
A Doppelganger then spawns, and a random player chosen will be able to see a Red Skull on their map. The player picked must reach the Red Skull quickly, using mounts (if possible), then dismount for the doppelganger to engage them. Break the Doppelganger’s defiance bar when possible and damage the boss until defeated. If the player dies or leaves the area, a new player gets chosen.
Junundu Rising
Map: The Desolation

- Collect sulfur crystals for NPC’s Junundu lure
- Defeat the Forged & Awakened commanders guarding their fort
- Destroy the Forged cannons & Awakened Trebuchets
Mount on a Skimmer or Skyscale to collect Sulfur Crystals, and bring them to the Junundu lures. For maximum profit, tag all 3 events, 3 crystals per event is enough for the gold reward.
Once all 3 events are completed, head to the Awakened Fort and defeat the Awakened Commander, make sure that you face north, your back against the fort, otherwise, the boss will be pushed inside the fort and become invulnerable.
Head to the Forged Camp and defeat the boss in a similar way. Once the boss is defeated, and after the Junundu Wurms have destroyed the protective barrier shielding the forged camp, destroy all 3 catapults in the Forged camp while cleaving champions that spawn, make sure to manually loot the chest that spawns in the middle; then go back to the awakened fort, destroy all 3 trebuchets while cleaving down champions, and once more manually collect the chest that appears.
Forged with Fire
Map: Domain of Vabbi

- Revive the Awakened Commander
- Break the Priests of Balthazar’s defiance bar
- Defeat the Forged Cannonades, the Forged Commander, and the Legendary Forged Hounds.
Enter the forged foundry and revive the Awakened Commander. You can give him
Then they will both be present and you have to kill them both. Make sure to avoid the area of effect that pulls you, because you will be immobilized, and being so onto the burning areas while being damaged by the hound’s regular attack can very quickly put you in the downstate or even in a full defeat. You can use the United Legions Waystation’s Medizooka in order to support allies with heal and boons.
Palawadan, Jewel of Istan
Map: Domain of Istan

- Defeat Joko’s champions to open the path into Palawadan
- Clear the Northern Awakened Forces
- Kill the Loyalist Leaders
- Tear down the statue of Palawa Joko
- Clear the Southern Awakened Forces
- Destroy the ships carrying corsair reinforcements
- Defeat Awakened Archon Iberu
Stack in the right corner of the door in order to trigger the LoS (Line of Sight) of Khepri and Khnum and make them come to you, defeat them to open the doors of Palawadan. Complete the 2 closest capture events, and kill the champions at Temple of Joko, after that move to the statue and destroy it.
Capture the next two points and get to the docks.
Once the corsair ships arrive, go onto the ships using mounts and stack to damage the ship, if not on the ship use the reflective abilities of canons to help out.
Note: so smallmetimes the second ship is bugged and has no collision, in order to fix this you can go to the character select screen and come back
Once all 3 ships are destroyed, defeat the final boss, Archon Iberu. Damage him and make sure you break his defiance bar at 75%, making the fight significantly faster. If the boss tethers itself to Awakened Servants, kill those Servants so the boss doesn’t heal himself.
Death-Branded Shatterer
Map: Jahai Bluffs
At Yellow Marker you’ll be fighting Death-Branded Shatterer, every 25% of his health new Champion Branded Riftstalker will spawn in different location:
- 75%
- 50%
- 25%
You can start the DERVs escort event North from Soul’s Vendetta Waypoint . Completing the escort is not necessary for the boss to spawn, but the DERVs are helpful for the boss event.
Gather where the Death-Branded Shatterer will arrive. Fight the boss and break its defiance bar when possible.
Every 25%, kill the Champion Branded Riftstalkers to stop them from healing the boss. For the last split, use tornadoes to glide to the platforms where the Riftstalkers are.
With good DPS, ignore the Riftstalkers that spawn every 25% and focus on the boss to prioritize a faster kill.
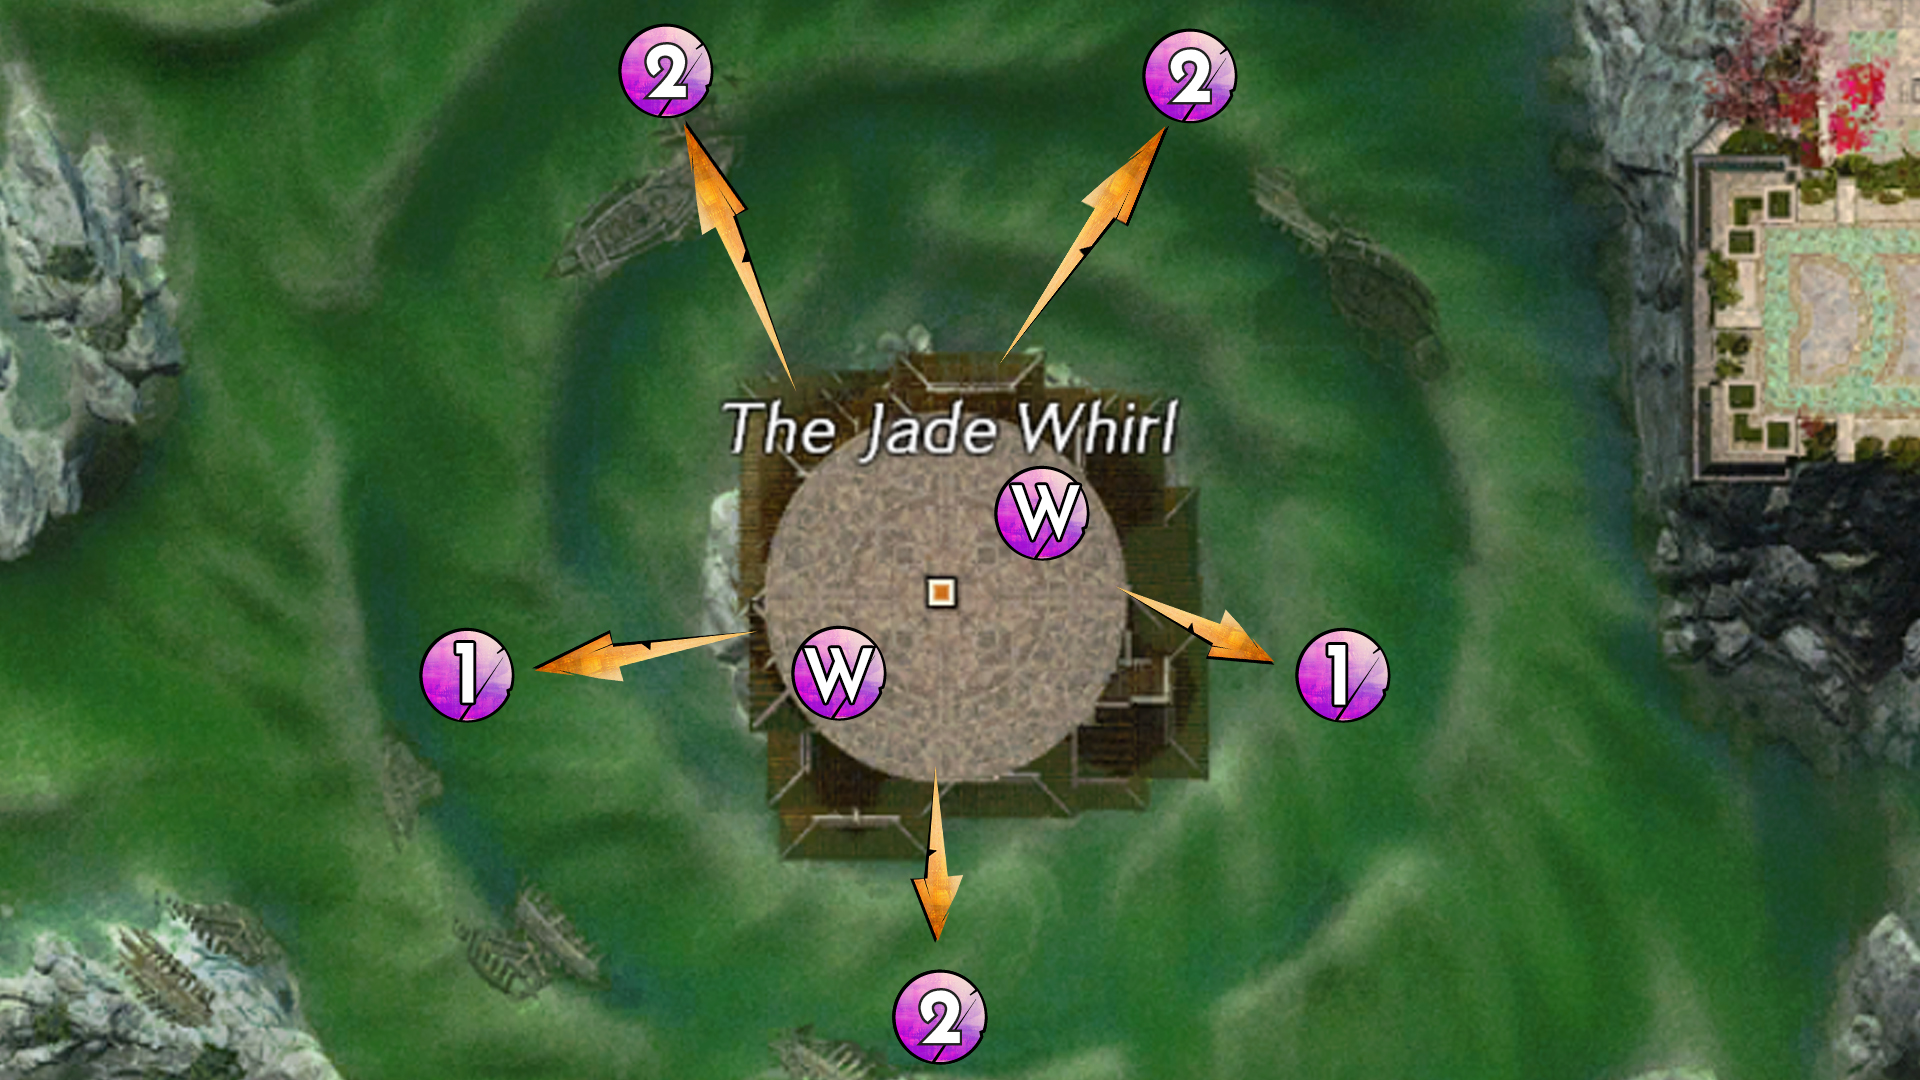
The Oil Floes
Map: Revolution’s Heart Waypoint

- Escort starting location
- Oil Drills
- Volatile Oil Sulpyx
Escort
The escort of the dredge Miner Mikhail will begin and immediately start on its own, and you will need to escort him to the 3 Oil Drills. Upon reaching each drill, an NPC will stay there and defend it from incoming waves of branded until all 3 drills are claimed. At each drill reached, players (ideally 10 or more) should stay near that drill and defend it so that the meta-event doesn’t fail.
Oil Collecting
Once all 3 drills have been defended and NPCs have been escorted; players will need to go near an Oil Reclamation Pump in order to gain a Special Action Key that allows them to collect oil on the ground, and then take the collected oil back to the Oil Reclamation Pump in order to progress the event. Once a drill has been filled, players of that drill can go and help the remaining drills. Once all 3 drills have been filled, the meta-event will move on to its last boss: Sulpyx.
Volatile Oil Sulpyx
Throughout the fight, Sulypix will occasionally leap up in the air and drop down, emitting a shockwave. This shockwave will knock players back but can be avoided by jumping over it. or dodging At times Sulypix will also charge in various directions, dealing area of effect damage on a trail.
When Sulypix reaches 50% health, Kralkatorrik will brand it. This will cause Branded mobs to spawn nearby the Oil Reclamation Pump, however, they can be largely ignored. Continue fighting Sulypix and reclaiming the spilled oil, and the meta-event will succeed when Sulypix has been defeated.
Flame Legion Effigy
Map: Grothmar Valley

- Defeat the Flame Elemental to help Flame Legion siphon their power
- Pass the flame from torch to torch to transport it to the upper brazier
- Ignite the effigy with the Sacred Flame
Pick up a torch, light it at the brazier, and run towards the next. Once it is about to burn out, throw it towards another player ahead that does not have a lit torch. Continue until the checkpoint brazier and effigy brazier are lit.
You can kill the Champion Devourers after the Effigy is destroyed for more loot.
Doomlore Shrine
Map: Grothmar Valley

1. Escort the Shaman to Doomlore Shrine
2. Defeat Murakai, Doomlore’s Bane
You can use
Once at the ruins, defend the Shaman and defeat Murakai’s Steward. Murakai, Doomlore’s Bane appears after. Break her defiance bar whenever it appears. Fight the boss until she becomes invulnerable at 75%, then kill the ghosts bound to her by a tether in order to resume attacking until the event is complete.
Ooze Pits
Map: Grothmar Valley

Ash: Get a bucket and fill it with oil at the other end, drop the oil in the vent in the middle of the arena.
Blood: Capture the points and kill the oozes by infusing yourself in the respective color.
Iron: Kill Oozes and cover the vents.
Spread out in 3 groups, one per legion, and complete the trials as fast as possible; once the 2 trials of each legion are completed, the Grand Ooze Champion will appear.
Damage the Grand Ooze Champion until it becomes invulnerable at 75%, after that you will have to cover the vents, go back to the middle and walk into a Poison Field in order to infuse yourself in the color of the ooze to damage it further.
When the Grand Ooze Champion Splits, go to one of its 3 parts and once again walk into the poison cloud that has the same color as the Ooze in order to be able to damage it. The Ooze in the Blood area will be Red, the Ooze in the Iron area will be Green, and the boss in the Ash area will be Blue. Once all 3 are taken down for the first time, repeat the process once more to complete the event.
Drakkar
Map: Bjora Marches

- Follow Jhavi into Drakkar’s lair
- Defeat Aberrant Enemies
- Drakkar’s first 20% of health
- Drakkar’s remaining 80% of health
If the escort is still up when the squad arrives, you can give
Attack Drakkar until its health reaches 80%. Ensure players provide aegis and stability to avoid shockwaves. Defend Jhavi from enemies so she can destroy the Ice Wall. Once destroyed, players will move to Drakkar’s next phase.
For the following 3 phases, stack with the squad behind an obstacle to avoid the push attack. Provide aegis and stability if possible, and continue damaging the boss.
Drakkar becomes invulnerable every 20%, attempting to destroy Jhavi’s shield. Break the defiance bar when it appears. Enter the active Raven Gate to defeat an Icebrood Champion. After defeating the champion boss, use the Raven Gate to return to the boss.
Players that have defeated a champion will receive the Spiritual Binding effect. This effect prevents entrance to another Icebrood Champion.
Most players should go fight the boss except for players using portals to access the next Icebrood Champion.
The use of a Mesmer, Thief or White Mantle Device Portal allows bypassing the debuff that prevents you from using Raven Gates, as such, during the phases at 40% and 20%, after the break bar is broken, you should put down a portal so that even players that have the debuff can fight the Icebrood Champion.
Dragonstorm
Map: Private Instance Entered from the Eye of the North
Secure North and South Staging Areas, Defeat Ryland then Braham. Then, do steps 1-4 twice:
(1) Destroy the Ley Siphons and (2) break the defiance bar of the Clashing Champions.
(3) After breaking the Clashing Champion’s defiance bar, divide the squad into 2 groups and assign each to an Elder Dragon Champion.
(4) Coordinate both groups to weaken the champions at the same time, within a 20-second window. The second time around, additionally break the boss’s defiance bar when possible.
Ryland: Avoid Jormag’s fatal AoE breath attack.
Braham: Stack to help Braham stay close by. Avoid the expanding rings from falling rocks by jumping over them. Ignore the Elite Destroyer of the Last Shields.
(5) Enter a circle by the prisms to fly towards a dragon. Use the Special Action skill to use the Prismatic Beam.
Break the defiance bar of the Clashing Champions one last time. Get to the prisms and use the Special Action skill to transfer power to Aurene.
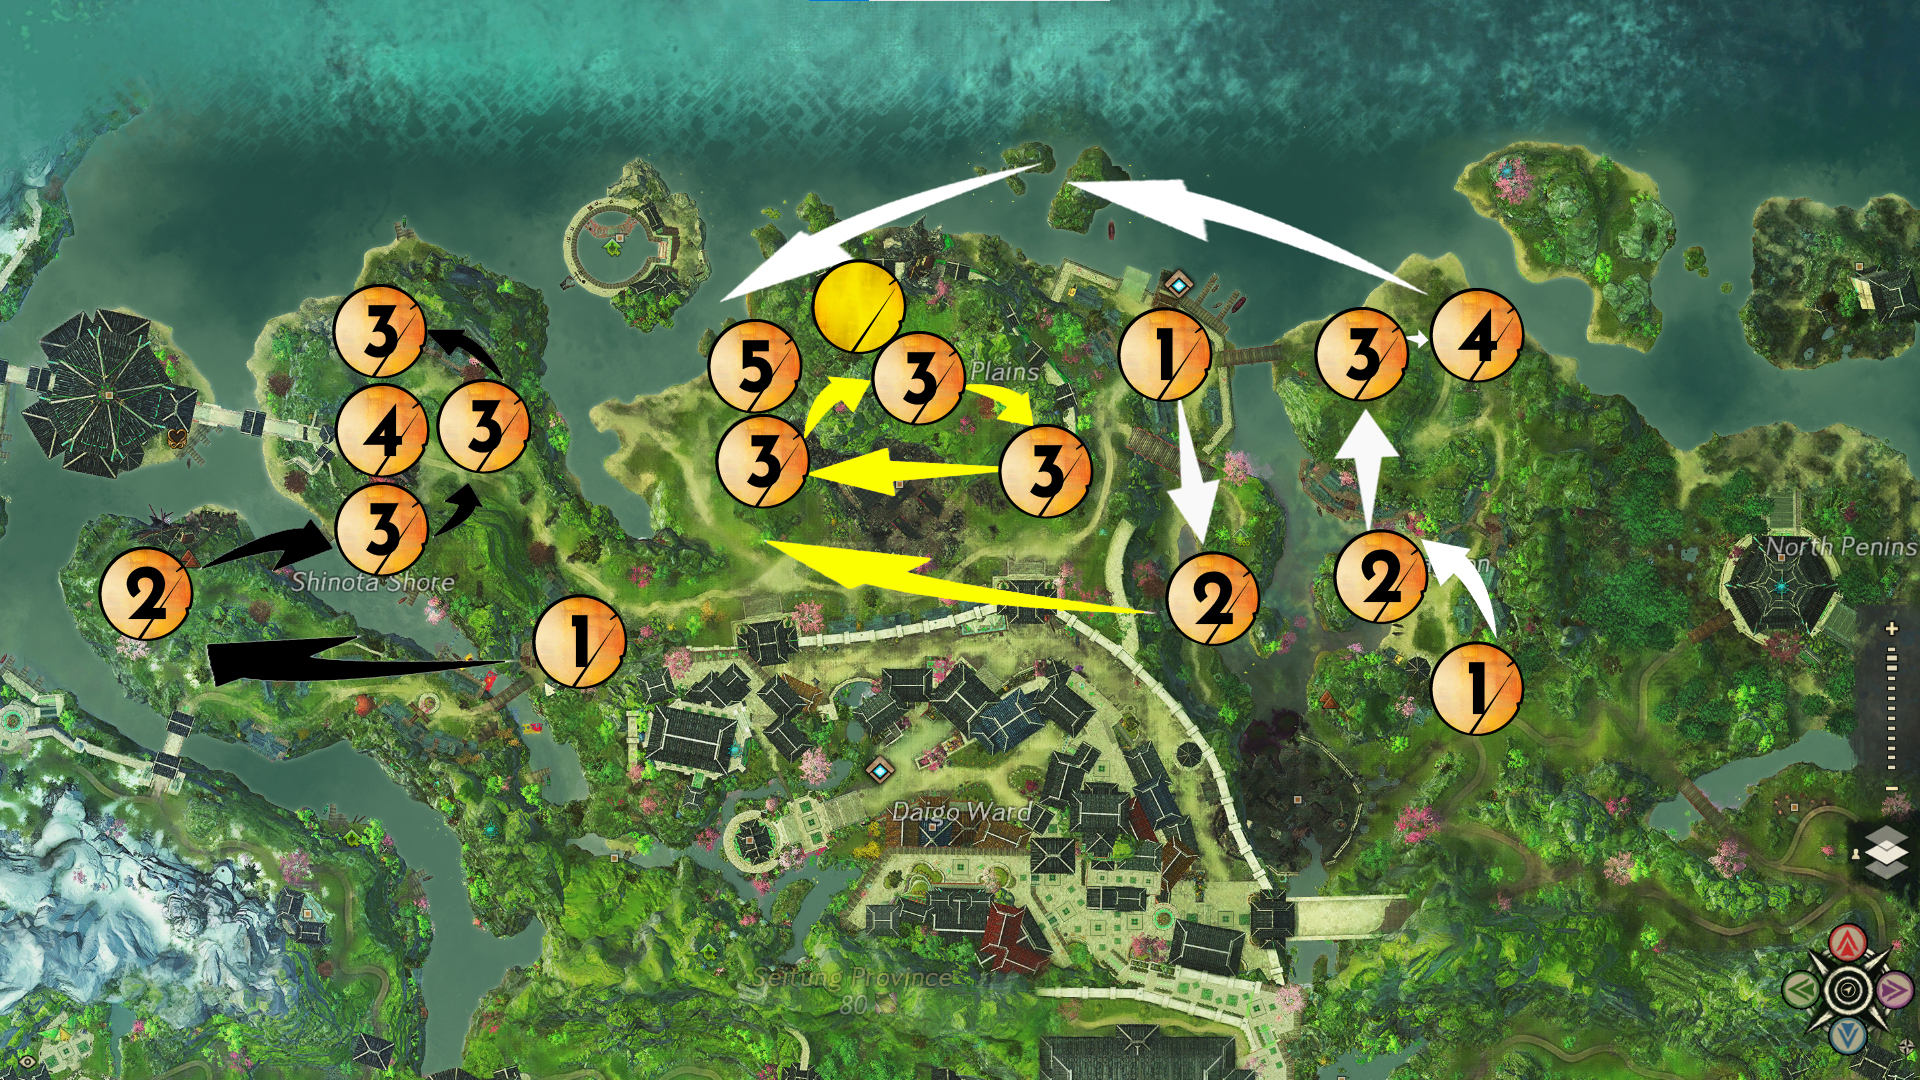
Adolescent Leviathan
Maps:
Seitung Province: Village Waypoint
Kaineng City: Promenade Waypoint

- Talk to Fahd al’Eshadhi to start the event
- Fend off the leviathan
When the Leviathan event is ready to begin, an orange star indicator will appear on the map to indicate the Largos NPC Fahd al’Eshadhi. Talk to them to start the event. An orange indicator circling the area will appear on the map showing where the Leviathan is.
Remove the Thick Skin effect to make the boss vulnerable. There are 2 ways to achieve this:
- Use Depths Charge (4th skill) while piloting your own skiff.
- Attack the weak points inside the boss after it opens its mouth to swallow the players. Attack the uvula to escape.
Attack the boss when vulnerable. Continue until either the effect appears again or it dies.
Note: In Kaineng, it is easier to attack the boss from the inside since the boss is deep underwater. You can still use depth charges to make it faster. In the Seitung event, it is possible to stand on top of the boss and attack it with non-underwater weapons as the boss is close to the surface.
Aetherblade Assault
Map: Seitung Province
- Defend the Villages from Aetherblade looting
- Destroy the Aetherblade Cannons
- Aetherblade Cannons location #2
- Defeat the area’s Aetherblade leader
- Defeat Renyak
Divide the squad roughly into 3 groups: east, middle and west. (East should have the most players, while West can have less since it is easier.)
Aetherblade Looting
On every lane, the Aetherblades will try to steal supplies and you will have to stop them to deplete the enemies’ forces. If they deliver the supply to the Aetherblade circles they will progress their morale bar and it will take longer, you can also grab the supply and return it for event progress.
This event will repeat 3 times while you advance through the villages and eventually you will have to ride a platform to get to the next phase; the cannons.
Cannons
You will have to kill 3 cannons to progress to the lane boss.
Break the defiance bar of each cannon to make it vulnerable, then destroy it. Once destroyed, an Elite Aetherblade Thug will need to be defeated.
Once the 3 thugs are defeated the Aetherblade Leader of that lane will be summoned, and you will need to defeat it.
When all 3 lanes are done with Looting, Canons and the Aetherblade Leader, the NPCs Gwan-Soon, Tai-Young, and Mister Bots will move on to assaulting the Aetherblade Hideout, and there will spawn Renyak, the final boss of the meta-event.
Renyak
From time to time, Renyak will become invulnerable, and up to 3 Champions Bulwark Gyros will need to be defeated to make him vulnerable again.
At 66%, 33%, and 1% of his health pool, Renyak will become invulnerable and his defiance bar will need to be broken in order to damage him again.
Kaineng Blackout
Map: New Kaineng City

- Priority areas for pre-events completion as they unlock Waypoints
- Defend the Xunlai Jade labs
- Defend the NPCs as they repair breaker boxes
- Escort NPCs to the substation and defend it
- Destroy the Jade Behemoth
Help to stabilize at least 1 of the power zones by completing any event all over the map. Then, spread out in 2 groups to defend both the Northern and Southern labs, usually, the northern one being considered the most difficult. Kill the enemies with swords on their heads to progress faster.
Once the labs are defended, 2 escorts come to each lab. You can Give the NPCs
Once both North and South event chains are completed, head over to the Power Plant to defeat the Jade Behemoth.
Every 25%, the boss will become invulnerable and create one additional power replicator per phase, after breaking these you will need to kill all the Jade Swarmers and then destroy the Power Replicator. Once all replicators are destroyed, the boss becomes vulnerable again.
Assault on Fort Aspenwood
Map: Echovald Wilds

- Use the siege turtles to destroy the shield generators
- Move through the research facility and reach the superweapon
- Deactivate the haywire Gods’ Vengeance
Use Siege Turtle’s lasers and/or United Legions Waystation’s Remote Charges to destroy the shield generators.
Divide yourselves into two groups, one northwest, and one southeast. Kill the champion and kill the generators the same way you did before. Once all shields are taken down, escort the NPCs up to a door. Once that door opens, swarms of Jade void-corrupted mechs will appear, and you must take them down to progress the event. After having taken down a few champions, finish the escort by reaching the gate to the final boss: Gods’ Vengeance.
Evade the flame wall as it deals heavy damage, then damage the boss. You can focus on the Champion Corrupted Jade Mechs, they are the most profitable part of the event. You can also ignore champions and damage Gods’ Vengeance all along to destroy it faster, damaging the boss while being stacked and having boons will make Gods’ Vengeance defeated very quickly.
The Gang War of Echovald
Map: Echovald Wilds

- NPCs Discussion (Bottom Right) & Free Kropa Village from the Jade Brotherhood
- Bring Speaker supplies to Stas & Defeat the Jade Brotherhood mechs assaulting the village
- Defend Kardast, Teleri, and Goa Villages
- Prevent both the gangs from seizing control of the junkyard
- Defeat Prototype XJ-1
Take back Kropa village that is being attacked first, then move to the Cyclow Outpost and use Adolescent turtles’ Special Action Key to remove the shields from the ads. At the same time, there will be an event at the Altrumm Mines that can be completed by 1 or 2 players so it doesn’t overscale.
Once these first 3 events are done, split yourselves into the next 3 locations being attacked: Goa, Kardast, and Teleri villages.
In Goa Village, you will need to take a defusing kit and use its special action key to reveal mines, and then interact with them, then a sequence of 3 symbols will appear and you need to reproduce the sequence using skills 1-3.
In Kardast Village, you will need to take a Jade Tech Ectospectrometer to uncover the spies by using skill 1 to locate where are the hidden jade brotherhood members (a red orb will appear if they are nearby) and use skill 2 to reveal them, then you can kill them.
In Teleri village, kill the Spirits Prisons to make their tethered Speaker Ritualists vulnerable, then kill them.
Once all outposts have been secured, head to the Xunlai Jade Junkyard to stop the Echovald Gangs from taking control over it, once again spread out in 2 groups to handle both events at once, then gather where In-Sook and Noomi are fighting one another, and defeat them both at the same time. Then comes the boss Prototype XJ-1. Bring Stability, and avoid the void-looking areas of effect. Once you arrive at the 60% mark, the 3rd phase will start, watch the boss’s movements as it will do its “Clap” attack.
After having slammed the ground twice using its fists, Prototype XJ1 will initiate a “Clap” attack, hide between one of the 2 trash piles, being created where the boss slammed onto the ground, in order to avoid damage from the smash attack. With protection, and at full health, the smash will instantly downstate you, otherwise, you will be instantly defeated.
After the boss moves a 4th time back to its original location, take it down while repeating previous mechanics to complete the meta-event.
The Battle for the Jade Sea
Map: Dragon’s End
As this event is one of the hardest, we recommend watching a detailed guide and securing your kill.
Event Preparation
Obtaining 10 stacks of Dragon’s End Contributor from preparation is not necessary. However, it provides boons and grants access to bonus chests for extra profit at the end of the meta-event.
The southern area has many consecutive events to quickly get 10 stacks, even in the last 15 mins of preparation.
Preparing all three regions to high readiness gives the Enhancement effect. This provides 5% extra damage to Dragonvoid Creatures.
The Preparation events stop appearing in the last 10 minutes of preparation, but any ongoing event will continue until it is finished.
Using Jade Battery charges, you can activate Offensive & Defensive Protocols while working on preparation events. Each use of a protocol gives an effect that lasts 15 minutes and grants boons upon entering combat.

- Escorts starting location
- First Void-Corrupted Saltspray Dragon
- Defend the Temple & the Hatchery from the Void Corruption
- Reclaim the Jade Brotherhood & Speakers outposts
- Quell the Void corruption near the Ley-Line Crystals
Squad preparation
If you are the commander, you can use the event preparation time to invite players and organize subgroups with boons, making sure there is a source of
Escort Events
Once the preparation phase is over, split yourselves into 3 groups as you will need to escort 3 NPCs, one West, one Middle, and one East. The Middle lane can do with fewer people and is a lot faster than the two other lanes, it simply consists of a short escort and then defeating a Void-Corrupted Saltspray Dragon at 70% health therefore once the Middle escort is complete, players assigned to it should go and help other lanes finish their events. The West and East lanes will have to defeat a Void-Corrupted Saltspray Dragon halfway through and make sure to break its defiance bar at 70% health. After escorting the NPCs further, they will stop by an area to clear of Void-Corrupted mobs and defeat a Champion Boss (the Juno Hatchery for the East lane and the Temple of the Fallen for the West lane).
Once this part is completed, the final part of the escort will begin. Once NPCs arrive at the Speakers (for East) and the Jade Brotherhood (for West) Outposts, an area will need to be captured so that Siege Turtles can arrive for the next event.
Once the area is captured, use Siege Turtles to damage the Rubble & the Void Shields. Once all 3 shields are destroyed, the Saltspray Dragon at the center of the Outpost will be vulnerable. Once more break its defiance bar at 70% health and defeat it to complete the escorts part of the meta-event.
Quell the Void Corruption
After all 3 lanes are done with their escort events, 4 areas will be corrupted by the void and players will need to defeat Void-corrupted Elder Dragon Minions and gather the orbs they drop. Once enough orbs are collected, a Void champion will appear and will need to be taken down. When all 4 Void champions are defeated, a 5th Area at the Harvest Complex will be corrupted by the void and will need to be handled similarly.
Use crystallized dragon magic to charge matching prismatic crystals
Once the Void Corruption has been dealt with, 5 Prismatic Crystals will appear at the Harvest Complex, each assigned to an Elder Dragon, and Void-Corrupted Elder Dragon Minions will spawn around the Harvest Complex. Just as the minions from the Void Corruption events, they will drop Orbs of Magic that this time will have to be thrown to their matching Prismatic Crystal in order to complete the event. The 5 crystals must all be filled in a 5-minute time window from the first to last, but every crystal field after the first one will add another 10 seconds to the time limit.
Defeat Soo Won
W. Soo-Won’s Hitbox location
- 2-Way Split at 60%
- 3-Way Split at 20%
Watch Mightyteapot’s guide on Defeating Soo Won as it is a complete rundown of all mechanics that would otherwise not be demonstrated well in a written guide.
The segment on Soo-Won begins at 16:54 and ends at 27:36. (10 minutes and 42 seconds)


