
Mursaat Overseer
Enrage: 6 minutes. When Enraged, players can no longer Claim tiles.
Recommended: Ranged cleave damage
Mursaat Overseer is one of the shorter raid encounters in the game, and is unique in that the boss has no attacks of its own; instead, everything else in the arena (stylized as a game board) is the real threat to the squad. This dynamic makes this boss one of the best for focusing on both one’s rotation and high damage uptime.


 This encounter has three special roles, with each having a unique special action skill. Usually, support players will take all three, but there are no specific build requirements for any player taking on one of these roles.
Reaching Mursaat Overseer’s game board requires a bit of a hike from Cairn’s platform.
From Cairn’s platform, glide forward and then walk up the vertical path to where Scholar Glenna is waiting, then talk to her and activate her first dialogue choice.
Further down the path, you’ll see a pile of rubble covering a hole to the left. One player must approach these rocks to make the Shovel at the very end of the path interactible, at which point a few players should pick up said Shovel, walk back to the rubble, and use the Dig skill on it to eventually open the path forward.
Arena Attacks
The fight starts when all three pillars of light at the front of the board, which each contain one of the encounter’s special action skills, are claimed by players.
At the start of the encounter, half of the board’s tiles will be orange. These tiles are claimed by Mursaat Overseer: standing in one will do heavy ticking damage to players and apply ![]() Claimed by a member of the squad.
Claimed by a member of the squad.
Spikes
At regular intervals, some of the board’s tiles will turn green. After 5 seconds, huge spikes will come up from these tiles, instantly killing any player standing on them.
Spikes cannot be  evaded
![]() Protect can mitigate their damage, however.
Protect can mitigate their damage, however.
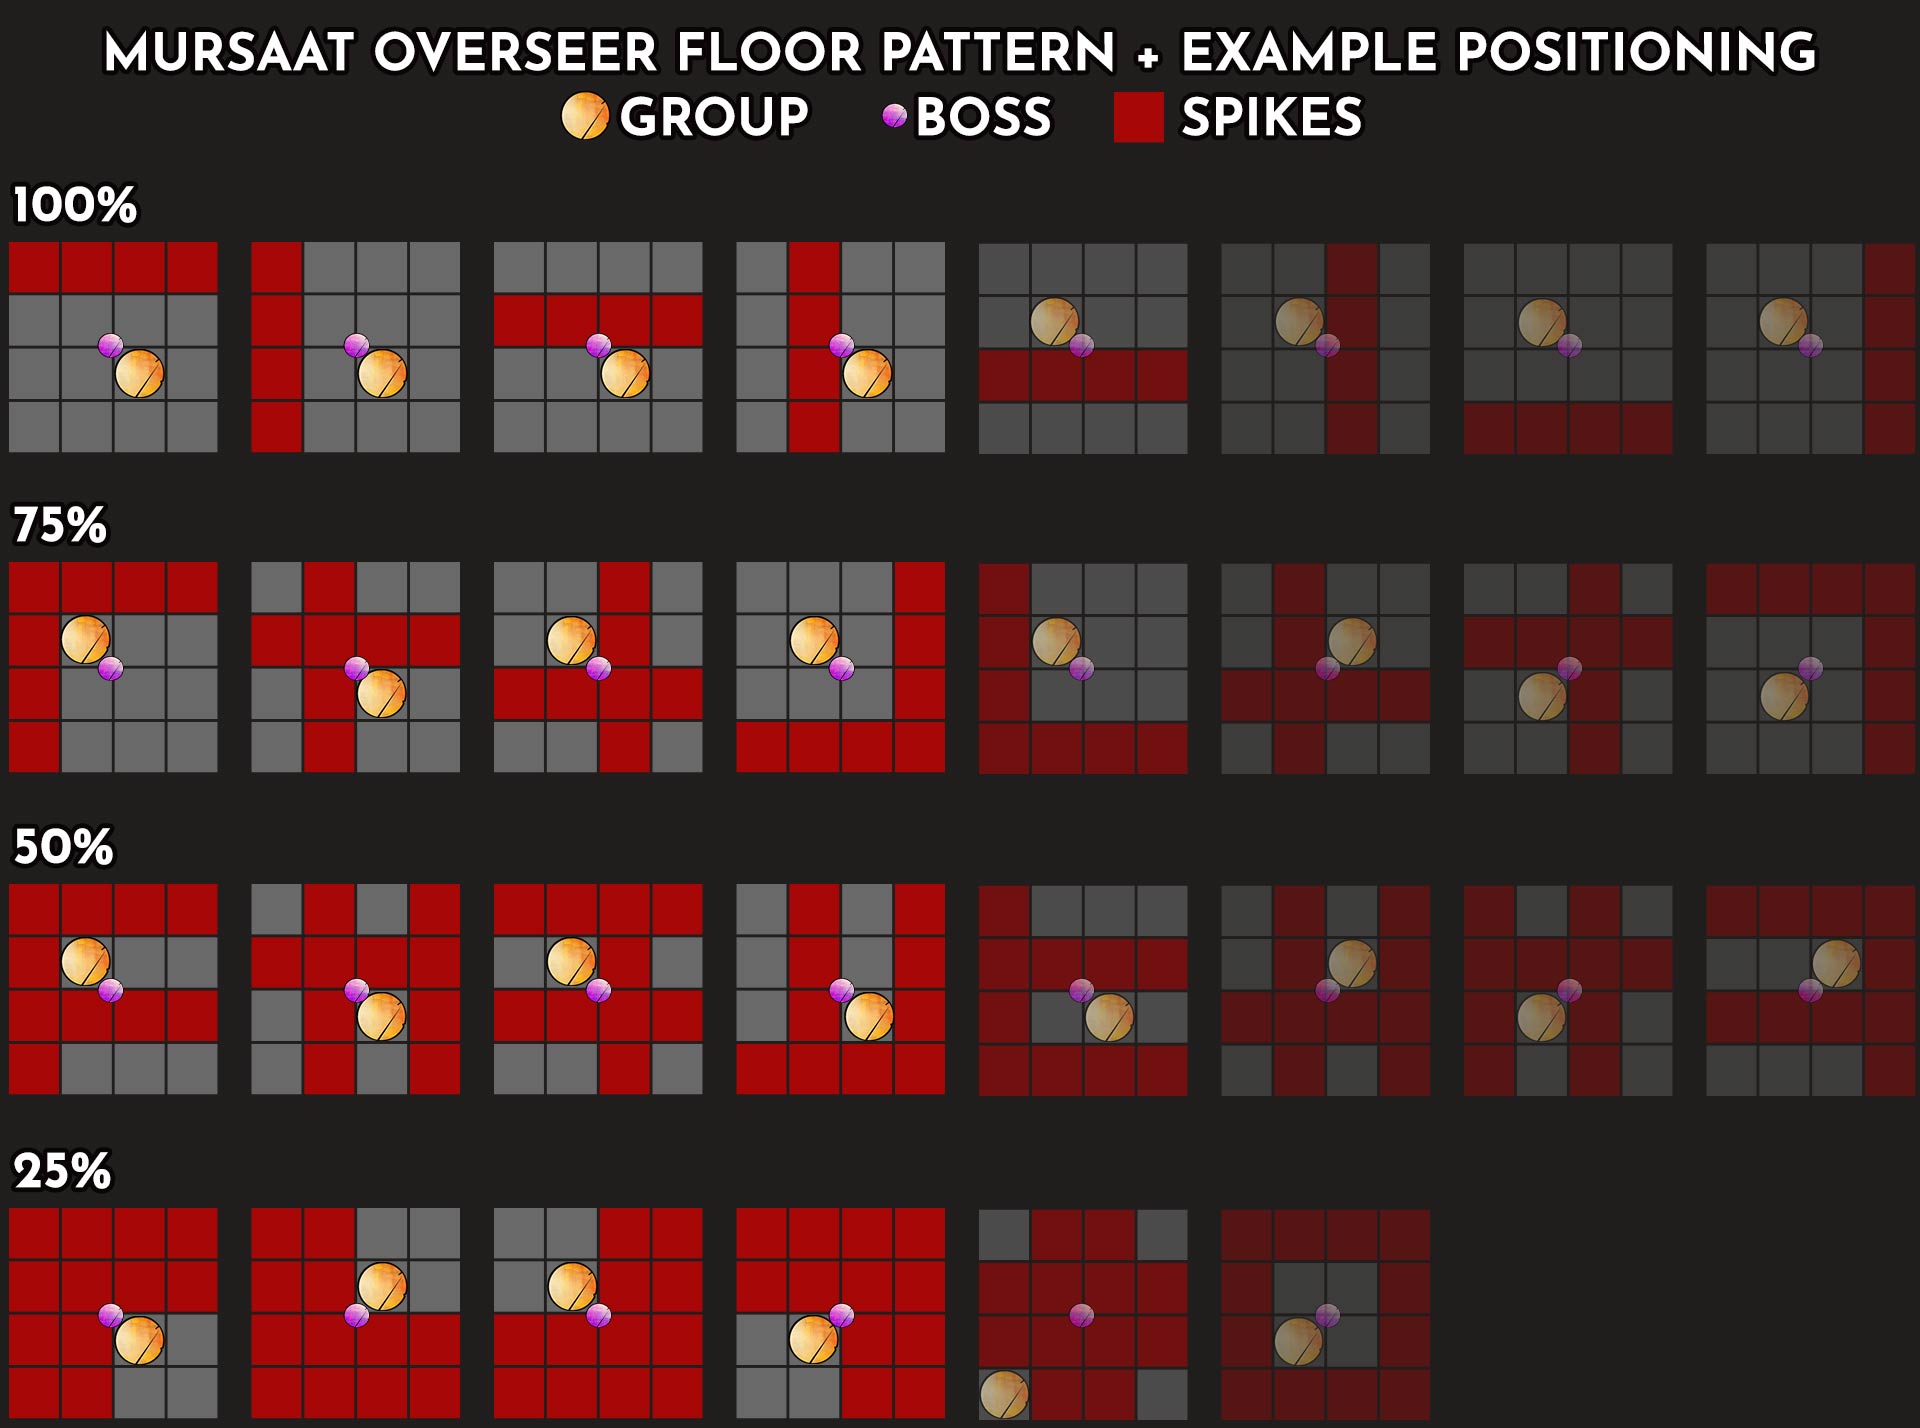
Spikes operate on a 10-second loop. The first set of spikes will appear 5 seconds into the encounter and will emerge 5 seconds after appearing. The next set of spikes will appear 5 seconds later, and so on.
Most groups will phase Mursaat Overseer every 40-50 seconds, only encountering the first 4-5 spike patterns. Squads with lower DPS may need to move the boss more.
There will almost always be at least one spike-free square in the middle of the board. However, squads with lower DPS may have to contend with a special spike pattern during the final 25% of Mursaat Overseer’s health where all four middle squares have spikes.
Jade Scouts
From the start of the encounter, four Jade Scouts will slowly advance across the board, flipping safe tiles as they travel over them.
If they are dispatched before they reach the other side of the board, they will pause and go invulnerable to regain their health before advancing again.
When they reach their destination, Jade Scouts will be upgraded into mobile Jade Soldiers that fixate on the player with ![]() Protect. Soldiers will still flip safe tiles they travel over, and gain an aura that applies
Protect. Soldiers will still flip safe tiles they travel over, and gain an aura that applies ![]() empowers Mursaat Overseer, increasing both its aura damage and the damage from any enemy-claimed tiles.
empowers Mursaat Overseer, increasing both its aura damage and the damage from any enemy-claimed tiles.
Occasionally, both Scouts and Soldiers will gain an orange shield that prevents all incoming damage; to remove this shield, ![]() Dispel must be used.
Dispel must be used.
Jade Soldiers will explode on death.
If the squad has a ready source of dodged
The squad’s DPS players should attempt to cleave down the Jade Scouts as much as possible in order to slow them down, especially at least one of the ones on the far edges of the board. The squad’s ultimate goal should be to make sure that if any Jade Soldiers spawn, they only come one at a time.
Special Action Skills
The three skills below can be used while downed, and if their users are fully defeated mid-encounter, their pre-fight interactible will respawn and can be picked up by any squadmates that are still alive.
Claim
The ![]() Claim special action skill is a ground-targetable ability that, when placed on an enemy-claimed tile, will flip it to the raid squad’s side and make it safe.
Claim special action skill is a ground-targetable ability that, when placed on an enemy-claimed tile, will flip it to the raid squad’s side and make it safe.
Additionally, Mursaat Overseer will always fixate on the player with Claim.
The player with Claim has two main responsibilities: maintaining safe locations for the squad and positioning Mursaat Overseer to cleave down Jade Scouts.
While this player can keep the Spike pattern in mind, there will typically be at least one Spike-free square in the middle four. As long as they remain prepared to adapt, focusing on keeping the middle four squares clear should be sufficient to maintain safe ground for the squad.
In terms of positioning Mursaat Overseer, the player with Claim should start the encounter by moving the boss to middle of the edge of one of the two central safe squares. This allows the squad to cleave down Jade Scouts to prevent all four Scouts from activating simultaneously. Once Spikes force the group to move, the player with Claim can prioritize moving out of Spikes from there on out.
Protect
The ![]() Protect special action skill is a ground-targetable ability that, when placed, creates a small dome that prevents all incoming damage, including both the insta-kill from Spikes and the damage from Jade Soldier explosions.
Protect special action skill is a ground-targetable ability that, when placed, creates a small dome that prevents all incoming damage, including both the insta-kill from Spikes and the damage from Jade Soldier explosions.
Additionally, any active Jade Soldiers will fixate on the player with Protect.
Protect has a 180-second cooldown, essentially relegating its use to once per pull. In groups with low damage, saving Protect for the difficult post-25% Spike pattern mentioned above is advisable, but in experienced groups (on Normal Mode) Protect is often not used at all.
The Protect player’s main responsibility throughout the encounter is to kite Jade Soldiers and prevent them from claiming the current tile the squad is standing on.
If the squad is cleaving Jade Scouts correctly, the Protect player will only have to keep one Soldier off a tile at a time, but if multiple are active, this player should position them to allow the squad to take them out together.
Note: When in the Protect dome, the squad is still vulnerable to the Blue mechanic in Challenge Mode and must respond appropriately.
Dispel
The ![]() Dispel special action skill is a single-target ability that will remove the orange shield from the targeted Jade Scout or Soldier if it has one.
Dispel special action skill is a single-target ability that will remove the orange shield from the targeted Jade Scout or Soldier if it has one.
At the beginning of the encounter, the player with Dispel should target any Jade Scouts with shields and use it as soon as possible. Later in the encounter, they should prioritize shielded Soldiers if any are up.
Note:
Dispel will work even if the target is out of the skill’s listed 1,500 range, if other targets are in the way, or if the target is not in line of sight. The only way for Dispel to “fail” is if a target isn’t selected.
Challenge Mode
In Challenge Mode, Mursaat Overseer gains 36% more HP (from 22 million to 30 million) and Jade Soldiers have almost double the HP, but otherwise squads only have one new (deadly) mechanic to contend with.
Blues
In Challenge Mode, at regular intervals four tiles on the board will turn blue. If players are not standing in a Blue at detonation, they will instantly die; ![]() Protect cannot save players from this fate.
Protect cannot save players from this fate.
This mechanic will spawn every 30 seconds starting at 5:33 time remaining and will last for 3 seconds.

The tiles that turn blue are client-side: every player in the squad will get their own set of Blues from one of four patterns.
These patterns only differ by a rotation and always include at least one center and corner tile, meaning the player with ![]() Claim must keep the four center tiles safe at all times in preparation for this mechanic.
Claim must keep the four center tiles safe at all times in preparation for this mechanic.
Since Spike timings are dependent on when the boss is brought to its quarter-health barriers, there is a non-zero chance that a squad may run into a situation where the positions and timings of the three-second Blue detonation and five-second Spike activation line up exactly.
Recognizing when this overlap is going to occur or whether there is enough to to move out of one and into the other is the trickiest part of the Challenge Mode encounter:
- If Blues unambiguously spawn first, they will detonate first and the squad will have enough time to move before the Spikes come up.
- If the Spikes have been charging up for a while before a Blue spawn (greater than 3 seconds), there is likely enough time to wait for them to come up before dodging into the Blues.
- If Blues spawn a little bit after the Spikes start charging up, the player with Protect should immediately place it directly in the center of the board.
- Since all four Blue patterns have a tile in the central four, all players in the squad will be able to stack in their Blue without dying to the Spikes.
If your overall squad DPS is in the ballpark of 200-220k, expect this overlap to occur at some point during the fight and plan accordingly.


