
Dhuum

100-10% Enrage: 10 minutes. When Enraged, Dhuum will deal 500% damage
10-00% Enrage: 1:45 minutes. When Enraged, the encounter will fail
Requires: Messenger Kiter, Boonstrip
Tank: Toughness
In this encounter, you must kill Dhuum while protecting seven allied Reapers. While Dhuum’s mechanics are punishing and can randomly target players, the fight itself is relatively formulaic. The usual cause of wipes will not be failing to surprise mechanics; rather squads will often wipe by failing to recover from routine mechanics.
Dhuum fixates on a toughness tank. The tank has a buff that greatly reduces incoming damage from Dhuum. This means that while the tank can benefit from self-sustain, most tank builds are suitable.
Messenger Kiter is a role special to Dhuum. The person’s role will be to collect Messengers spawning around the room and keep them off of the group. Having high sustain and mobility will benefit this role. In more advanced groups this player is often the main healer, but less experienced groups benefit from dedicated stack support.
Arena

Seven Seals lie in a loose circle around the room. Friendly Reapers will spawn at each seal. The community has come to use one set of markers on those seals, allowing for easy communication of Green Locations and the last 10% phase assigns.
Dhuum’s Throne has a green shadow around it. Running into this at any time will instantly kill the player.
A Column of Light is in the center of the arena. While players can run through it at the floor level, flying through it in the air will instantly kill the player.
Note: In less experienced runs, or “lfg” groups, players will often be assigned seals for a mechanic in the last phase. Before the fight they will spread across the seals to indicate which seal they will activate. Once all seals are covered the group will return to northern side of the arena to prepare for the fight.
Pre Event
Dhuum’s encounter starts with a 2-minute pre-event. Here players must handle a series of mechanics that will continue through the fight.
Enforcers
Known as: skeletons
Skeletal Enforcers will spawn in the four corners of the room. These will aggro on the friendly Reapers, or if no Reapers are visible, the squad. Players should kill these Enforcers quickly to prevent them from damaging the Reapers.
Enforcers have an extremely painful cone attack. You should avoid standing directly in front of them.
Dhuum’s Messengers
Messengers will spawn around the room and will fixate on the first player to attack them; they will die 15 seconds after fixation.
If no one attacks them they will damage the friendly Reapers. The Messengers’ hitboxes will deal heavy damage, so the Kiter’s main responsibility is to keep them off of the group and off the Reapers.
The kiter should attack the Messengers as soon as they spawn to gain fixate. They will then run around the room avoiding dying to the Messengers. Small blue
If another player gains a Messenger’s fixate they should behave as a temporary Messenger Kite by running their Messenger around until it dies.
Note: people fixated by Messengers will have a red border around their icon in squad UI
Deathlings
Small spiders will spawn, attacking the friendly reapers. These should be cleaved down whenever players pass them.
 Each individual Deathling does negligible damage but if allowed to build up they can eventually kill the Reapers. Whenever a player is off of stack handling a mechanic they should check on the Reapers and kill any large groups of Deathlings. The Star Reaper is especially vulnerable to Deathlings.
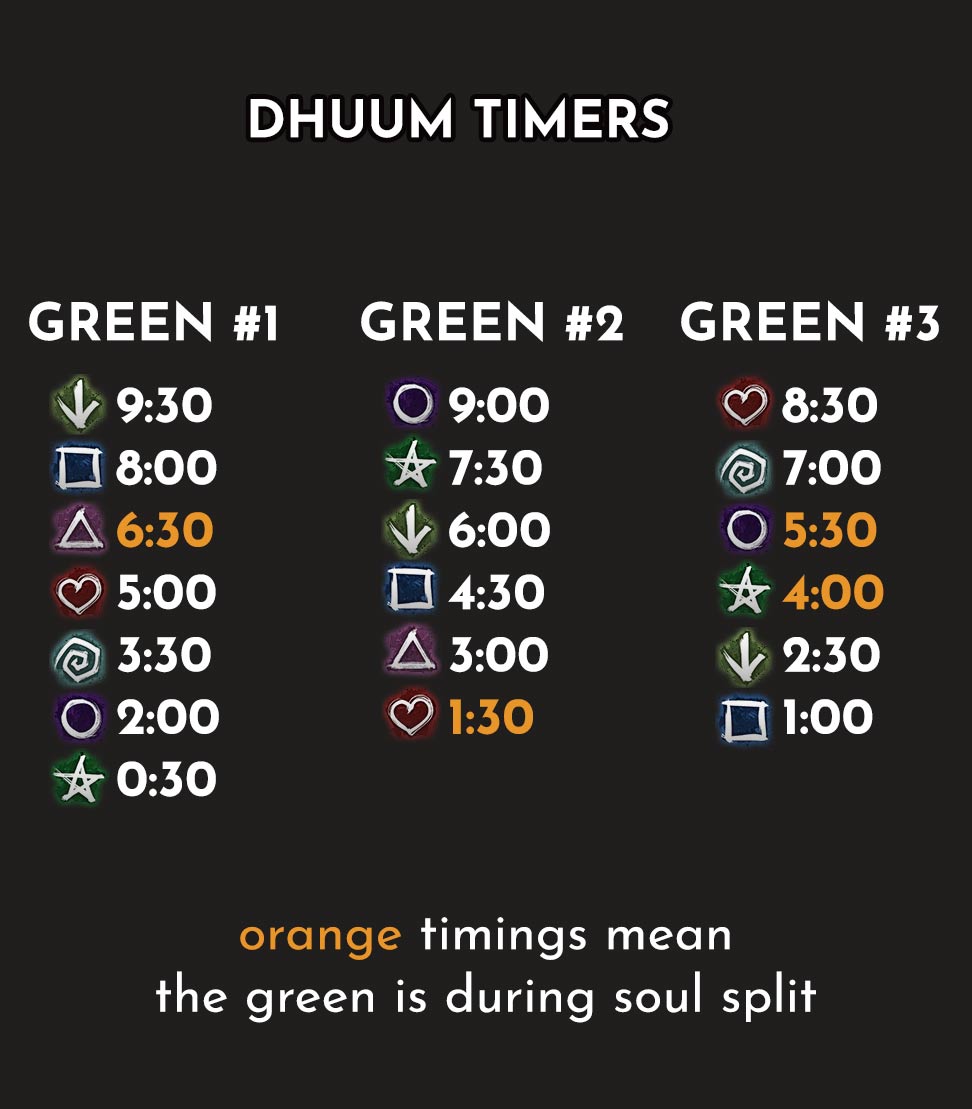
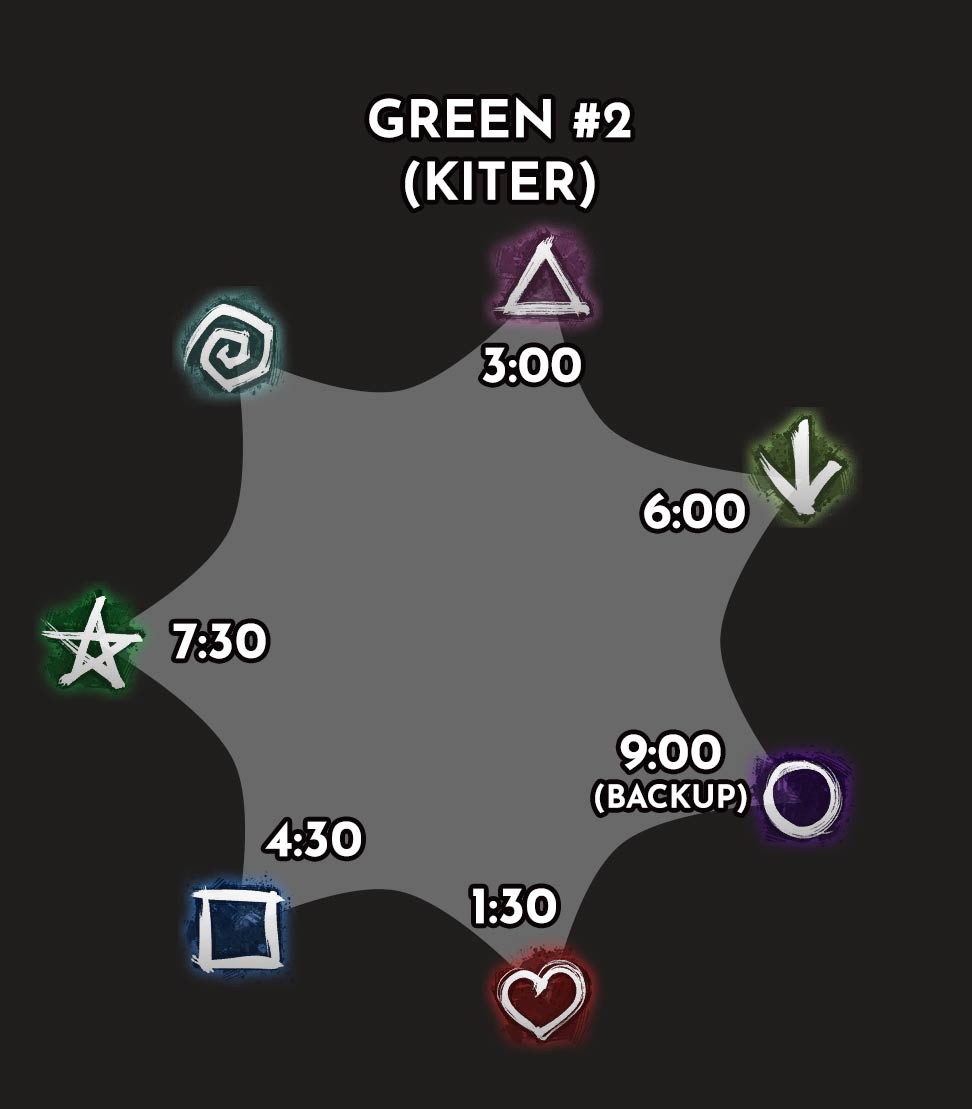
Greens
Greens are the most punishing mechanic of this encounter. Every 30 seconds Dhuum will reach for a friendly Reaper, as telegraphed by a large green circle. If a player is not alive in the circle at detonation the Reaper will die and the squad will wipe. Players in the circle at detonation will be lifted into the sky where they have to catch five red orbs within 15 seconds to be returned to the ground.
After handling this mechanic players cannot go back up for the next two greens. Attempting to do so will keep the friendly Reaper alive, preventing a wipe, but will instantly kill the player.
For that reason, three players are assigned to handle these greens, and are referred to as Green 1, Green 2, and Green 3, or simply G1, G2, and G3. Commonly groups will assign:
- A DPS to G1
- Messenger Kiter to G2
- Tank to G3
Greens rotate clockwise around the room to a timer. As each assignee will need to remember different greens, we have prepared three different green-specific timer maps as well as a general table for reference:
-

- Timers
-
- Green 1

-
- Green 2
-
- Green 3

The green collector should aim to collect one big red orb slightly clockwise from their green and four smaller red orbs. The big red orb is an Enforcer orb. By collecting this orb the player prevents the spawn of an Enforcer. If the player fails to collect this orb they must inform their squad so that the tank can adapt accordingly. Additionally, Greens must avoid flying through the column of light in the center of the room. Known as: bomb Starting at 9:00 of the encounter timer, one player will become Afflicted with a bomb. This player will gain a special action key, an icon over their head, and will see a prompt over their screen. Afflicted players should leave stack quickly. The bomb will detonate after 13 seconds or if the afflicted player will go downstate or will use a special action key. A new player will become afflicted 3 seconds after the previous bomb detonates.Affliction
During the pre-event players can blow their bombs as soon as the squad is sufficiently distant. Afflicted players must be on the lookout for the stack, the Greens, and the Kiter before detonating.
During the actual encounter, players should get off stack and allow their bombs to time out as detonating early may misalign the timing of the bomb spawns.
Boss Fight
Dhuum will leave his throne, walking towards the tank. Now players must continue to handle bombs, greens, and Messengers in addition handling Dhuum’s attacks.
Dhuum attacks on a rotation. He will autoattack five times then stab his scythe into the floor forming cracks in the ground.
Cracks
Cracks must be sidestepped. Standing on them when they detonate will damage and
Dhuum will autoattack three more times before dipping to form a Death Mark.
Death Mark
Known as: dip, lesser dip, lesser
Dhuum will reappear on a random player with a large orange circle.
Players in his circle at detonation will have their boons stolen and be separated from their souls – they must quickly run back to a pillar of light to regain their souls. If the player fails to do this within 10 seconds they will instantly die.
Dhuum’s Death Mark will gain green fire after fully activating. Entering this field will heavily damage and typically kill players. It is important that the squad baits this mechanic away from friendly Reapers, as the active Death Mark may prevent players from handling greens.
Prior to Dhuum’s Death Mark players should stack tightly to bait the Death Mark, wait for Dhuum to choose a location, then quickly leave his area of effect.
Greater Death Mark
Known as: soulsplit, greater dip, greater
At 6:30 Dhuum will dip into the ground, reappearing at the center of the room. He will blast the squad backwards out of their bodies, damaging them for 20% of their health and applying stacks of torment. Each person must run back over their “soul”, a shining beacon of light where they originally stood. Failing to claim their soul in time will result in the player instantly dying.
Dhuum will gain an orange circle under him, steal boons, and pull players in. Strip or corrupt his boons and avoid getting pulled into the harmful orange circle.
The stack must prepare for soulsplit by handling bombs and positioning.
Bombs: Bombs acquired just before 6:35, 5:15, 3:55, 2:35, and 1:15 must be run off the stack and detonated early. Any bombs acquired between those times and soulsplit can be held – they will dissipate when players are split from their souls.
Positioning: To avoid obstacles and to easily reclaim your soul, face the center of the room when Dhuum reappears, with your back against safe walls (this excludes Dhuum’s throne, which will instantly kill you).
Shackles
Starting at 60%, the two non-tank players closest to Dhuum will be shackled together.
These players will see a yellow border, receive a red message in their chatbox, and see a bright tether connecting them to each other.
Four seconds after spawning shackles will activate, heavily damaging the two shackled team members. They must run in opposite directions to break the shackle.
Often players communicating in voice will call “throne” or “door” to tell their shackled partner that they are moving towards the throne or the door respectively, ensuring that their partner does not move in the same direction. However, during “pug” runs you will have to respond to the positioning of the other shackled person.
Slash
Starting at 30% Dhuum will start to Slash. This is telegraphed as a cone attack that pulls in players and strips their boons. This can be avoided by sidestepping this attack.
Tanking Dhuum
As a tank, your responsibility is to keep Dhuum pointed away from the stack and to facilitate mechanics. This means holding Dhuum in positions to bait Death Mark, bring Dhuum close to Enforcers’ paths allowing the group to cleave them, and walking the group to the next Greens.
Note: Remember – as the person with the highest toughness you will receive a buff lessening the damage you take from Dhuum’s auto attacks. Your squad does not! If your squad is dying don’t try to hand rez! The best thing you can do is keep Dhuum pointed away from the stack.
In general, you can start the Boss Phase at the northeast of the room until the first Death Mark. From there, you can bring Dhuum to your Green in the northwest (Spiral).
After Dhuum’s Greater Death Mark you can tank near the center, pointing Dhuum towards the southeast. After his next Death Mark you can bring him to your Green in the southeast (Circle).
You will continue to rotate him around the room, bringing him to your Greens until he is successfully phased.
Final Phase (10%)
At 10% the timer will reset to 1:45.
All players will be sent into the air to collect orbs. This is exactly like the green mechanic – collect five orbs while avoiding the central light beam.
Once you have collected five orbs you will reappear in a protective dome on the ground, with Dhuum floating over you. To kill Dhuum, players must retrieve him by channeling each of the seven seals around the room within 10 seconds of each other.
To easily coordinate this phase, each person should stand on the edge of the protective dome near their chosen seal. This allows the rest of the squad to quickly survey which seals are not covered yet.
Less experienced groups will often pre-assign seals before the fight. This can make coordinating covering all seven seals easy, but can make things more confusing if one of the assignees has died during the fight. Pay attention to chat and adapt! Anyone assigned a seal that has died during the fight should communicate in chat which marks need backups.
Leaving the central dome will heavily damage players, so you should be loaded up with boons before leaving. Most importantly, preboon with
Note: Commonly, the commander will start a ready check, and players who have successfully collected greens and returned to the ground will accept it indicating they are ready to go to their respective seals.
Dead players should instantly press Yes to allow ready check to complete.
If the group cannot kill Dhuum within 20 seconds they must repeat the seal activation process. If players fail to kill Dhuum before enrage time, they will wipe resetting the entire encounter.


