Qadim the Peerless

Enrage: 12 minutes. At Enrage Qadim does 200% damage
Tanking: Tether Mechanic
Qadim is considered difficult due to its special roles and random mechanics.
 Recommended
- Weapon Mastery
Pistol


Sword & Pistol
Tanking Qadim is not limited to any class but is typically handled by a Firebrand, Chronomancer, or Druid. This is one of the more difficult encounters to tank as the tank must stay off of stack, be aware of players positioning, and handle heavy damage pressure. Qadim is not a toughness-based tank but tanks are encouraged to bring toughness gear due to the heavy pressure. To become a tank you will need to turn on the ‘flux disruptor’ and ‘tether’ yourself to Qadim by being the first player to enter his range.
Pylons & Tethers
Pylon Kiter: Pylon Kiters are a new raid role where a player must ‘tether’ to a pylon. Pylons will start the encounter in Qadim’s possession, forming an invulnerability shield around him. By breaking each pylon’s breakbar and tethering to the broken pylon the pylon kite can possess the pylon, stripping Qadim of his invulnerability. If Qadim repossesses a Pylon during the fight, he will regain his shield and knock players backwards.
 Flux Disruptor: When you enter Qadim’s arena, you will notice a special action skill which can be either activated or deactivated. Only the Tank and the three Pylon Kiters should activate this skill. These roles must activate their Flux Disruptors before the fight starts and each time after a wipe.
While the Pylon Kiters will be tethered to each of the three pylons, the Tank will be tethered to Qadim. This tether applies a stack of
Phase 1 (100-80%)
Chaos Currents (moving electric “sharks”) will dart around the arena, flowing through the white lines on the floor. These currents deal heavy damage, weakness, and burning to anyone who stands on them.
The fight starts when players enter the ring running through the pylons. Qadim will start to channel Ruinous Nova until each pylon’s breakbar has been broken. If the breakbars fail to break, Qadim will wipe the squad.
Note: The squad should split into 3 groups to distribute crowd control between the three pylons. Remember which pylon you started at as you will return to this pylon later in the fight.
After all three pylons are broken Qadim will unleash Force of Retaliation, an attack that repeats when pylons are broken at 100%, 80%, and 60% of Qadim’s health. At 40%, 30%, and 20% Qadim will use this attack after flying to a pylon. This is a shockwave that radiates outwards from Qadim, knocking players backwards and potentially into deadly zones. This attack can be dodged or negated with
After this knockback attack, Qadim will select the tank: the closest person with an activated special action skill. He will use three autoattacks and then place a Carpet, a very deadly rectangular area of effect. The tank is responsible for placing the Carpet in safe directions for the group.
Force of Havoc (Known as: carpet)
Qadim will create a long rectangular path that deals heavy damage to anyone standing in it. If it hits a pylon, the pylon will be repossessed by Qadim, forcing players to re-break it. There is a visual bug where the carpet will disappear; players must avoid the carpet’s location for 20 seconds. The tank should alternate between two places when aiming with the carpet.

Starting at 95% and at every 5% until 40% (excluding “Fire” split phases at 80% and 60%), Qadim will shoot an Orb in the air. A red arrow will point at one of three locations where the orb will land.

If the orb lands on the ground or is caught by an enemy Anomaly, it will deal high damage. Pylon Kiters are responsible for catching the orb before it lands and quickly returning to their pylon. Kiters should have teleport skills to handle quick orb pickups.
The orb can land in three different spots and is telegraphed by a red arrow. Commonly Kiters will pick up the orbs to the left of them, or clockwise when looking from above, but different groups will handle this differently – confirm before the fight starts!
Starting at 90%, when Qadim lays a carpet he will also target a random player with his Skyhammer attack. Only the tank will be exempt from this: kiters may be targeted. This player will be targeted with a barrage of lightning comprising of three orange areas of effect. Each circle will grow progressively larger and will deal heavy damage to any players staying in the AoE at detonation. To handle this mechanic, the targeted player should simply run out of the group toward the edge of the arena. Be careful to avoid assassinating your kiters!
Note: The area of effect does not move with you. Instead, each circle will be placed at your current position allowing you to move out of them prior to detonation. The last circle is very large, so players cannot escape prior to detonation without swiftness or superspeed – save your dodge for this final circle.
The last mechanic introduced in this phase is Fires. At 80% of Qadim’s health Qadim will reshield and lift all players in the air, gaining a slowly expanding white circle. Once this circle has fully expanded players will be dropped back onto the ground, spawning deadly firey circles underneath them. Pylons will regain a breakbar and must be broken to remove Qadim’s shield.
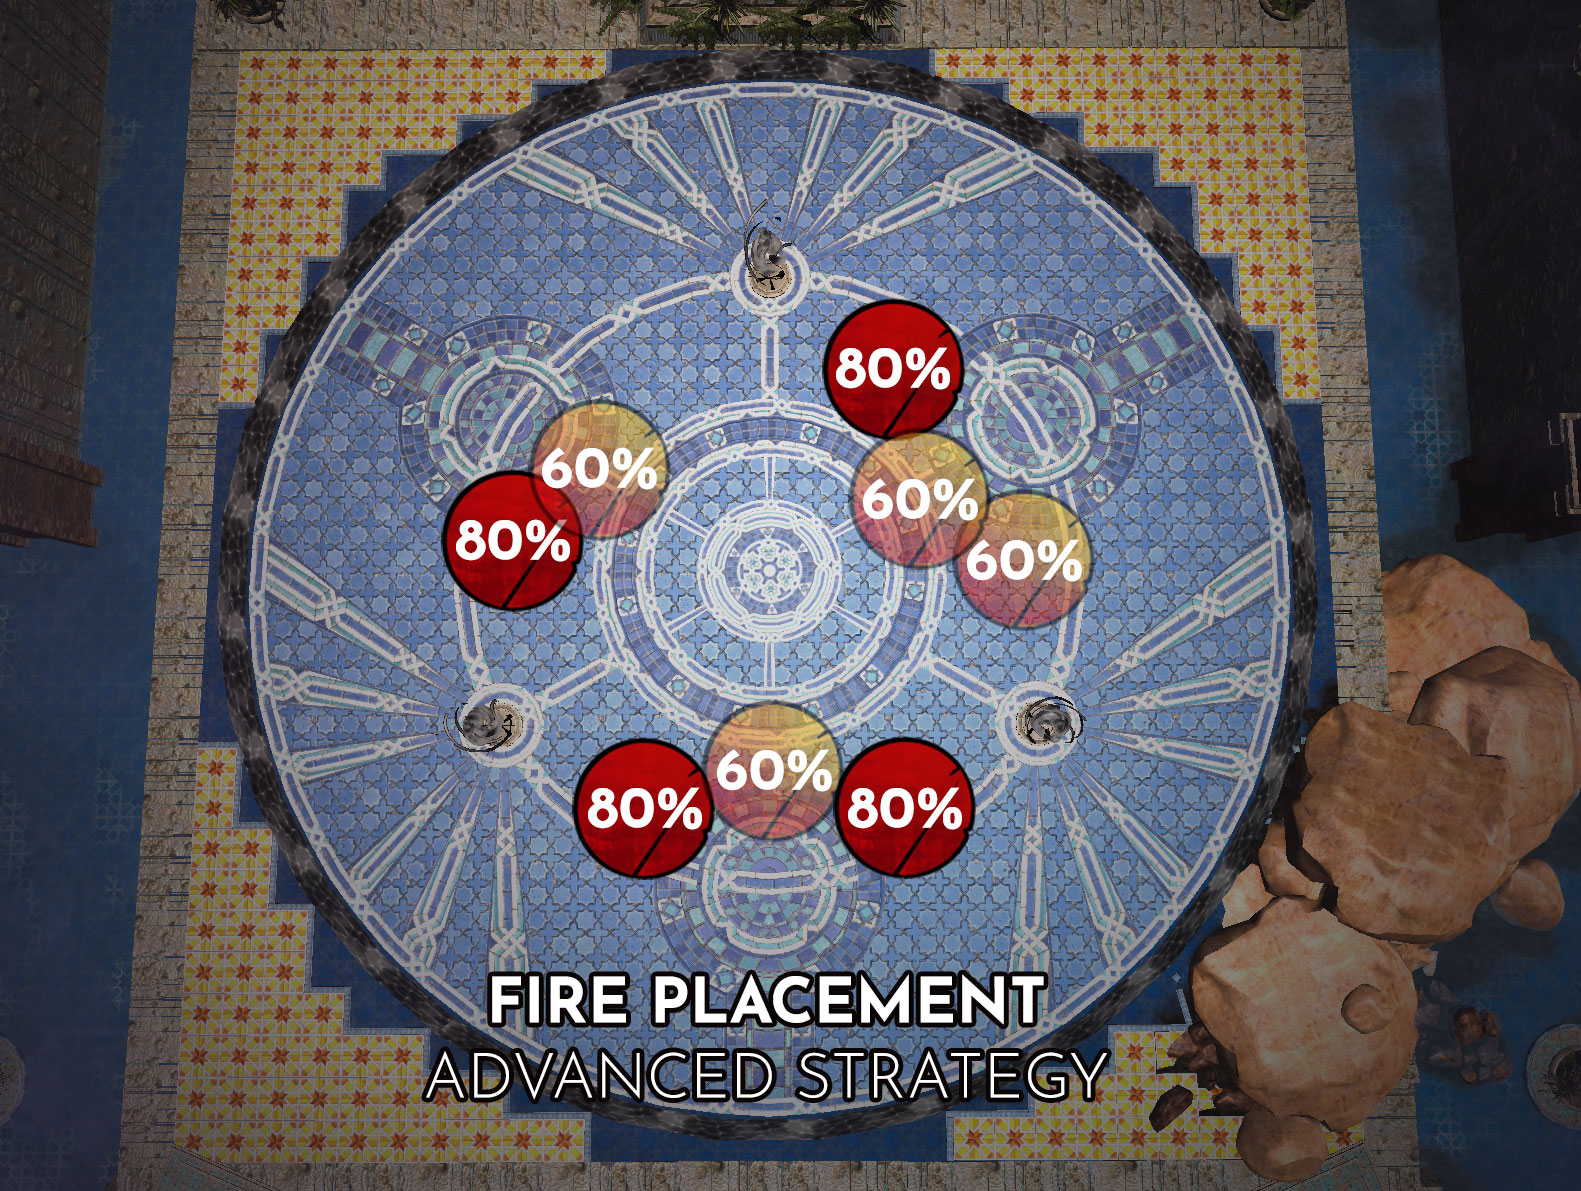
Most casual groups will use “PUG Fires,” stacking Fires first on the left of each pylon at 80% of Qadim’s health, then stacking on the right of each pylon when this mechanic repeats at 60% of Qadim’s health. This allows groups to coordinate easily while maintaining safe locations for Kiters to stand.
Players should be ready for this mechanic – while you have plenty of time to reach the fire locations you must move expeditiously. Just before 80% and 60% look towards the pylon you originally broke at the start of the fight. As soon as you are lifted move straight to the appropriate side of that pylon.

Phase 2 (80-60%)
Once Fires have been placed and Pylons have been broken players must again dodge a Qadim’s Force of Retaliation knockback. This knockback is much more deadly after Fires have been placed – being knocked into the Fires typically kills the player.
Qadim’s pattern is the same as in Phase 1, with the exception of two new mechanics.
Occasionally Qadim will channel Poisoned Power, gaining a breakbar and channelling a purple beam at a pylon. The respective kiter will gain an Enfeebled Force debuff which applies
Starting at 75% health and every subsequent 40 seconds Anomalies will spawn at one of the orb spawn points. These spawns will be telegraphed by a purple-black void over their spawn location. The Anomalies will spawn with a breakbar that must be broken to strip them of invulnerability.
There are two common strategies for dealing with Anomalies:
- A confident Druid can solo each Anomaly’s breakbars. Pet skills, such as
 Lightning Assault
 - If groups have a different team comp or less experienced Druid another class with heavy crowd control can be assigned to Anomaly control. This is often a Warrior.
 Lightning Assault
In both cases, the Anomaly should be broken once they have walked into the Fire areas of effect. A broken Anomaly on at least two stacks of Fire will die without any other group attention. If the Anomaly will not traverse over Fire the squad must focus it down instead.
Orbs will continue to drop at 75%, 70% and 65% in this phase. When the boss hits 60% hp, the Fire mechanic will happen again, just as in Phase 1.
Phase 3 (60-40%)
While players are retaking Pylons any living Anomalies will walk towards Qadim, powering up if they successfully reach the boss. If this happens, the Anomaly must be killed manually.
During this phase Qadim’s attack pattern repeats with one new mechanic, the Arrow mechanic. This will occasionally take the place of Skyhammer.
Arrow: Qadim will track a random player with a red arrow. After a few seconds, he will slam his hands down, releasing a narrow missile that explodes on the fixated player if not avoided. These explosions have a medium-range and can hit other players. Qadim will repeat this attack three times on the chosen player, then resume his autoattack pattern. This attack deals heavy damage and applies the Chaos Corrosion debuff which causes you to take increased damage from the next arrow attack.
If targeted you must move slightly away from the group and watch Qadim’s hands. When he drops his hands you can jump or dodge the detonation. This attack cannot be blocked. Remember to be aware of your surroundings – if you are hit you may be knocked back into the Fires.
Orbs continue, dropping at 55%, 50%, and 45% in this phase.
Phase 4 (40-30%)
At 40% health, the boss will fly to the north pylon dropping a large Fire and knocking any players in his route. The north Pylon Kiter should be prepared to deactivate their special action key, dodge this movement, and join the group. This Fire is less damaging than the Fires dropped by players, so you may see some players standing on it and continuing to DPS Qadim.
Qadim will perform another Force of Retaliation knockback from this Pylon. Players will often stack at the edge of the Fire and use shared  "Stand Your Ground!"
After Qadim’s knockback players should move to the remaining Pylons. Avoid standing within Qadim’s central circle or the circles surrounding each Pylon as Qadim’s shield will knock players standing in these circles back, potentially into Fires. Additionally, Qadim will start his usual attacks including his Carpet, Skyhammer, and Arrow attacks while his shield is still up – the tank should be prepared to kite the Carpet and the squad should be prepared to handle Skyhammer and Arrow attacks.
Once the pylons are broken Qadim’s shield will drop once more making him vulnerable to damage.
There are a few changes in this phase compared to the previous phases:
- Anomalies will spawn every 30 seconds (previously every 40 seconds)
- Orbs will no longer spawn
- Small orange circles will spawn around the arena, detonating for moderate damage
Additionally, Qadim will now tether to a player with an active special action key, making them the Primary Bad Tether. The Primary Bad Tether can spread its effects to up to three other people, making them the Secondary Bad Tethers.
Phase 5 (30-20%)
This phase is a repeat of the previous phase, except that Qadim will destroy the west pylon and assign two Primary Bad Tethers and their associated six Secondary Bad Tethers.
Phase 6 (20-0%)
At 20%, Qadim will fly to the east pylon. Players no longer need to reclaim the Pylons. They only need to avoid Qadim’s two knockback attacks: his large knockback from the east pylon and his shield knockback when he returns to the center.
Note: While Qadim will not reshield at 20% health he will do the same central knockback. Players should stand outside of their central circle until this skill has been cast. He will additionally cast one final knockback, activating all players’ special action keys.
There are a few changes in this phase.
- There is no more boss CC mechanic as there are no remaining Pylons for Qadim to target with his Poisoned Power attack.
- Qadim will gain
, , , , and at regular intervals. These buffs must be stripped, commonly by Chronomancer - Qadim will switch on all players’ Flux Disruptors (activate all special action keys). These cannot be switched off.
 Mind Spike
 Feast of Corruption
 Banish Enchantment
As all players now have active special action keys, care must be taken to ensure the assigned tank gains Qadim’s fixate. The squad should remain outside of the central circle while the tank moves to the middle and dodges the knockbacks. Once knockbacks are over the squad can reenter melee range. Qadim will assign three Primary Bad Tethers and seven Secondary Bad Tethers.
In this phase, players must finish killing Qadim while handling all of his attacks and killing any spawning Anomalies.
Strategies
Advanced Fire Deviation
These Fire placements are used in many organised groups, statics, and taught in some advanced trainings. They are a bit more difficult to coordinate but provide full coverage against all Anomalies throughout the fight.
Optimized Tethers
The Good Tether buff causes players with this tether to apply a debuff onto Qadim that increases his damage taken by 5%. This debuff stacks up to 10, increasing Qadim’s damage taken by 50%. In many groups you will have three tethers, one applied by each Pylon Kiter. Sometimes the tank will apply a fourth tether. The maximum tether stacks will drop each time a Pylon is removed, at 40%, 30%, and 20%.
The Bad Tether debuff will reduce tethered players’ outgoing damage.
Squads can optimize their tethers, having up to 10 stacks of Good Tether debuff on the boss and eliminating their Secondary Bad Tethers. This can be difficult to pull off but speeds the fight considerably.
Maximum Good Tethers
Each Pylon has a Primary Good Tether, stacking to three Primary Good Tethers. Each caught orb increases their maximum Secondary Good Tethers for a max of three Secondary Good Tethers per Pylon at the end of Phase 1, six at the end of Phase 2 and 7 at 55%. This would mean the entire squad would apply the Good Tether debuff on Qadim.
Three dedicated Secondary Good Tethers will turn on their Flux Disruptor in the 1st Phase, and another three will turn on their Flux Disruptor in the 2nd Phase. These players are each assigned to a specific Pylon and will stand in range of their Pylon to connect to the Good Tether.
If done correctly, this is how the squad will look at the beginning of Phase 2:

By the end of Phase 2, the squad will look as follows, resulting in eight Good Tethers of the maximum nine:

Finally, all players will switch on their Flux Disruptor during Phase 3.
It is possible to juggle Secondary Good Tethers in Phases 1 and 2 by alternating which player is in range of the Pylon Tether. Done correctly, this would result in nine stacks of the Good Tether debuff on Qadim by the end of Phase 1. While this is very difficult to pull off it is possible to skip then entirety of Phases 4 and 5 with good DPS and good tether management, phasing Qadim before he has a chance to return to the center of the arena.
Phases 4 and 5 do not have specific Tether strategies as optimal strategies skip these phases altogether. If you don’t get the Phase 4 or Phase 5 skip, all players except for the Pylon Kiters and the tank should turn off their Flux Disruptor.
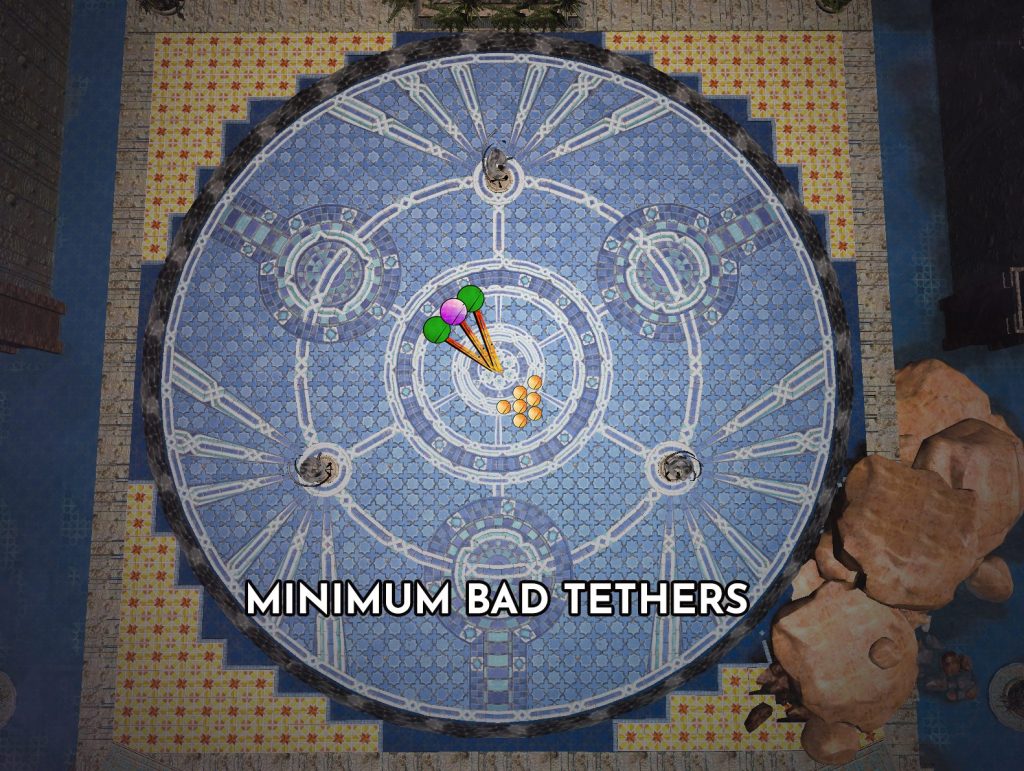
Minimum Bad Tethers
During the last phase (20-0%), it can be hard to see who becomes the Primary Bad Tethers since the Flux Disruptors are also activated. With the exception of the 3 dedicated tethered players (typically 2 pylon kiters and the tank), everyone will turn off their Flux Disruptor before it is locked on.
The tethered players should stand in the middle of the arena while everyone else remains outside of the middle circle. This allows Qadim to assign his Primary Bad Tethers prior to activating the Flux Disruptors.
The tethered players then move on the tank’s side edge of the inner circle and stay ranged. The rest of the group should stand behind the boss in melee range. By doing this, the group can freely do damage and provide buffs while the tethered players are not linking to anyone else with the debuff.
By optimizing Bad Tethers to only three of ten players, the last 20% of the fight will be much quicker than the typical unorganized free-for-all strategy.
If done correctly, the last 20% will look like this: