skip to content
Buy Guild Wars 2: Secrets of the Obscure and support Hardstuck!
All builds
  • Any Gamemode
  • Any Role
  • Any Labels
    Difficulty

    Power Daredevil
    August 2023

    Group PvE
    Damage

    Armor

    Illustrious Visage icon Superior Rune of the Dragonhunter icon
    Berserker's HelmSuperior Rune of the Dragonhunter
    Illustrious Shoulderguard icon Superior Rune of the Dragonhunter icon
    Berserker's ShouldersSuperior Rune of the Dragonhunter
    Illustrious Guise icon Superior Rune of the Dragonhunter icon
    Berserker's ChestSuperior Rune of the Dragonhunter
    Illustrious Grips icon Superior Rune of the Dragonhunter icon
    Berserker's GlovesSuperior Rune of the Dragonhunter
    Illustrious Leggings icon Superior Rune of the Dragonhunter icon
    Berserker's LegsSuperior Rune of the Dragonhunter
    Illustrious Striders icon Superior Rune of the Dragonhunter icon
    Berserker's BootsSuperior Rune of the Dragonhunter

    Weapons & Sigils

    Staff icon Superior Sigil of Force icon Superior Sigil of Impact icon
    Berserker's StaffSuperior Sigil of Force Superior Sigil of Impact
    Axe icon Superior Sigil of Force icon
    Berserker's AxeSuperior Sigil of Force
    Pistol icon Superior Sigil of Impact icon
    Berserker's PistolSuperior Sigil of Impact

    Trinkets

    Quiver of a Thousand Arrows icon
    Berserker's Backpiece
    Black Ice Earring icon
    Berserker's Accessory
    Asgeir's Talisman icon
    Berserker's Accessory
    Asgeir's Amulet icon
    Berserker's Amulet
    Black Ice Band icon
    Assassin's Ring
    Mistborn Band icon
    Berserker's Ring
    Relic icon
    Relic of the Thief

    Food

    Cilantro Lime Sous-Vide Steak icon Potent Superior Sharpening Stone icon
    Cilantro Lime Sous-Vide Steak Potent Superior Sharpening Stone

    Infusions

    Mighty WvW Infusion icon
    20xMighty Infusion

    Utility Skills

    copied

    Rotation

    First combo:

    1. Dodge when at 1+ endurance.
    2. Weakening Charge + Assassin's Signet
    3. Fist Flurry
    4. Palm Strike
    5. 4x Weakening Charge

    Second combo:

    1. Dodge when at 1+ endurance.
    2. Weakening Charge + Assassin's Signet
    3. Fist Flurry
    4. 2x Weakening Charge
    5. Palm Strike
    6. Dodge
    7. 2x Weakening Charge


    Power Daredevil is a burst-centric DPS class that not only offers good single targets DPS but also a significant amount of cleave/AoE damage.

    In addition, the stolen skills gained from Steal can be very useful for multiple situations:

    Finally, the build can provide amazing CC via Basilisk Venom and Fist Flurry.

    Build fundamentals

    Your DPS comes in repeated bursts. After you perform one, you will enter a rest period where you will refill your resources with the staff Auto-attack chain.

    If your endurance bar fills to one dodge while in your rest period, you will want to Dodge and use Weakening Charge.

    If you cannot use your staff skills safely, swap to your double pistol set. Fill with your auto-attacks and occasionally use Unload after dodging until you are ready to swap back to staff.

    Crowd Control

    Alternatives

    Skills

    Armor

    Illustrious Visage icon Superior Rune of the Scholar icon
    Berserker's HelmSuperior Rune of the Scholar
    Illustrious Shoulderguard icon Superior Rune of the Scholar icon
    Berserker's ShouldersSuperior Rune of the Scholar
    Illustrious Guise icon Superior Rune of the Scholar icon
    Berserker's ChestSuperior Rune of the Scholar
    Illustrious Grips icon Superior Rune of the Scholar icon
    Berserker's GlovesSuperior Rune of the Scholar
    Illustrious Leggings icon Superior Rune of the Scholar icon
    Berserker's LegsSuperior Rune of the Scholar
    Illustrious Striders icon Superior Rune of the Scholar icon
    Berserker's BootsSuperior Rune of the Scholar

    Weapons & Sigils

    Staff icon Superior Sigil of Force icon Superior Sigil of Impact icon
    Berserker's StaffSuperior Sigil of Force Superior Sigil of Impact
    Shortbow icon Superior Sigil of Force icon Superior Sigil of Accuracy icon
    Berserker's ShortbowSuperior Sigil of Force Superior Sigil of Accuracy

    Trinkets

    Quiver of a Thousand Arrows icon
    Assassin's Backpiece
    Black Ice Earring icon
    Berserker's Accessory
    Asgeir's Talisman icon
    Berserker's Accessory
    Asgeir's Amulet icon
    Berserker's Amulet
    Black Ice Band icon
    Berserker's Ring
    Mistborn Band icon
    Berserker's Ring

    Food

    Cilantro Lime Sous-Vide Steak icon Potent Superior Sharpening Stone icon
    Cilantro Lime Sous-Vide Steak Potent Superior Sharpening Stone

    Infusions

    Mighty WvW Infusion icon
    20xMighty Infusion

    Utility Skills

    copied

    Rotation

    When entering the lamp, make sure you are fully buffed and you have at least one charge of Throw Magnetic Bomb.

    Inside the lamp use Trick Shot paired with Cluster BombDetonate Cluster, but save your initiative for when you have to swap to staff near the end.

    Out of lamp play as you normally would as Power DD:

    1. Dodge when at 1+ endurance.
    2. Weakening Charge + Assassin's Signet
    3. Weakening Charge
    4. Fist Flurry
    5. Weakening Charge
    6. Palm Strike
    7. Weakening Charge until out of initiative

    Videos

    With only minor traits changes, Power Daredevil can have very good self-sustain without losing much damage. By pairing Trick Shot that bounces through groups of mobs with Throw Magnetic Bomb for harder enemies, this build is perfect for the niche role of “Solo Lamp” on the Wing 6 Qadim encounter.

    Build fundamentals

    Before each Legendary Enemy phase, a Lamp will spawn in the middle of the arena. One or more players will have to enter the Lamp, fight through mobs, and retrieve a friendly legendary creature who helps defeat enemy adds.

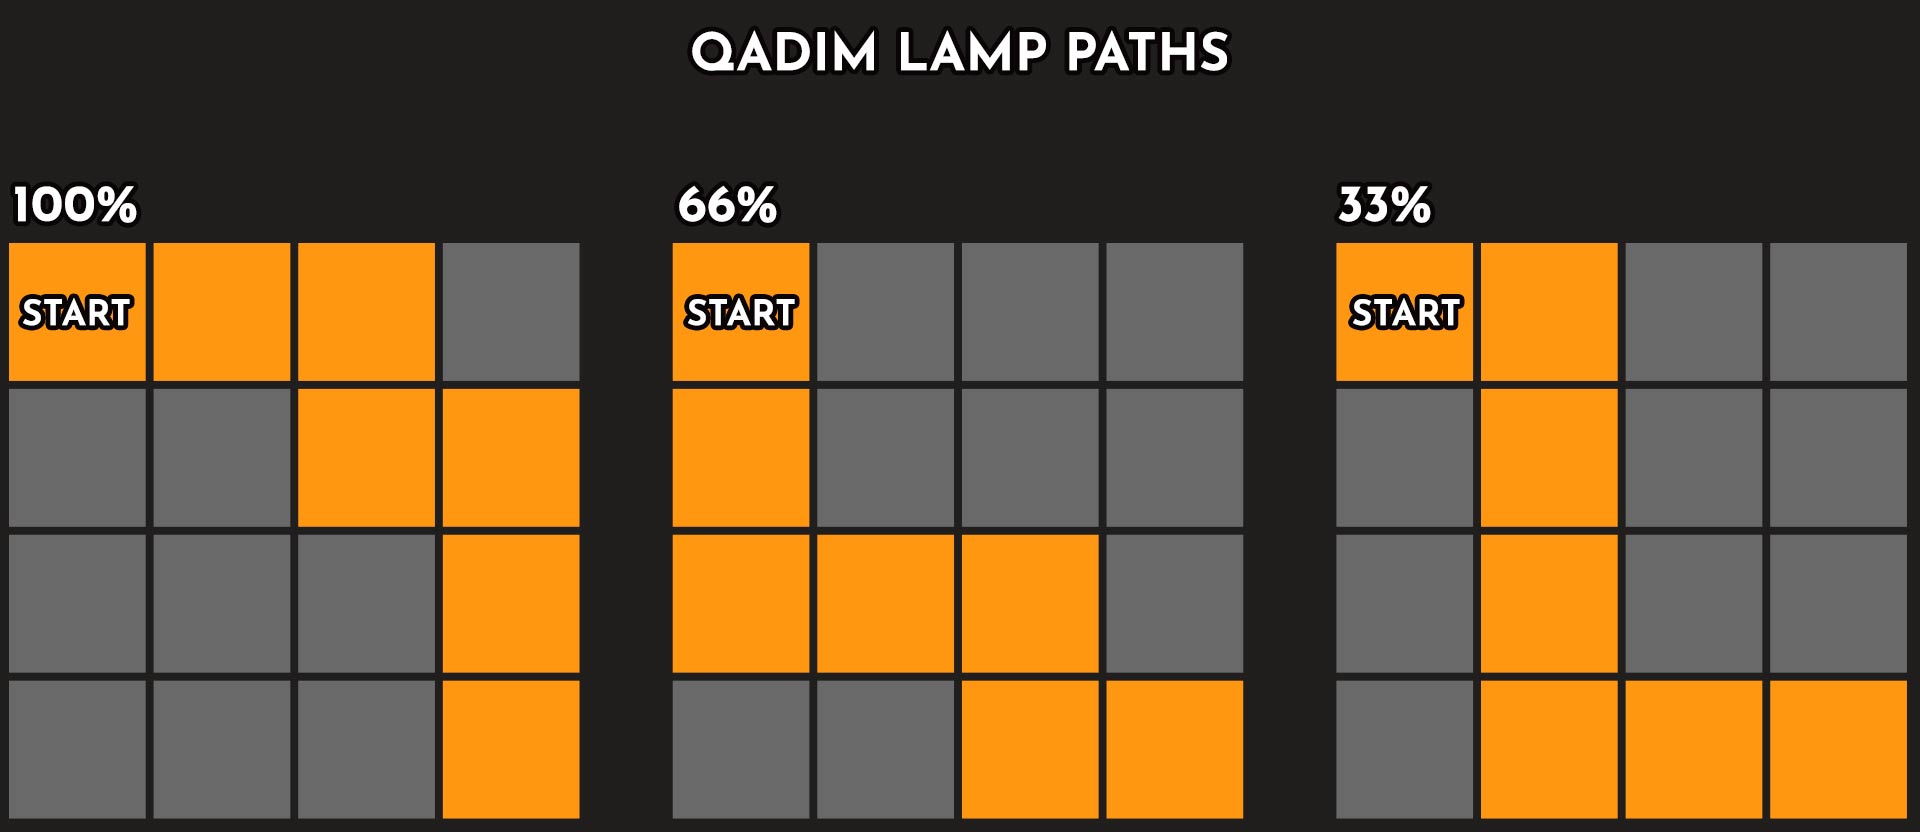
    You will have to complete the Lamp three times: at the beginning of the fight, at 66% of Qadim’s HP, and at 33%. Typically more players will join you for the final 33% lamp, as enemies are much harder and it’s easier to fail.

    Magnetic Bomb

    Always aim to have at least one charge of stolen Throw Magnetic Bomb as it will trivialize navigating through the Lamp. Two stacks are highly recommended. You can steal this from Qadim, the Destroyer, and the Patriarch during the encounter.

    Note: The most convenient source of Throw Magnetic Bomb is from the Elemental you fight before entering Qadim’s arena. Most groups will leave one alive to give the Solo Lamp Daredevil a ready source to steal Throw Magnetic Bomb from between pulls.

    If you don’t have Throw Magnetic Bomb and the Elemental is dead, you need to run to Qadim just as the fight starts, steal from him, and quickly run back to the main group for boons before entering the lamp.

    Make sure to steal Throw Magnetic Bomb before every Lamp phase.

    Entering fully buffed

    It is crucial to enter the lamp fully buffed. Every group will be aware that they need to stack boons just as the fight starts so you will be able to enter the Lamp with the core offensive buffs: Might, Fury, Alacrity, Quickness as well as some defensive ones like Protection or Regeneration.

    Navigating the lamp

    In the Lamp, you will traverse square rooms. Each room will have enemy mobs that will allow you to progress once a room has been cleared. The community has determined optimal routes to avoid the more dangerous enemies. Each Lamp has a different optimal route, highlighted in orange.

    You might want to use Assassin's Signet right at the start of every Lamp to speed up traversing it so it will be up again when you’ll exit the lamp.

    Throw Magnetic Bomb is best used on enemies that pose the biggest threats, or on enemies that do not line up for Trick Shot, resulting in being slower to kill:

    1. In the first Lamp, those are Hylek (second room) and Devourers (last room).
    2. During the second Lamp, Polar Bears (4th room) and Moas (5th room).
    3. When in the third Lamp, Dredge (4th room) and Giants (5th room).

    Once you reach the friendly legendary creature, you must communicate that to squad members on top. This can be done in voice or, as is commonly done in pick-up groups, by spamming your mount skill. A player in the main squad will “let you out” by killing the Lamp object in the center of the main arena.

    Latest video

    Latest Hardstuck video

    Streams

    We use cookies to provide necessary website functionality, improve your experience and analyze our traffic. By using our website, you agree to our Privacy Policy and our cookies usage.
    Got it!