
Qadim

Enrage: 13 minutes. When Enraged, Qadim gains stacks of Fiery Empowerment (20% more damage and 2% faster attacks per stack)
Tank: Proximity (closest)
Requires: Kiter, Lamp, Crowd Control
The fight occurs on multiple moving floating platforms, which paired with heavy usage of teleports and multiple enemies to take care of makes this one of the hardest and most confusing raid encounters. Prepare for a long guide followed by many hours of progression – stick with it! Getting your first Qadim kill is immensely satisfying.
Players will alternate between facing Qadim and Legendary Enemies from his menagerie. This encounter requires players to handle three special roles throughout the whole fight: Kiting, the Lamp, and Tanking.
Thieves are a particularly good pick here in this encounter as they fill Kiter and Lamp roles very well. In addition, thieves are good picks for stack DPS in this encounter due to access to great stolen skills:
- Qadim, Destroyer, and Patriarch:
 Throw Magnetic Bomb
 - Hydra, Matriarch, and every Pyre: Detonate Plasma
 Detonate Plasma
Kiting
The Kiter will be the “tank” of the main boss for the majority of the fight. Once engaged, Qadim will summon Lava Elementals on his current platform. Whenever a Lava Elemental reaches him, he will gain a stack of Fiery Empowerment, increasing his attack speed and damage. If there are no players on Qadim’s platform he will instantly gain 5 stacks and move to another platform. He will then repeat this until he reaches a platform with a player.
One player will Kite Qadim, staying on his platform and killing Lava Elementals before they can reach him. Often Rifle Deadeyes will perform this role as they have high passive sustain and can easily handle all spawning Lava Elementals.


Other common kiters are Daredevils and Scourges. Other DPS such as Dragonhunters and Soulbeasts can kite, but are much less common.
The Kiter must be aware of each of Qadim’s attacks. Qadim’s auto-attacks may be sidestepped but his Flame Wave attack will knock you back if not evaded.
Qadim also has a Flame Dance attack, which shoots flame across the patterns in the platform. These can be avoided by not standing in the lines on the platform.
Kiting requires practice as you must kill all Lava Elementals while remaining aware of Qadim and your surroundings. However, once learned, this role is very comfortable as Qadim’s attacks are consistent.
We recommend that the Kiter stays on the blue part of the platform since this allows you to avoid almost every attack. The exception to this is his Flame Wave. Overall, his attack pattern is very simple to remember:
- Flame Slash > Flame Slash > Flame Wave > Flame Slash > Flame Dance
- Flame Slash > Flame Slash > Flame Wave > Flame Slash > Flame Dance
- Flame Slash > Flame Slash > Flame Slash > Flame Slash > Call Meteor (Switch Platforms)
Lamp
Before each Legendary Enemy phase, a Lamp will spawn in the middle of the arena. One or more players will have to enter the Lamp, retrieving a friendly legendary creature who helps defeat enemy adds.
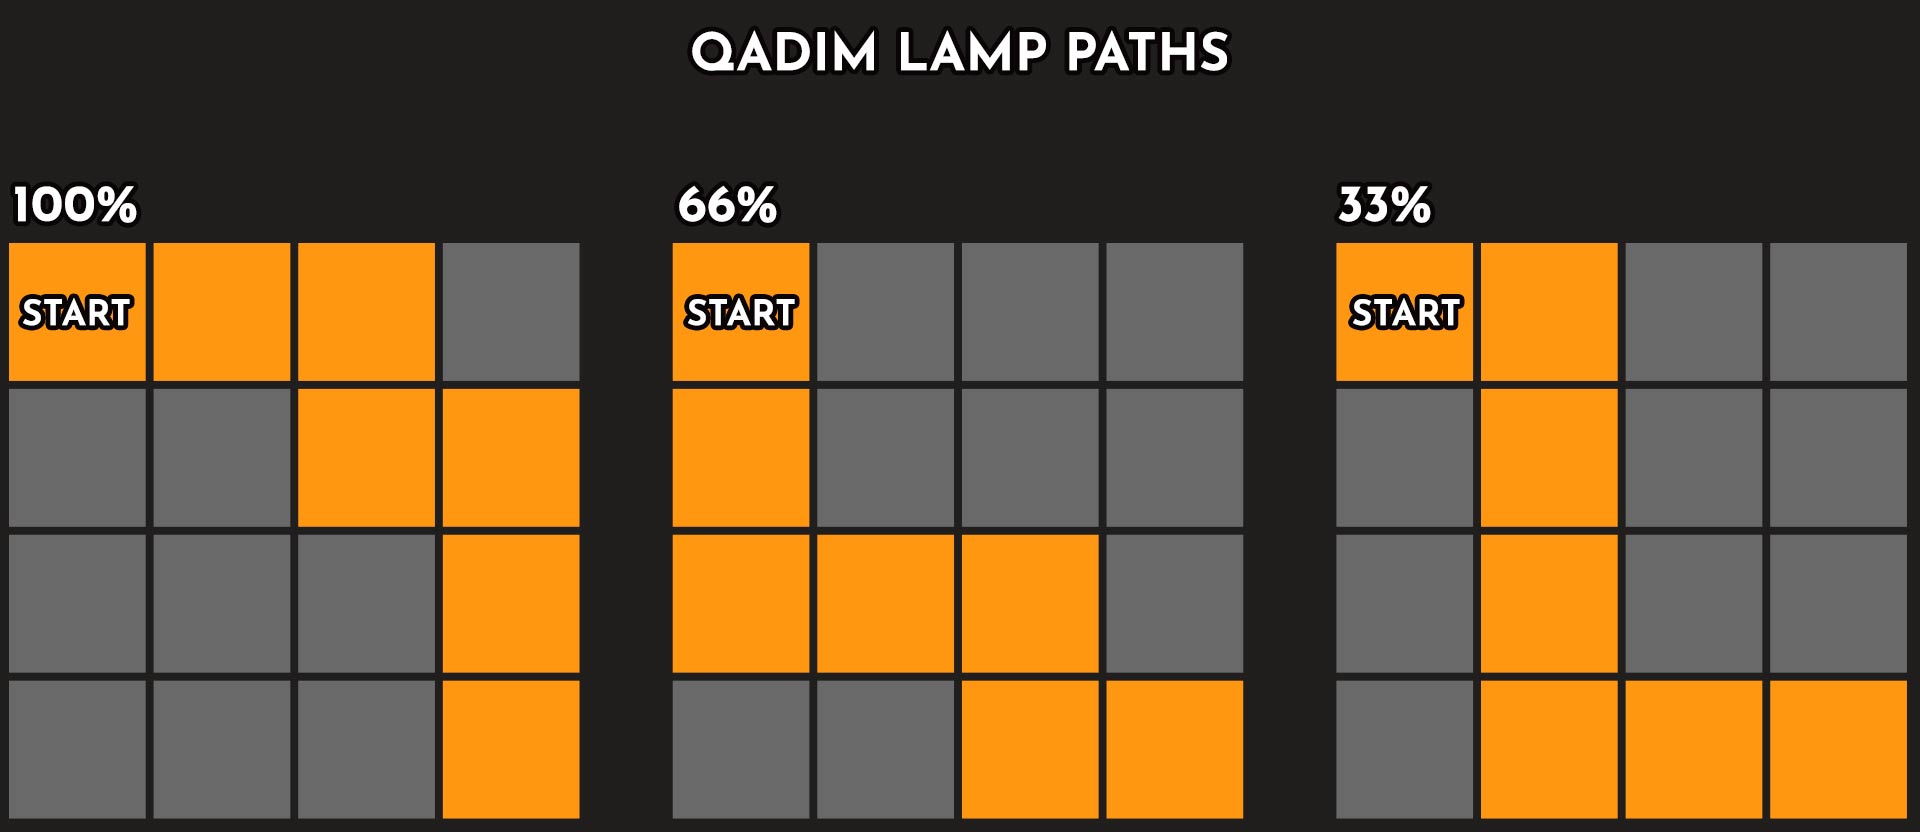
Players have to complete the Lamp three times: at the beginning of the fight, at 66% of Qadim’s HP and at 33%.
In the Lamp players will traverse square rooms. Each room will have enemy mobs, and will allow players to progress once these mobs have been defeated. These mobs are not random, so the community has determined optimal routes to avoid the more dangerous mobs. Each Lamp has a different optimal route, highlighted in orange.
Once the Lamp players have reached the friendly legendary creature, they must tell the main squad to open the Lamp: a player in the main squad will do this by killing the Lamp object in the center of the main arena. Commonly, Lamp informs the squad that they’re done by spamming their “Summon Mount” button in chat. Once the squad has opened the Lamp, one player in the Lamp will gain a green circle, porting up other players and the friendly legendary creature if in that circle. This will spawn the allied creature on the main platforms who will deal 80% damage to the current enemy creature in addition to briefly stunning it. The players that were in the Lamp will be launched into the air, slowly floating back to the platforms. These players can use a special action key to drop immediately to the platform.
Usually, groups will look for a “Solo Lamp” to handle Lamps 1 and 2. Lamp 3 is more dangerous, so groups typically send more players. This role can be filled by almost any DPS but is most often handled by a Power Daredevil with Staff/Shortbow because of how quickly a fully buffed Shortbow auto-attack can handle most of the Lamp mobs. Thieves will also gain access to the stolen skill  Throw Magnetic Bomb
Newer groups may choose to send multiple DPS players into each Lamp. This ensures the safety of the Lamp players, but reduces the overall DPS and crowd control capacity of the main squad. This fight has unforgiving breakbars – Lamp squad should be as small as possible to maximize the main squad’s crowd control.
Tanking
Any Tank is a good choice here, but Tank Chronomancers are popular picks due to the high value of portals in this fight.
One player will have to Tank three Legendary Enemies. Every enemy aggro in this encounter is based on proximity. This means that the enemies will fixate on whichever player is closest to the enemy. As Tank, you should aim to stand in the middle of each Legendary Enemy’s hitbox.
Qadim’s Menagerie
Each enemy has a set attack pattern: Autoattack > Autoattack > Special Ability.
When Qadim moves platforms, the Legendary Enemies will gain a red circle around them. All players must leave this red circle within two seconds, or they will be teleported to Qadim’s location, far from the group. For two of the Legendary Enemies, the Ancient Invoked Hydra and the Apocalpyse Bringer, this teleport will happen when they get their second breakbar.
Qadim
While often overlooked, Qadim can also be tanked during phases where you can damage him. Like every enemy in this fight, he is also a proximity tank; the closest player to him can point his attacks away from the group.
Qadim has four attacks:
- Auto attack: Qadim will raise a hand, dealing damage on this side of raised hand
- Flame Wave: Qadim will damage and knock players backward
- Shockwave: An orange circle will collapse on Qadim. Once it reaches him he will send out a shockwave, heavily damaging players and knocking them backwards. This should be dodged or jumped. Failing to dodge or jump often results in players instantly going downstate
- Lines: The floor pattern will be lit by leaping flames, damaging players standing on the lines
Qadim will become invulnerable after his second Shockwave attack, gaining a breakbar. Failing to break this bar will deal massive damage to the squad. If the squad does not believe they can break this bar they can quickly run to a Pyre platform on the outskirts of the arena to evade this attack. However, squads should plan to always break the bar, and rely on the platforms only if things have gone wrong.
Fight Overview
The encounter will begin when the Kiter approaches Qadim to begin Kiting. If “Solo Lamp” player doesn’t have Throw Magnetic Bomb
Shortly after engaging the boss, the Lamp will open in the center of the platforms. Designated players should stand in the telegraphed green circle to be teleported to the Lamp.
Note: As the tanking is proximity based here, it’s very easy to disturb tanking during the fight. All players need to be aware that being closer than the tank to any of the bosses during the encounter have potential to wipe the group. Make sure to always stay further from the boss than the tank.
Throughout the fight, platforms will be moving based on champions and the boss’ HP, and it can be confusing to remember every configuration, that’s why we prepared simplified animation of the whole fight with common portal placements.
Hydra Phase
The rest of the group will be confronted by the first Legendary Enemy, the Ancient Invoked Hydra. Each head of the Hydra will apply one of 4x
The tank can easily avoid Hydra’s cone-shaped auto attacks by sidestepping each attack or walking slightly behind the center of Hydra’s hitbox. Be careful to move back quickly though – avoid pointing the Hydra at your squad!
The Hydra’s special ability is a Flamebreath attack, which it will do after the first two auto-attacks. After two more auto attacks, the Hydra will gain a breakbar. Failing to break this breakbar will grant the Hydra 5x
After two more auto-attacks the Hydra will leap to a different platform.
You should remember: Attack > Attack > Flamebreath > Attack > Attack > Break the bar > Attack > Attack > Teleport
Once the Lamp players call for the Lamp to be broken one DPS can kill the Lamp, releasing an allied creature. If this aligns with the breakbar, you should always prioritize breaking breakbars over destroying the lamp.
The allied creature freed from the lamp will damage the Hydra for 80% of its health. Typically this will kill the Hydra, but lower DPS groups may need to finish it off. Once the Hydra has been killed, Qadim will spawn in the middle of the arena.
Pyres
Three Pyres will spawn around the arena, each of which will give Qadim a boon:
- North-West Pyre:
- South-West Pyre:
- East Pyre:
Different squads will choose to kill different Pyres. Groups heavy with condition DPS should kill the
Additionally, each unkilled Pyre will spawn bouncing Fireballs. Any player hit by these fireballs will go downstate. If hit in downstate, the player will die. Newer groups may choose to kill all three Pyres to avoid these Fireballs.
One common strategy is splitting into two groups and killing two of the three Pyres. Two players can place portals like  Portal Entre
 Shadow Portal
These players can then portal their group back to Qadim to maximize DPS uptime.
Commonly, the Kiter’s subgroup will go to the  Winds of Disenchantment
Qadim (100%-66%)
At the same time as Pyres, three Greater Magma Elementals will spawn tethered to four Lava Elementals each. If these Lava Elementals reach Qadim they will give him stacks of Firey Empowerment. These Lava Elementals will be invulnerable until their Greater Magma Elemental reaches 50% health or until their Greater Magma Elemental is pulled out of range of them.
Commonly, Mesmers will use  Into the Void
Players must handle Qadim’s attacks and his breakbar until phasing him at 66%.
Destroyer Phase
At 66% of Qadim’s health the platform will morph, but the locations of Qadim, his Lamp, and his menagerie will remain the same. The Kiter will return to Qadim, the Lamp will return to the Lamp, and rest of the squad will handle the second Legendary Enemy: Apocalypse Bringer.
Apocalypse Bringer will spawn with a breakbar and three Reapers of Flesh. Players should stack inside the boss’s hitbox to lure adds in and instantly break its breakbar. Failing to break this bar will spawn additional Destroyers at Qadim’s platform, potentially killing the Kiter.
After this, group should move out from the boss’ hitbox and cleave down the three adds. These adds will also have breakbars – if the squad is struggling to cleave or outheal their damage players can break the adds’ breakbars as well.
Apocalypse Bringer’s basic attacks are large cone-shaped areas of effect from the right side of his body. These can easily be avoided by the tank moving slightly to their right, towards the boss’s left side.
Like other bosses, Apocalypse Bringer’s pattern is static: Attack > Attack > Special Ability. Apocalypse Bringer’s special ability is a shockwave, which radiates outwards. This can be jumped over or avoided using  Warding Rift
 Blurred Frenzy
Destroyer’s attacks: Attack > Attack > Shockwave > Attack > Attack > Second Shockwave > Attack > Attack > Break the bar
Pyres + Qadim (66%-33%)
Platforms will move again and the second set of Pyres will spawn around the arena. These Pyres are one platform counter-clockwise as compared to their original placement. Once killed, this boss phase is the same as the first boss phase.
Wyverns Phase
When Qadim reaches 33% health the platforms will transform again and the last set of menagerie adds will appear: Wyvern Matriarch and Patriarch.
In this phase, squads will often send more players into the Lamp as this set of mobs can be more deadly.
Meanwhile, the Kiter will return to Kiting, and two players will handle Tanking the Wyverns; One player will need to tank the Matriarch away from the group, while the other player will tank the Patriarch with the remainder of the squad. Both Wyvern’s attack with two basic swings, which can be blocked or dodged. After the basic swings they will do a Flamebreath attack or a Tailswipe.
A Spellbreaker is often assigned to tank the Matriarch due to its many defensive skills like  Counterblow
 Full Counter
Once Lamp has completed, Zommorros will arrive to tank the Patriarch. He will hit the Patriarch for 25% of his health with each of three attacks for a total of 75% damage overall. He will then jump to the Matriarch, also dealing a total of 75% to her health.
After attacking both Wyverns, Zommorros jump to Qadim’s platform, taking over Kiting and allowing the Kiter to return to the group.
Players can avoid the swipe attacks by dodging or using skills like CounterblowFull Counter Echo of MemoryBlurred FrenzyWarding Rift
Pattern for the Wyvern attacks:
Matriarch:
Tailswipe > Slash > Firebreath > Tailswipe > Slash > Slash > Push attack > Firebreath > Teleport
Patriarch:
Tailswipe > Slash > Firebreath > Tailswipe > Slash > Slash > Break the bar > Teleport
The Wyvern Patriarch will gain a breakbar; failing to break this bar will result in him destroying his current platform and leaping to another platform. Always prioritize breaking this breakbar, even over breaking the lamp.
The Wyvern Matriarch will occasionally push players off of her platform. The Matriarch Tank must point her away from the Patriarch platform and step behind her whenever she telegraphs an attack.
Note: Zommorros is an erratic tank, baiting the Patriarch’s attacks in surprising directions. Players should be prepared to block, sidestep, and evade the Patriarch’s attacks.
Jump Puzzle + Qadim (33%-0%)
Once the Wyverns are defeated Qadim will start to evaporate the platforms. The squad should group up on Zommorros’ protected platform where he will cure conditions, apply
Note: On the way to Zommorros, Chronomancers will usually place Portal Entre
Platforms will respawn, spinning erratically. Additionally, two Pyres will spawn (
Players will again face Qadim. In this final phase players can use Zommorros’ bubble to survive some attacks. For example, if the squad is down some players, the squad can enter Zommorros’ bubble to survive failing Qadim’s breakbar.
At 15% Qadim will leap to another platform. Two Greater Magma Elementals will spawn on this platform with their associated Lava Elementals, which players should cleave down to avoid allowing Qadim to gain stacks of Fiery Empowerment.


