
Kaineng Overlook (CM)

Enrage: 16 minutes. Once enraged, everyone dies
Required: Swiftness, Crowd Control, Stability, Protection, Direct Healing
Recommended: Damage reduction food
Kaineng Overlook’s Challenge Mode updates most Normal Mode mechanics by increasing the deadliness and relevancy of each. While there aren’t too many new additions and each incremental change does not completely turn the fight upside down, the combination of ramping intensity and an ever increasing amount of overlapping mechanics makes this a very difficult fight to master.
Coordination here is very important; this is one of the very few fights in Guild Wars 2 that strongly benefits from voice communication. The encounter itself has a relatively generous enrage timer, allowing you to focus solely on executing mechanics properly. As a group, prioritize working together, remaining calm, and above all else: staying alive.
Upon enabling the CM, the railings on both platforms will disappear. This encounter has a number of knockback and push mechanics, which make it easy to fall off the platform and instantly die. As such, having
While there are a ton of mechanics across the encounter, they always occur in a consistent sequence in each phase. This makes it very important to be familiar with the Normal Mode encounter before trying the Challenge Mode.
The split phases with Minister Li’s Elite Guard will require a dedicated player or two for kiting/tanking; because of the relatively low damage pressure and the fact that most attacks can be avoided outright, these roles are best filled by ranged DPS classes. Due to its 1200 attack range and its ability to pierce through enemies,  Virtuoso
More information on Tanking and Kiting can be found in the Enforcer and Tanking the Mech Rider sections of this guide.
Minister Li: 100% – 66%
The first phase of Kaineng Overlook CM is very similar to Normal Mode, with each mechanic (with the exception of his Dash) being updated to be more threatening.
Li’s attack pattern is the same as in the Normal Mode with the addition of one Green mechanic:
- Green+Cleave in the center towards a random player
- Dash to the corner
- Green+Cleave towards the middle
- Dash to the middle
- Numbers
Cleave
Li will cast his Cleave about 5 seconds after charging it up. This attack is not telegraphed and cannot be dodged or blocked in CM.
If Minister Li is in the center, he can rotate with this attack for up to around 2 seconds before using it. If he is in a corner, he will always Cleave towards the center.
In later phases, if Cleave does not line up with a Spread, simply move behind the boss to avoid the knockback. Otherwise,
Having skills like  "Stand Your Ground!"
 Mantra of Concentration
 Mantra of Liberation
 Stalwart SpeedMantra of Liberation
Numbers
In CM, Minister Li will mark five players with numbers instead of three; after 12 seconds Li will send a wave in the direction of each marked player in ascending order.
Each wave will explode on the marked player and apply an upgraded
Each player will now also place lethal lingering red AoEs on the ground when hit by an explosion.
While the explosions can be blocked or dodged, their damage is minimal, making it easier to tank the hits instead. Furthermore, dodging will often lead to misplacing the AoEs, since they will still be placed after a delay; don’t drop them on the group!
Once the AoE is dropped, players can simply walk out of it and toward the group; the damage doesn’t activate immediately.
Until the last phase, marked players should avoid the corners and place the red AoEs on the flat edges of the platform, as Minister Li can dash to any corner after this mechanic. Marked players should also make sure to spread out from the other Numbers, as the explosion that applies

Note: In CM, the waves will not explode on unmarked players, so as long as these players stay towards the center of the platform (and away from marked players), they will be safe even if a wave passes through them.
Greens
Known as: Stack
In CM, the stacking Green Circle mechanic from the last phase of NM will spawn from the start of the encounter. If there are fewer than three players inside of the green circle when it closes, it will explode, downing the entire squad.
The player marked with the Green should always stay with the group behind the boss. If Minister Li is in a corner, this is self-explanatory, but if he is in the center of the platform, be prepared to use
The Enforcer, Ritualist and Mindblade
There are a few new additions to the mini-bosses’ arsenals in this phase, but as with the rest of the fight, it ends up being very similar to its NM iteration, with most mechanics being updated to be deadly or simply deal more damage.
Due to these similarities, squad positioning and tanking strategies are essentially the same as NM: the squad should keep The Mindblade and The Enforcer out of tether range to prevent them from gaining the ![]() Lethal Inspiration buff, while cleave damage between The Mindblade and The Ritualist should be facilitated by The Mindblade’s Tank.
Lethal Inspiration buff, while cleave damage between The Mindblade and The Ritualist should be facilitated by The Mindblade’s Tank.

Attacks performed during this phase are “queued”: this means that once you eliminate one of the bosses, the other bosses’ attacks will occur more frequently in accordance with the phase’s predefined pattern.
The best order of priority for the bosses is exactly the same as in NM:
- Mindblade (while cleaving the Ritualist)
- Ritualist
- Enforcer
This order is the most convenient as it allows you to damage two mini-bosses at once, while also nullifying the most coordination-sensitive mechanics first.
Enforcer
In CM, The Enforcer won’t instantly teleport to the middle like in NM, so one player must Kite him by taking his aggro (by being the nearest player) and holding him in his initial spawn spot to keep him away from The Mindblade, which prevents them from stealing life and gaining boons from ![]() Lethal Inspiration.
Lethal Inspiration.
Ideally, the Kiter will be a DPS player with self-sustain and long-range cleave potential, such as a Virtuoso Scourge
The Kiter can return to the group when The Enforcer starts Dashing but should return to Kiting once the Bladestorm attack is finished.
After teleporting to the middle, the Enforcer will perform a series of Dashes, leaving flames behind in an hourglass pattern. These flames apply a stack of ![]() Infirmity for every second that a player stands in them, which reduces incoming healing by 25% per stack. You can
Infirmity for every second that a player stands in them, which reduces incoming healing by 25% per stack. You can  Dodge
Dodge
Bladestorm
After Dashing, The Enforcer will cast a Bladestorm. This attack has two sequential layers in CM: an outer
You can use Dodge
During the Bladestorm, the Enforcer will now also lob Fireballs around the platform. Getting hit by a Fireball applies ![]() Debilitated, which reduces outgoing damage by 25% per stack.
Debilitated, which reduces outgoing damage by 25% per stack.
Each Fireball AoE has a small radius and lands along the edge of the outer
It is very common for groups to stand on the edge of the platform to avoid getting hit by Fireballs, but it is safer to simply stack slightly behind the black lines on the floor or stand behind The Ritualist, closer to the center (be careful of The Enforcer’s fixation once the Bladestorm ends, though).
Slam (Known as: Spread, Heaven’s Palm)
In CM, the entire squad will be targeted by The Enforcer’s Slam attack. Each squad member will take moderate damage from their own AoE, but if players are in two or more as the attack comes out, they’ll be put into downstate.
The Slam can be blocked, and while you can Dodge
Prioritize staying alive, especially if you have ![]() Infirmity stacks – instead of greeding for DPS, give your squadmates as much space as you can while spreading.
Infirmity stacks – instead of greeding for DPS, give your squadmates as much space as you can while spreading.
Mindblade
Of the three mini-bosses, The Mindblade’s auto-attacks are the most threatening, which can make it difficult to tank her without healing. The group should stick with The Mindblade’s tank and focus damage on her.
She will fixate on the closest target at the start of the phase and at regular intervals. Make sure she is moved to the proper tank spot before using skills that apply
Healers are a very good choice to tank the Mindblade. If you’re aiming to Tank, ensure you’re the closest person to The Mindblade to gain her fixation, then bring her to The Ritualist (preferably closer to the wall to avoid tethering her to The Enforcer). This allows your group to cleave both the Mindblade and the Ritualist together.
Unstable Bladestorms
In CM, this attack has been converted into a hybrid of the two NM variations. Now, six AoEs will travel outwards from The Mindblade, dealing heavy damage and applying stacks of ![]() Infirmity.
Infirmity.
To avoid these AoEs, step outside the telegraphs and quickly Dodge
Timed AoEs (Known as: Pools, Puddles)
In Challenge Mode, The Mindblade will spawn Timed AoEs that target two random players. The targeted players will drop five deadly red AoEs on the ground, one at a time.
The dropped AoEs only deal damage after a short delay, so players have time to simply walk out of each AoE after it’s been dropped.
Targets of this mechanic should place the AoEs along the shorter sides of the arena. Ideally, the two players should stack the AoEs together on one side to allow for the most space on the platform, but they must move as one unit; if one player falls behind they will likely die to the other player’s AoEs.
Furthermore, targeted players should start from one of the far corners of the arena, if possible, while moving towards the group, as subsequent mechanics require the group to stack up. They should always prioritize their own safety, however – there is always adequate time to reach the group even if the final pool is placed in the furthest corner instead.
Note: The Timed AoEs are extremely deadly and take priority over other mechanics. Even if you are currently fixated by one of the mini-bosses, you must prioritize moving with your AoE.
Ritualist
Ghosts + Green
In CM, The Ritualist’s Ghost mechanics cover a much larger area of the platform. He will alternate between casting two versions of this attack: the first version has five Ghosts that will down and launch you if you fail to move out of their AoEs, while the second version with four Ghosts will only down you.
Standing in any overlapping areas of either version of this attack will instantly kill you.
During both Ghost attacks, two random players will also be targeted by the Green mechanic. As in other phases of this fight, at least three players must be inside each Green at detonation. Failure to do so will down every player.
Note: The players stacking in the Greens don’t have to be unique. This means that at minimum, having the two players with Greens and one additional player is sufficient to handle both circles at once.
During the five Ghosts variant of this attack, the group can stay at the Ritualist’s spawn spot, while the Kiter moves The Enforcer to the opposite safe spot (unless they have a Green). Stack in Greens there and continue with the encounter. During the four Ghosts variant, you will have to move. There will be small safe zones under each of the Ghosts – stack in one safe zone with the Greens until the Ghost attack finishes.
Lightning Storm
The Ritualist’s Lightning Storm will strip boons on hit. Furthermore, the larger AoEs will apply a short-duration ![]() Debilitated. The attack is not particularly threatening damage-wise, but still try to avoid the AoEs regardless.
Debilitated. The attack is not particularly threatening damage-wise, but still try to avoid the AoEs regardless.
You can step out of the AoEs, Dodge Tome of Courage
 Epilogue: Unbroken Lines
Strategy
To be efficient in this phase, the group will be positioning themselves exactly as they would in Normal Mode. This only requires players to be extra careful during Fireballs and react quickly to Timed AoEs.
Here is a quick summary of ideal positioning and reaction to each of the initial mechanics. After finishing this sequence, the squad should be left with only The Enforcer and his mechanics to contend with; if your squad’s DPS is lower, however, you may have to handle more of the other mini-bosses’ mechanics. If this happens, the loop of mechanics will simply restart with the Bladestorm:

- At the start of the phase, the Kiter should stand near The Enforcer and hold him at his spawn point. Everyone else should stack on The Ritualist, while the Tank should stand near The Mindblade, grab her fixate, then bring her to the group. The squad should focus on The Mindblade but cleave The Ritualist with AoEs like Scourge shades and skills that pierce.
- Once The Enforcer teleports for his Dashes, the Kiter can return to the group.
- Players should use
,  Dodge
DodgeAoE just before the Bladestorm, then avoid the Fireballs landing around the arena by standing on the edge of the platform or slightly to the side. - After the red Bladestorm AoE disappears, The Mindblade and The Enforcer will refixate on the closest player to each.
- Players must quickly react with Timed AoEs and place them along the shorter side(s) of the platform, starting from the farther corner and stacking them if possible.
- The two players should return to the group after placing the last Timed AoE and stack in the Greens. If The Enforcer’s Kiter is targeted by a Green, either two players should run toward them or the Kiter should return to the group.
- The Enforcer will do his Slam after the Ghosts disappear, and refixate afterwards. At this point, if The Mindblade is very low (5-10% HP), quickly finish her off while The Enforcer’s Kiter brings him to The Ritualist. Otherwise, move The Mindblade instead to The Ritualist and finish them off together.
- The phase mechanics loop at this point, sans the mechanics from any killed mini-bosses: Bladestorm Timed AoEs (if The Mindblade is alive) Ghosts+Greens (if The Ritualist is alive).
Minister Li: 66% – 33%
The second phase of Minister Li in CM is mostly the same as NM pattern-wise, with the addition of a Cleave+2x Green combo replacing a few of the Cleave+Spread mechanics in the corners.
The phase starts with Minister Li Dashing to the far-left corner (from the Zip Line), then moving clockwise between the corners while interchangeably performing these two combos in each of the corners, before Dashing to the center for Numbers. The whole rotation looks as follows:
- Dash to the corner
- 2x Green+Cleave towards the middle
- Dash to the corner
- Spread+Cleave towards the middle
- Dash to the corner
- 2x Green+Cleave towards the middle
- Dash to the corner
- Spread+Cleave towards the middle
- Dash to the middle
- Numbers
Spread
In CM, only the four closest players to Li are targeted by the Spread, rather than five, but the AoEs are much larger than in NM.
Mechanically, the Spread behaves similarly to NM, where being in two circles when they explode will instantly downstate that player; consequently, exactly one affected player can stay in the corner with the group and will deal very little damage with their explosion.
The Spread mechanic makes the knockback on Cleave much more threatening, as part of the squad needs to stand in front of the boss while being unable to dodge or block the Cleave due to the Challenge Mode changes.
You will have a few seconds from the moment the Spread AoEs appear before the Cleave happens. Cast
"Stand Your Ground!"Mantra of LiberationMantra of ConcentrationMantra of LiberationStalwart Speed
You can leave the distribution of this mechanic completely to chance, or you can assign specific players to bait the AoEs. Healers and support players can go to the boss first to bait the AoEs, quickly distribute offensive boons and
Advanced Positioning
If your group is well-coordinated, or you are trying to get the achievement A Test of Your Reflexes for more than six players at once, you can assign four players to get to Minister Li first to bait the Spread mechanic.
Those players should then pick between three spots safe from Minister Li’s Cleave for their AoEs, while the fourth person will have to either stack in front of the Minister and tank the Cleave with Dodge
One person with the Spread will stand in the corner behind the boss with the group, while the two other safe-zone Spread players will stand on the sides of Minister Li’s Cleave attack.
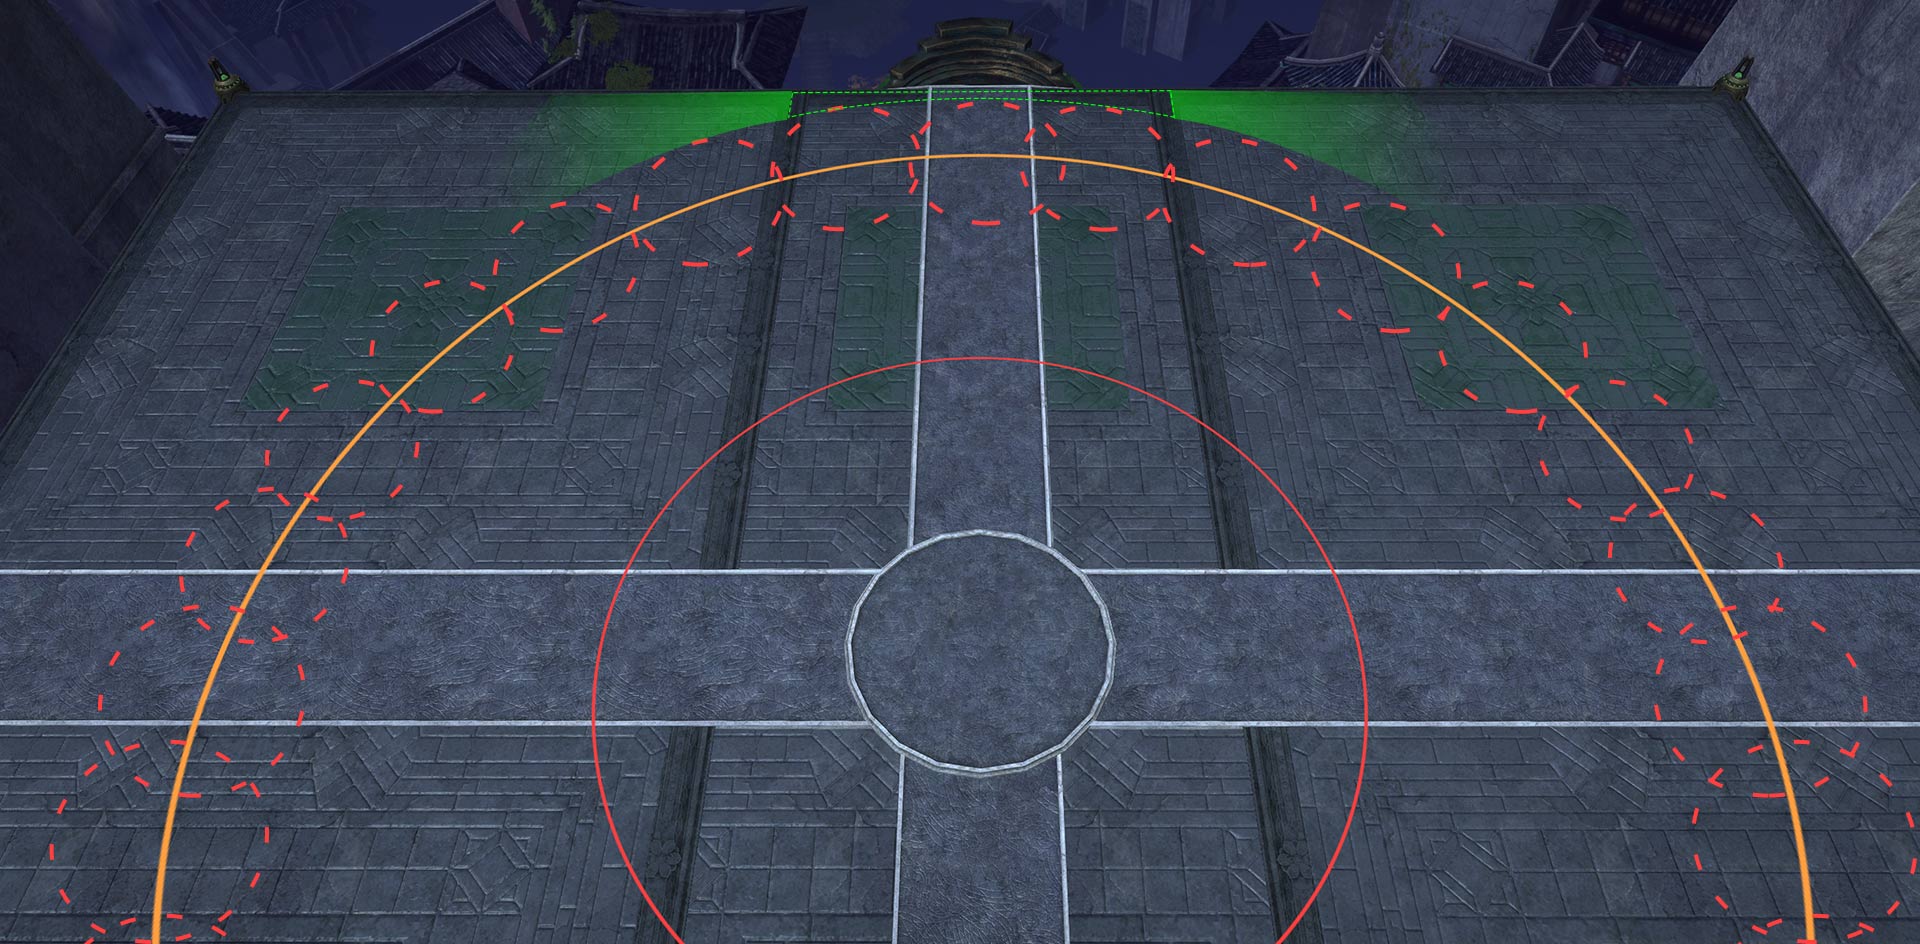
The platform itself has two side safe spots “engraved” in each corner that can be used as markers for where to stand:


The Mech Rider and Sniper
This phase of the fight is often the trickiest to learn and execute on due to the many varied and deadly mechanics overlapping across the phase. Thankfully, the phase can be simplified significantly with proper Mech tanking and good positioning of Ricochet shots.
The general mechanic of a ![]() shared health pool for the two mini-bosses remains the same. Their HP difference is still indicated by the number of stacks of
shared health pool for the two mini-bosses remains the same. Their HP difference is still indicated by the number of stacks of ![]() Equalization Matrix on each, and upon reaching over twenty stacks (i.e. going over a 20% difference in HP), the bosses will equalize their health bars and gain
Equalization Matrix on each, and upon reaching over twenty stacks (i.e. going over a 20% difference in HP), the bosses will equalize their health bars and gain ![]() Enhanced Destructive Aura.
Enhanced Destructive Aura.
The ticking damage from ![]() Enhanced Destructive Aura is much higher than in NM. Additionally in CM, the whole squad will have their boons corrupted on equalization. Corrupted
Enhanced Destructive Aura is much higher than in NM. Additionally in CM, the whole squad will have their boons corrupted on equalization. Corrupted
Avoid going over 20 stacks of ![]() Equalization Matrix at all costs.
Equalization Matrix at all costs.
If the group is trying to get The Great Equalizer title, you should DPS both enemies down to slightly below 30% HP, then kill The Sniper. This will ensure you only get equalization at the end of the phase.
The entire squad should be aware of
Equalization Matrix – at 18 stacks, get ready to spam condition cleanses as soon as the boon corrupt occurs. Any source of
on the group after the boon corrupt, especially AoE skills like , will give the squad much-needed breathing room to cleanse all conditions. If, as a DPS player, you have condition cleanses in your kit (like
), you should avoid using them as part of your rotation and instead use them for cleansing at this point. For example, and preceded by can single-handedly control this mechanic. Plan ahead for when you’ll trigger equalization – avoid having it stack with other difficult mechanics. One option is to trigger it when The Mech Rider marks players with Numbers. This mechanic has a bit of downtime before activation, within which you can trigger the
 Chapter 4: Stalwart Stand
 Nefarious Favor
 Purging Flames
 Cleansing Flame
Mech Rider
In CM, all but one of The Mech Rider’s attacks are inherited from Normal Mode, but are made more threatening. Its melee attacks now do more damage and apply ![]() Debilitated (reducing outgoing damage by 25%), while its Barrage applies a 50-second
Debilitated (reducing outgoing damage by 25%), while its Barrage applies a 50-second
Spread + 2x Green
During his Pushback attack, The Mech Rider will spawn four large AoEs on players that work the same as Minister Li’s Spread mechanic, and two Green AoEs on two random players.
Just like the rest of the encounter, the Green circles require at least three players inside at detonation and will wipe the squad if failed.
There are other Spread and Green mechanics during this phase that will be detailed later, but this deadly combo only occurs during the Pushback and is very high priority.
Mines
During the Pushback, The Mech Rider will also drop Mines around the platform. These deal heavy damage while stepped on but can be dodged, blocked, or evaded.
The squad should aim to clear the mines from the arena: players with channeled blocks like  Static Shield Dodge
Handling these overlapping mechanics is not too bad, as long as the group is not affected by The Mech Rider’s Pushback.
Players are only pushed back if they are within about 400 range of The Mech when it starts the Pushback proper, so the group should start this phase stacked near The Sniper, as she always spawns out of range of the attack. From here, the group should focus DPS on The Mech Rider from range while cleaving the Sniper. Watch out for ![]() Equalization Matrix!
Equalization Matrix!
Numbers
The Mech Rider will mark five players with Roman numerals, and after charging this attack up, rush at them in ascending order.
This attack applies ![]() Float) to any player hit by it; getting hit a second time while under this effect will instantly kill you.
Float) to any player hit by it; getting hit a second time while under this effect will instantly kill you.
Marked players should spread out slightly, preferably staying closer to the center (due to The Sniper queuing up Ricochet), and Dodge
Barrage & Jade Lob
If The Mech Rider doesn’t have a player in front of it and within in its range, it will shoot out four Barrages towards a player; these do heavy damage and apply
It is very important that either The Mech has a Tank at all times, or if it won’t have a Tank for a moment, this fact is communicated quickly.
Tanking the Mech Rider
This phase becomes much more managable when a player Tanks The Mech Rider properly.
Any player can take the role of the Tank, as this role only requires you to sidestep the Mech’s highly telegraphed auto-attacks. Usually the Enforcer Kiter will also Tank the Mech, as this role also benefits from ranged piercing damage or cleave: VirtuosoScourge
The Mech Rider has a pseudo-proximity fixate. It will aggro on a player in front of it within about 400 range, prioritizing Line of Sight (LOS). This means that The Mech will fixate on a farther player standing in front of it over a closer player behind it.
At the start of the phase, The Mech Rider will spawn facing the upper platform; to capture the initial fixate, stand on this side while being inside its hitbox.
The Mech Rider’s melee auto-attacks always come in sets of two, so the Tank can reposition The Mech in any direction after the first auto-attack without breaking fixation.
Do not move too much between these sets; always move slightly toward the edge of the auto-attack cones. Moving at too far an angle, or excessively wiggling, is what causes The Mech’s fixation to break even when a player is in melee range.
The Tank should always stand in front of the Mech, pointing it away from the group, to ensure they will avoid its auto-attacks. One good direction to tank the boss is toward the upper platform, as The Sniper cannot teleport up there for her mechanics.
Teleport skills such as  Blink
Blink Sand Swell
Note: If the Tank understands the fight’s pattern well, they can move out right before the Pushback occurs (meaning that they won’t be affected), then dodge back in right before it ends, avoiding any Barrages without the need for a teleport. This requires some practice, but means any class can tank quite comfortably.
Due to the random nature of targeted mechanics in this encounter, there are a few situations which can disrupt your flow as a tank: namely, if you are targeted by The Mech’s or The Sniper’s Greens or by The Sniper’s Ricochet. In both cases, communication with your team will allow you to cleanly adapt.
- Mech’s Green:
If you are targeted by the Mech’s Green, let yourself be pushed back into the group. Communicate that the Mech needs a temporary tank while you handle the Green. It’s better to have the group deal with a Barrage than for the entire squad to go downstate from failing the Green, so always prioritize the Green. - Sniper’s Green:
If you are the target of the Sniper’s Green, your group will be running towards a Zip Line. Communicate that the Mech needs a temporary Tank, group with the squad to complete the Green, then move back to The Mech. - Ricochet:
If you are the target of the Sniper’s Ricochet attack, you have two options: either stay by the Mech while keeping the Ricochet AoE away from the group and ask someone (preferably a healer) to “bait” the next shot by standing closer to the Sniper, or ask for a temporary tank while you move towards the Sniper and wait for heals.
Sniper
The Sniper will alternate between her Jade Ricochet and her Snipe (and the extra mechanics associated with each) for as long as she’s alive.
Jade Ricochet (Known as: Orange)
In CM, Jade Ricochet cannot be blocked or reflected and will be fired three times total. Her first shot will be 10 seconds after picking her target, while the next two are fired 4 seconds after the previous shot.
The target of the Ricochet will be surrounded by a faint 600 range AoE; if anyone but the initial target stands inside this AoE when the Sniper shoots, the target will be hit by multiple Ricochet shots and instantly defeated.
Once the Sniper picks her first Ricochet target, most of the players on the platform will gain a small Spread AoE under their feet as well, so make sure to not be in two circles as usual.
As a non-fixated player, never enter the red AoE for any reason. Even if you mean well (like trying revive the fixated player if they’re down), the only thing you will accomplish is outright killing the targeted player, especially on the quicker second and third shots.
The Sniper will always pick her target based on proximity. When she initially teleports (randomly) to one of her seven perches, she will fixate on the player closest to her. Her fixate will update after each shot, again on the closest player (whether that’s the same player or a new one).
Additionally, The Sniper will jump to an adjacent platform after refixating on her 2nd and 3rd targets; the refixation always occurs before she moves. She will only jump in one direction in one Ricochet sequence, meaning you can predict her movement after seeing where she jumps the first time, and position yourself accordingly.
Note: The Sniper can jump the gap made by Minister Li’s platform (which is not a valid perch for her) during Ricochet, so players on the opposite side need to be prepared to deal at least one of the shots if she decides to jump in the direction of the gap.
There are two ways to handle the Ricochet targeting. First, your squad can choose to distribute its damage by positioning new players closer to the Sniper than her current target, to bait out subsequent fixates. This strategy can be dangerous, however, as it requires players to move towards the Sniper without entering her Ricochet radius.
A more efficient and less chaotic strategy is to keep one player as the focus of her Ricochet and simply outheal its damage. As this strategy only requires the targeted player to move, it is the easiest strategy to execute, making it the most popular way of handling this mechanic. If you choose to outheal the Ricochet, the target of the attack should move out of the group to the corner closest to the Sniper while the squad’s healers spam ranged heals on them. To further simplify the strategy the healers can equip toughness gear and then completely handle the mechanic themselves; after the two green circles during pushback and also during mech numbers the healers can take up positions on the north-east and south-west sides of the platforms so that one of them is guaranteed to be targeted by the sniper, they can then simply outheal themselves and endure the damage thanks to having toughness and damage reduction.
While this strategy is the most straightforward, it requires excellent ranged healing and benefits heavily from ranged barrier, making Heal Firebrands and Condition Scourges very strong. Ranged resurrection skills are especially useful; utility skills such as Scourges’  Signet of Undeath
 Function Gyro
 Signet of Mercy
Staff

 Recommended
- Weapon Mastery
Pistol


Snipe (Known as: Red)
The Sniper will teleport to one of the four corner perches (with a Zip Line) and gain a defiance bar.
If her bar is broken in time, she will be
She will also spawn a single Green on a random player when she teleports up for this mechanic.
In CM, this attack is telegraphed by a solid red line instead of the green telegraph from NM.
Note: The Green AoE may not register players as stacked if they are in transit on the Zip Line at detonation. This means the group should first stack and wait for the Green to explode, then take the Zip Line up to break the Sniper’s defiance bar. To maximize CC time, stack in the corner closest to the Sniper so you can go up as soon as the Green has detonated.
Strategy
At first, this phase may be overwhelming. However, the mechanics always happen in a set pattern (which repeats), allowing the group to position properly before a mechanic starts, rather than having to react every time:
- Mech: Pushback (+ Greens + Spread)
- Sniper: Ricochet (+ small Spread)
- Mech: Laser at the end of Ricochet, on 3rd snipe
- Sniper: Red Snipe (+ Green)
- Mech: Numbers (+ Spread)
- Sniper: Ricochet (+ small Spread) at the end of Numbers, on IV
- Mech: Laser at the end of Ricochet, on 3rd snipe
- Sniper: Red Snipe (+ Green)
This phase starts with The Mech Rider spawning in the middle, facing the upper platform. The Tank should stand directly in front of The Mech, while the rest of the group moves to The Sniper, wherever she spawns.
The group, while stacked on The Sniper, should focus DPS on The Mech Rider while cleaving The Sniper. This prevents equalization from being an issue, and also prepares the group for the Pushback; by stacking on the Sniper, the group avoids the pushback, allowing them to easily handle stacking the Greens on the group and separating the Spreads away.
Handling the Snipe is as easy as stacking in the Green and taking the Zip Line up to break the Sniper’s defiance bar. If the Tank is properly handling the Mech, the only truly threatening mechanic is the Ricochet, which can be negated with positioning and overhealing the Sniper’s target.
Minister Li: 33% – 0%
The last phase of Minister Li is similar to his second phase, but with more overlapping mechanics. This forces slightly different positioning.
The most important thing in this phase is to take it easy, take a deep breath, and focus on the mechanics. The enrage timer is typically a non-issue here – if you have to auto-attack to stay alive do so!
The mechanics are in a consistent sequence, so if multiple mechanics are up handle them in order: Spread Greens Numbers.
Remember is to use your
Note: If you don’t have enough players alive to properly distribute players with all the mechanics, you can still handle the Green. Go out for the Spread detonation, then quickly stack back up in the Green.
The order of the attacks is as follows:
- Dash to the corner
- Spread+Numbers towards the middle
- Dash to the corner
- Greens+Cleave+Spread towards the middle
- Dash to the corner
- Greens+Numbers towards the middle
- Dash to the corner
- Greens+Cleave+Spread towards the middle
- Dash to the middle
- Greens+Spread+Numbers
- Loop resets here, but Li stays in the middle for the first attack, which is Spread+Numbers

During the Numbers+Greens attack, it’s always best to place the Number AoEs far from the group, giving players ample room to handle other mechanics.
The higher number values have enough time to stack in the Green and spread out safely afterward, but the players marked with I and II should move out in preparation for the wave attacks on the Numbered players which will follow Green shortly after it’s completed.
If you have Numbers I or II and a Green you may need to move slightly out of the group, but ensure three people move together to handle the Green.
If players get stacking mechanics, for example, if one player gets Numbers + Spread, or Numbers + Green, prioritize handling the Spread first, then the Green, then Numbers. The same rule applies if there are only a few players alive, prioritize having players in the Green and prepare to get out as fast as possible afterward to handle other mechanics.
There are a variety of scenarios that may occur with overlapping mechanics – we can’t give you a strategy for every one of them. Simply stay calm, communicate with your team, and prioritize keeping yourself and your squadmates alive while handling each mechanic in sequence.


