
World Bosses : The Compendium

World Bosses are map-specific large-scale Meta Events. Those fights are usually very cinematic, sometimes offer unique drops, and almost always have achievements connected to them.
This is the list of Core World Bosses overview offering a cheatsheet-like map and description to quickly inform you of what to do during each encounter
Those bosses are available for all players, including Free-to-Play accounts, some of those events are even part of organized Meta Event Trains.
Svanir Chaman Chief
Map: Wayfarer Foothills

- Protect Tor the Tall’s supplies from the Grawl
- Protect Scholar Brogun as he investigates the Grawl tribe
- Destroy the Dragon Totem
- Destroy the corrupted portals summoning creatures from the mists
- Kill the Svanir shaman chief to break his control over the ice elemental
Stay in the Village until the “Protect Tor the Tall’s supplies from the Grawl” event spawns. Kill Grawls and then escort the NPC to the frozen lake. You can give him
Once there, destroy the Dragon Totem and wait until portals spawn behind you. Destroy the portals and vanquish foes to complete the event.
The Svanir Chaman Chief will then spawn and become vulnerable after a short dialogue. Dodge the spin attacks and kill him.
Fire Elemental
Map: Metrica Province
- Defend the C.L.E.A.N. 5000 golem
- Destroy the fire elemental created from chaotic energy fusing with the C.L.E.A.N. 5000’s energy core
Walk over to the NPC golem C.L.E.A.N. 5000 until the escort event and escort it through the lab, during this event you can collect and infuse the Matrix Cube Key to fight the Champion Steam Ogre as a bonus event once the Fire Elemental has been defeated.
In order to get the key, you will have to search for a Green item with no nameplate hidden in the labs, it can look like a chaos shard, a rock, or a small obelisk, when you are close to it you will get an interact button to get the key.
Matrix Cube Key will change places randomly to specific spawn points, these are listed on the GW2 Wiki.
Otherwise, search for it in the labs until you get it; once you get it you will have to go to the labs and infuse it with the 4 elements.
- Earth: On the earth/poison zone you will have to do a mini jumping puzzle to attune the key to earth.
- Ice: same as earth but a longer jp in the ice zone, there are a lot of mobs that will push you down so bring stability.
- Water: Go underneath the bridge connecting to the fire elemental and drop down to the tunnel with the waterfall, at the end there is a hidden path to the left. Destroy the chaos crystal covering the console and the Oozes that spawn, then interact with the elemental charger to infuse your key.
- Fire: When the fire elemental boss is defeated, interact with the destroyed golem C.L.E.A.N. 5000.
After the escort, you will have to defend the golem from enemies trying to destroy it.
The Fire Elemental will then spawn, dodge the attacks and jump the shockwaves, once the boss is defeated, you can loot the chest and go back to the lab, use the matrix key and jump down to kill the bonus Champion Steam Ogre.
Shadow Behemoth
Map: Queensdale

- Drive back Underworld creatures by destroying portals
- Defeat the Shadow Behemoth
Wait until the portals spawn around the swamp in 3 separate locations. Destroy these portals and return to Godslost Swamp.
More portals will spawn within the swamp. Destroy them to make the Shadow Behemoth appear.
When the Shadow Behemoth appears, there will be a short period of time to inflict damage. When it becomes invulnerable, destroy the portals that appear to make the boss vulnerable again. Repeat until it is defeated.
Great Jungle Wurm
Map: Caledon Forest

- Destroy the blighted growth
- Destroy the avatars of blight
- Defeat the great jungle wurm
Eliminate the blighted foes part of the first 2 events. Kill the 3 Champions Avatar of Blight in order to make the Great Jungle Wurm come out.
Damage the boss and dodge its swipe attacks. Every 33%, the boss will become invulnerable. Break the defiance bar of the Veteran Summonned Husk to make them vulnerable and kill them. If they reach the Jungle Wurm, they will heal it. Repeat until the boss is defeated.
Modniir Ulgoth
Map: Harathi Hinterlands

- Take Bridgewatch Camp from the centaurs
- Defend Seraph forces at Bridgewatch Camp from the Modniir assault & Capture the camps before more centaurs arrive
- Assault Kingsgate and drive the centaurs back before they can rally their forces
- Keep the Modniir invaders from retaking Kingsgate
- Defeat Ulgoth the Modniir and his minions
The pre-events simply require defeating centaurs in a certain area whether to defend or capture Seraph camps; and then escorting the NPC Captain Edwards to Modniir and releasing a prisoner.
Kill the foes that spawn, then kill the veteran boss. complete these to make Ulgoth the Modniir appear. If the time for the boss to spawn is up and the event chain is done; the boss will appear, otherwise the pre-event “Keep the Modniir invaders from retaking Kingsgatewill” will restart if you complete events too early.
Admiral Taidha Covington
Map: Bloodtide Coast

- Eliminate the cannons at the northern defensive tower
- Capture Taidha Covington’s southern defensive tower
- Defend the galleon and help it destroy Taidha’s gate
- Kill Admiral Taidha Covington
Destroy the northern & southern cannons, then defend and capture the point. Once captured, carry bombs to the gate to destroy it. You can make use of Mesmer, Thief, White Mantle or Watchwork Portals,
Wait for the Admiral outside once the gate is destroyed. At 50% health, she will teleport to the bottom of the ship, and at 25% health, she will teleport to the outside, on the east of the ship, where the fight ends.
The Shatterer
Map: Blazeridge Steppes

- Collect siege weapon pieces for Crusader Blackhorn
- Escort the Sentinel squad to the Vigil camp in Lowland Burns
- Slay the Shatterer
Once the timer indicates that the Shatterer can be lured out, 2 pre-events will be available, both will begin at the same time.
The siege weapon piece event requires you to bring 50 pieces to the Charr NPC Crusader Blackhorn within 5 minutes. With enough players, this will be easily doable within a few minutes.
The escort event requires you to defend a squad of Sentinels from the branded until they reach the Vigil camp. You can use
A few minutes after both events are completed, the Shatterer will spawn. Damage it as much as possible and prepare your crowd-control for when its defiance is breakable, with a lot of damage you will be able to kill it within a few seconds from them, otherwise, if you don’t, you will have to go around and destroy branded crystals by breaking their defiance bar and damaging these in order to stop them from healing the boss, then come back and kill the Shatterer.
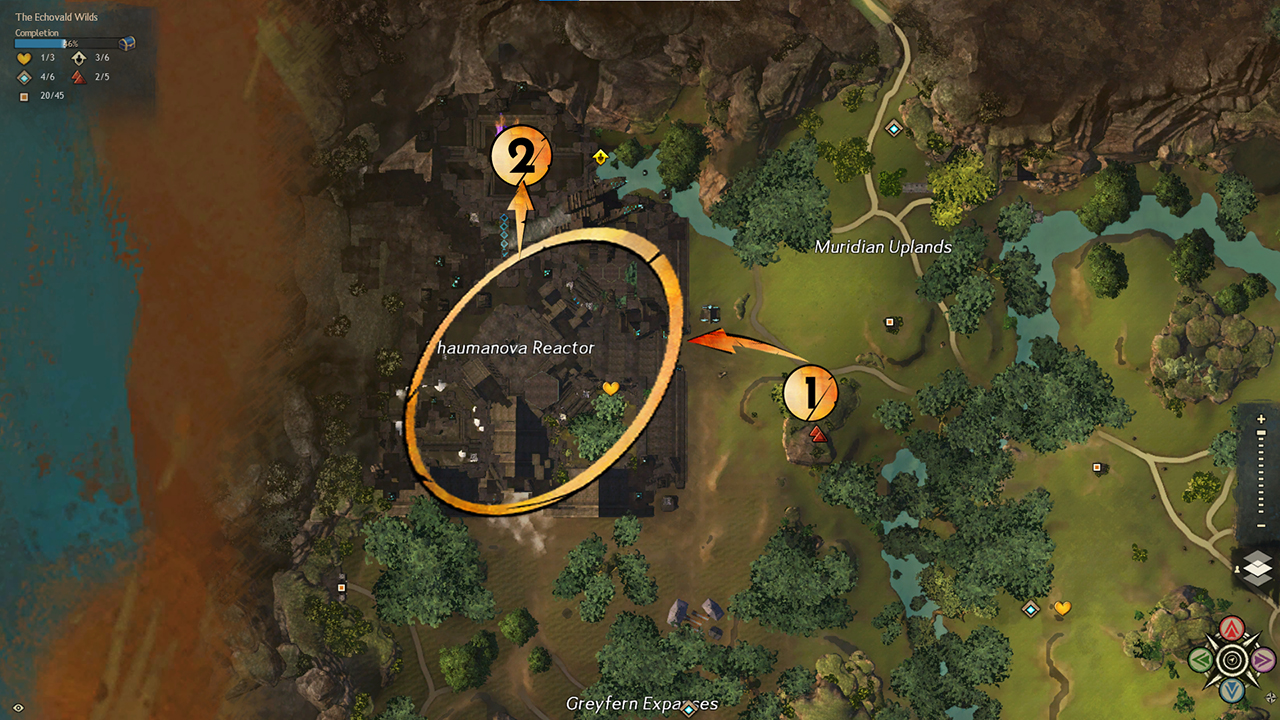
Megadestroyer
Map: Mount Maelstrom
- Defend the Advanced Arcanomics lab
- Stop the rampaging Inquest golem, Eliminate destroyer forces
- Protect the asura and their technology while they quell the unstable volcano & Kill the Megadestroyer
The first pre-events will start and you will have to defend the Arcanomics lab in order to progress the event chain. Once defended, several events will spawn around and inside the volcano will begin, requiring you to kill destroyers, inside the volcano, and a rampaging Inquest golem, outside of the volcano northwest of the Avernan Waypoint.
Once these events are completed, a final pre-event will spawn on the heart of the volcano and will require defending 3 asura specialists from incoming destroyers while they stabilize the volcano’s unstable magic. After that, the Megadestroyer will appear.
The Megadestroyer uses melee attacks that shouldn’t do much damage. Once it reaches 75% health, it will hide in the lava and summon three Veteran Destroyer Crabs around the pool of lava. Once they are defeated, it will return. At 50% health, it will hide in the lava again, this time summoning three Veteran Destroyer Harpies. Once they are taken down, you will be able to defeat the Megadestroyer.
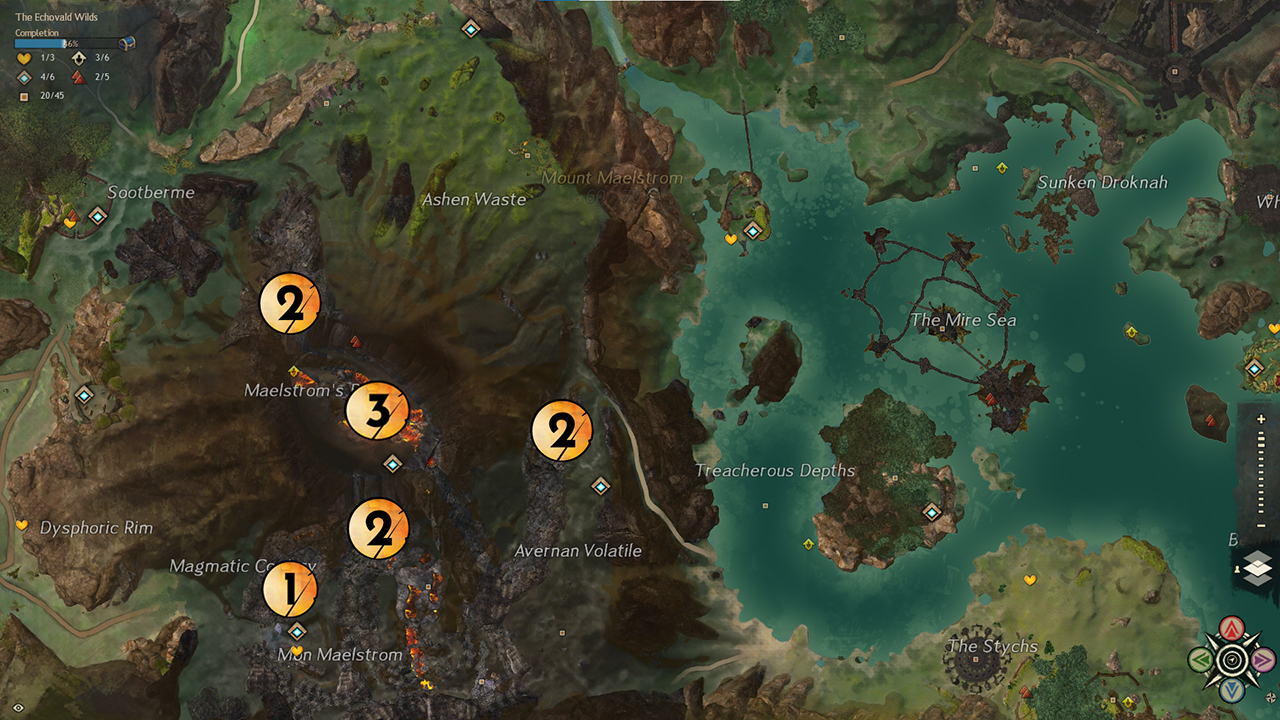
Inquest Golem Mark II
Map: Mount Maelstrom
- Disable the containers before they release their toxins
- Defeat the Inquest’s golem Mark II
The pre-event required disabling inquest containers, once a container is disabled, Inquest engineers will spawn near that container and need to be killed in order to contribute to the event.
Once the event is completed, the Inquest Golem Mark II will appear.
The boss will create large electric sections that will deal massive damage. Avoid standing on these and dodge the golem punches. The boss will also launch projectiles covering the edge of the platform that deals area of effect damage to any player standing in these. Range damage is a huge advantage as you will not have to encounter the boss’s attacks.
Claw of Jormag
Map: Frostgorge Sound
Split yourselves into 4 groups and go to the crystal’s spawn location (1) to damage them fast, after they are destroyed, quickly gather yourselves on the last crystal that will spawn (2).
Damage the boss to at least 50% and go to the other cliff to wait for the boss, if you haven’t done enough damage, you will have to repeat the previous phase again.
The boss will fly away to the other cliff and you will have to damage it, if you damaged the boss enough in the first phase, you would just have to damage the claws of the boss. If not, stack together on the right-hand side of the cliff and attack the boss’ head with range attacks until it dies.

- Destroy the dragon crystals
- Lure out the Claw of Jormag by destroying the final dragon crystal
- (4. & 5.) Defeat the Claw of Jormag
Tequatl the Sunless
Map: Sparkfly Fen
Divide the squad roughly into 4 groups for each area. (West should have the most players, while Middle can have less since it is easier.)
Each battery and the Megalaser have different mechanics that make defending them significantly easier if these are done:

- Hylek Turrets
- Tequatl’s stacking location for the first 25%
- Defend the Batteries and the Vigil Megalaser
- Tequatl’s stacking location for the remaining 75%
Stack on Tequatl’s left paw and damage it for the first 25%. Then, do these steps three times:
- Defend the batteries and the Megalaser.
- Megalaser (3C): Focus on the champions and pull mobs together.
- North: Stomp the Wurm nodes so you don’t get more risen Grubs.
- East: Pull and push away the bloated creepers so they don’t explode on the batteries.
- West: Focus Tequatl’s fingers or reflects on their attacks.
- Stack on Tequatl’s right paw and damage for 25%.
Make sure some people are using the Hylek Turrets, the first skill is used to remove stacks of protection from Tequatl, otherwise, once it reaches 20 stacks Tequatl will become invulnerable and a bone wall will need to be destroyed for Tequatl to be vulnerable again. The third skill is used to remove the orange damaging areas of effect that spawn on players.
- Use the 2nd skill off cooldown.
- Use the 3rd skill to clean the poison areas as soon as they appear.
Triple Trouble
Map: Bloodtide Coast
Gather at Firthside Vigil Waypoint to organize 3 different squads with 3 specific commanders, 1 for each Wurm Head. Each squad should have at least 30 players and the Amber squad should have the most players.
Once the event starts, complete the Escort Events and engage the Great Jungle Wurm head until around 25% of health.
Players on every Wurm Head will do its specific mechanic until they are ready to finish their respective Wurm Heads at the same time (which is the requirement for this event to succeed).
Accord a time with the other commanders and call out when people assigned to the Amber Wurm Head are killing the Plague Carrier Abomination, when you are stacking to get eaten and when you are in the Wurm Head.
When people assigned to the Amber Wurm Head are devoured, other commanders will start doing their Wurm Head mechanics so the Wurm Head kills are synchronized.
The Wurms Heads can only take damage once the preparation phase is complete. The explanations for each Wurm Head are as follows:

Amber
- Kill the Plague Carrier Abomination and get devoured by the Amber Wurm Head, then grab the Unfortunate Adventurer’s harpoon
- Use your harpoon after being spat out by the Wurm Head and damage it
For the boss to become vulnerable, you will have to get yourself, and your squad eaten. To do this you must kill a Plague Carrier Abomination in order to get the buff that its death provides, this will make you edible by the Wurm Head.
When that’s completed, you must go to the Red Arrow and stack there to be consumed by the Wurm Head.
When inside, grab the Unfortunate Adventurer’s harpoon and throw it into the Wurm Head’s mouth to damage it. When the mouth is around 20% call “hold!” informing people to save their harpoon to damage the Wurm Head when outside.
The Wurm Head will spit you out, be careful not to use the harpoon yet and that any other creature is not in the way of the harpoon and the Wurm Head. Call “fire!” (you can wait for the Wurm Head to start its attack animation to get even more damage uptime) and everyone should then get into its hitbox to damage it. Repeat until you have one damage phase left.
If you kill the Plague Carrier Abomination by mistake and you still have the debuff to not be able to get eaten or you are not ready, you will have to wait for the next Plague Carrier Abomination to spawn in around 30 seconds.

Cobalt
- Pick up a Powder Keg
- Place the Powder Kegs on the marker using skill #1
In order to make the boss vulnerable, you will have to drop 20 Powder Kegs using skill #1 while holding the keg onto the arrow marked by the event. This will make the boss eat the Power Kegs and be vulnerable. Every 2 minutes the spot where you can get the Power Kegs switches between 3 possible spots. If you mount while holding the keg, you will keep it, making it much faster to go to the Keg deposit location.
You will want to stack your squad where the Powder Keg acquisition spot is and tell your squad to take & drop Kegs all at the same time. This way everyone will place the Powder Kegs in the shortest window possible, this will be important later.
When a Powder Keg gets placed on the red arrow, an internal timer will start ticking that will remove a random Powder Keg after 2 minutes. For this reason, you must always remember when the first and last bombs were placed, because 2 minutes after that, Powder Kegs will start being removed.
When you know that you, will be able to kill it within your next damaging phase, tell the other commanders that you are ready. If everyone is ready you will have to tell the other commanders when they should damage their assigned Wurm Head. This decision should be made considering the last Powder Keg placement and it should be 2 minutes after the last Powder keg was placed.
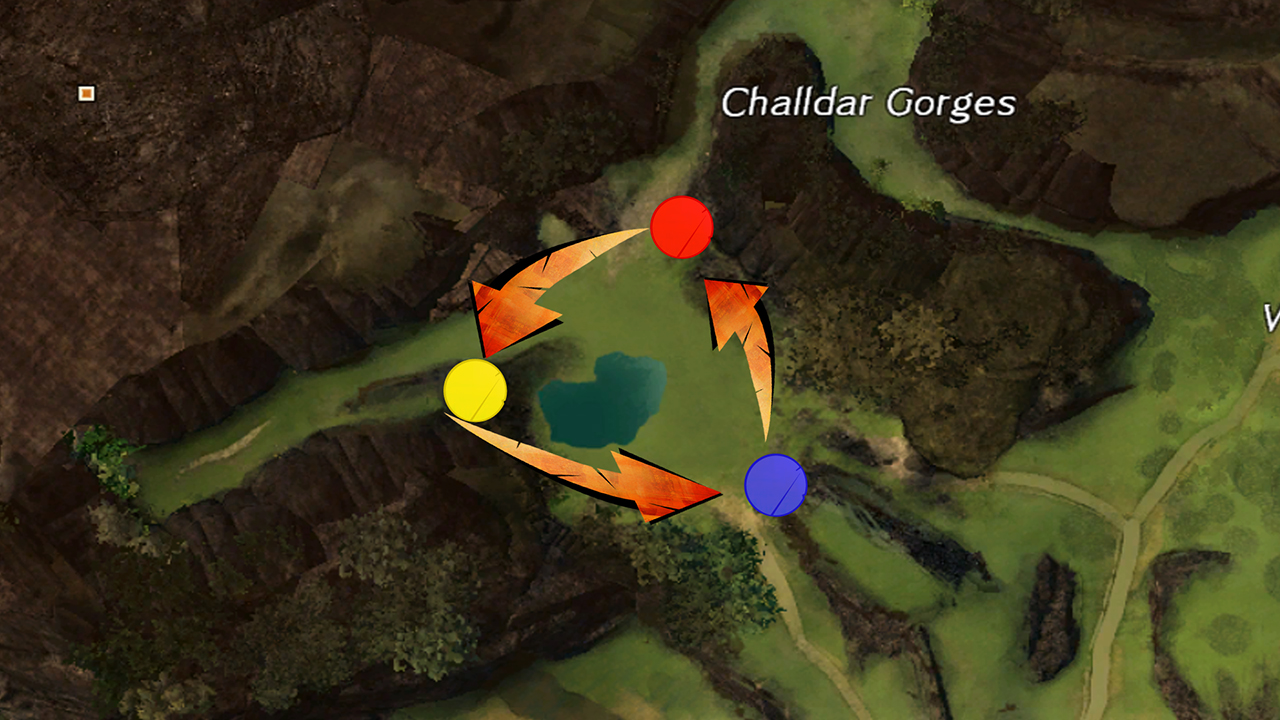
Crimson
Red, Blue & Yellow markers are Phytotoxin Extractors.
In order to make the boss vulnerable, you need to walk into Phytotoxin Clouds in order to gather Phytotoxin.
There are 3 different types of clouds, Yellow, Red, and Blue, each giving its own type of Phytotoxin. Once you gathered Phytotoxin, walk into the color-associated Phytotoxin Extractors in order to fill them, once all 3 are filled, the Crimson Wurm becomes vulnerable. You can both acquire and deposit Phytotoxin while on a mount in order to make the process much faster.
Do this until you can kill it with one more damaging phase, when this happens, tell everyone to kill wandering creatures and fill Yellow & Red extractors but not Blue, that way when everyone is ready you will only have to gather blue and be able to damage the Wurm Head faster.
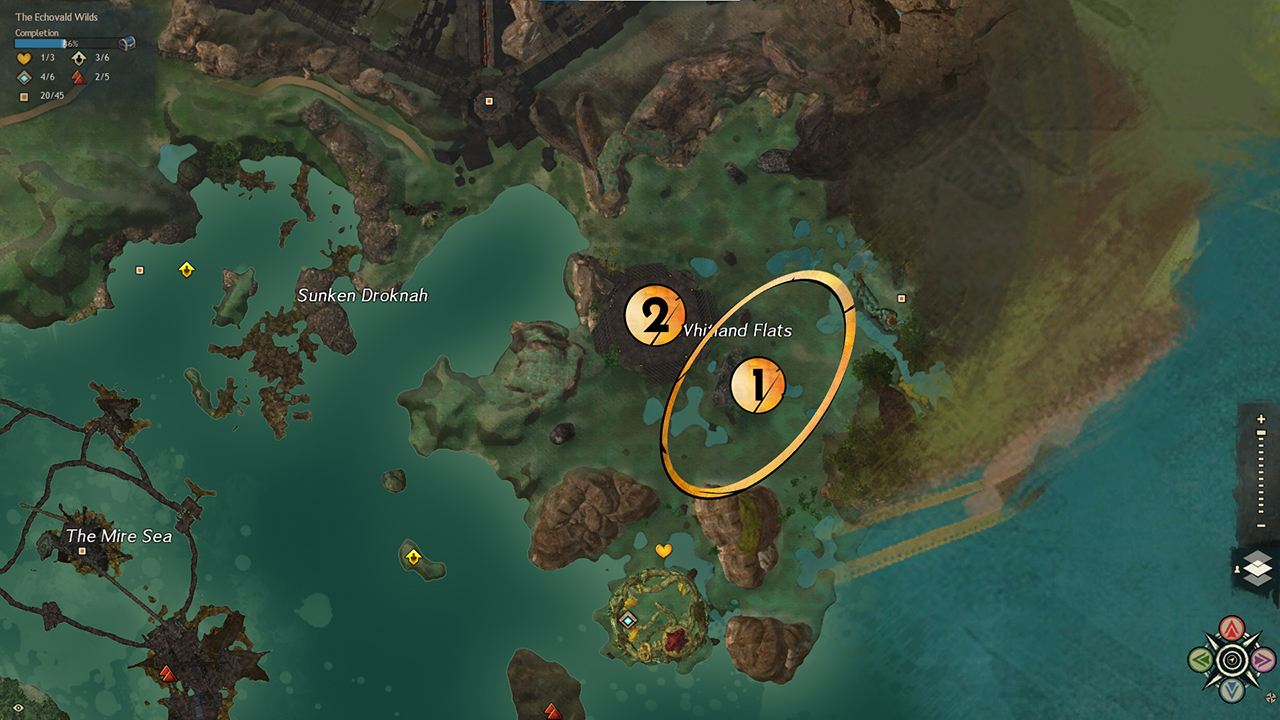
Karka Queen
Map: The Legendary Karka Queen spawns in 1 of 4 locations:
- Pride Point Waypoint
- Kiel’s Outpost Waypoint
- Camp Karka Waypoint
- Steampipe Steading
Spread out and secure the 4 settlements, once all 4 settlements are secured, the Karka Queen will spawn close to one of them.

- Capture the settlements by doing their respective event and defend them until the Karka Queen spawns
- Possible spawn locations of the Karka Queen
The Karka Queen’s roll attack can deal a lot of damage and chain knockdowns, make sure to evade it.
Once the Karka Queen’s health reaches 0% for the first time, it will re-fill to 50%, just take down its second health pool to defeat it.


