
Equipment basics

Gear in Guild Wars 2 can be quite convoluted as there are many different attributes and a lot of gear slots. But don’t worry it’s easier to get started than you might think.
Grind for items isn’t as prominent as it is in other MMORPGs. Getting equipment that is sufficient for every content in the game is rather easy, fast, and cheap. It also doesn’t require too much time to get maximum stats if you put your mind to it.
The are of course some gear optimizations players can do to squeeze 1-2% extra value out of their build that will take quite a lot of resources and is not required for any content.
We’ve explained a few basic things about Attributes (Stats) and Gear quality in our introductory guide, if you need to learn about more GW2 systems and mechanics, make sure to give it a read:

If you are not yet familiar with your Equipment panel, you should check out all it has to offer, from the armory system to templates, to attributes, PvP equipment view and even gathering tools.
All that and more was covered in:
Gear quality
Items in Guild Wars 2 have 7 usable rarities unlocked while leveling (8th rarity is junk). Simply put the higher the rarity the more attribute points (stats) items will have.
The item quality goes as follows from best to worst in terms of stats offered:
- legendary – “quality of life”, account-wide rarity, offering the same stats and advantages as ascended with the ability to swap attribute points for free out of combat
- ascended – unlocked at level 80, highest stats in game, account bound
- exotic – unlocked at level 62, entry level quality for end game content
- rare – unlocked at level 30, you will be using rare gear for most of your leveling phase
- masterwork – unlocked at level 14
- fine – starting gear
- basic – starting gear
In addition, each item will have a level requirement, the higher this requirement is the more stats that item will give the most stats will be given by items that have a level 80 requirement. Ascended and legendary items can only be used by level 80 characters.
During leveling, quality won’t matter that much, the more important thing to do will be to stack primary attributes matching your gameplay on all or most items, for example Power if you are using weapons and skills with power damage, we will explain this later in this guide.
While ascended items do have higher stats than exotic any content in this game can be cleared easily with level 80 exotic gear.
Ascended gear is only a ~6% attribute increase in comparison to exotic gear making ascended gear only relevant in two situations:
- If you want to do high-level fractals and need the infusion slots for agony resistance (which is explained in detail in the Introduction to Fractals of the Mists guide.
- When you are ready to optimize and have the best in slot gear.
The main reason Hardstuck guides show ascended gear is due to how easy it currently is to acquire most of them. If you find yourself in a situation where you want to play a build but only have access to exotic gear, don’t hesitate to play it anyway.
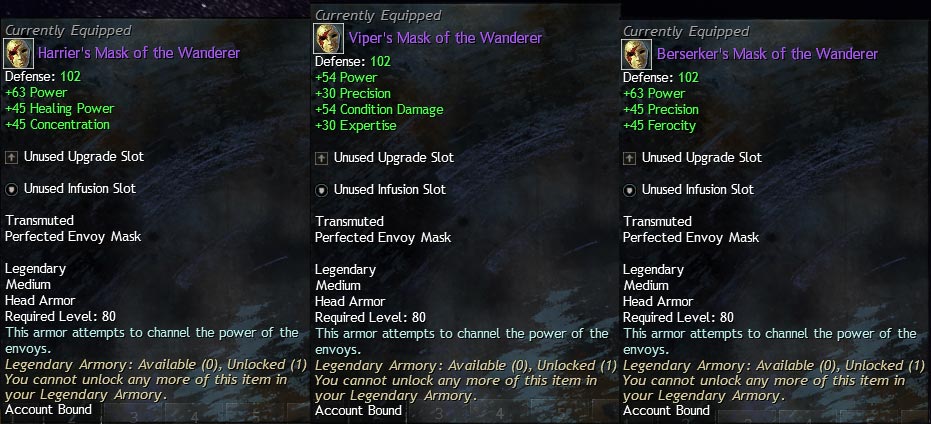
Legendary gear is the final tier of items available in Guild Wars 2. Unlike other gear rarities, upgrading to legendary will not grant an increase in stats, but will instead offer the ability to swap attributes on the fly as well as freely remove runes, sigils, and infusions.
Equipment items of Legendary quality are also shared between characters via the legendary armory system, meaning that if you, acquire a set of legendary heavy armor, for example, you will not need another heavy armor piece ever again, as all your level 80 characters that use heavy armor will now have access to that set.
Stats (attributes)
If you look at your equipment in the hero panel the first thing you will see on the right of your character are the attributes. These attributes determine what your character will be good at. Be it dealing massive damage or healing allies.
Most abilities interact or scale with attributes in some way so you will want to make sure that your gear lines up with your trait and skill choices.
Power, Precision & Ferocity
![]() Power increases direct damage also known as ‘power damage’. There is no such thing as base skill damage in Guild Wars 2, instead all directly damaging abilities in the game scale with power. Twice the power is double the damage and if you had zero power you would deal zero damage on every attack. Fortunately, power has a 1000 baseline value at level 80 so that won’t happen! Power attacks have a chance to critically strike which is determined by Precision.
Power increases direct damage also known as ‘power damage’. There is no such thing as base skill damage in Guild Wars 2, instead all directly damaging abilities in the game scale with power. Twice the power is double the damage and if you had zero power you would deal zero damage on every attack. Fortunately, power has a 1000 baseline value at level 80 so that won’t happen! Power attacks have a chance to critically strike which is determined by Precision.
![]() Precision starts at a value of 1000 and every 21 points of precision over that 1000 increases your critical strike chance by 1% from the base critical strike chance of 5%. The hero panel shows your exact
Precision starts at a value of 1000 and every 21 points of precision over that 1000 increases your critical strike chance by 1% from the base critical strike chance of 5%. The hero panel shows your exact ![]() Critical Chance including all modifiers such as the
Critical Chance including all modifiers such as the  High Caliber
![]() Ferocity controls just how good your critical strikes are. Every 15 points of ferocity increase your
Ferocity controls just how good your critical strikes are. Every 15 points of ferocity increase your ![]() Critical Damage by 1%, which is a simple multiplier of your critical hits. To fully benefit from Ferocity on power damage builds, players should aim to achieve 100%
Critical Damage by 1%, which is a simple multiplier of your critical hits. To fully benefit from Ferocity on power damage builds, players should aim to achieve 100% ![]() Critical Chance.
Critical Chance.
All of the above attributes are very desirable to have together in order to deal great power damage, in particular, the ferocity with precision as without critical chance, you won’t be dealing as many critical hits to fully benefit from ferocity.
Condition Damage & Expertise
![]() Condition Damage is very similar to power. Damaging conditions scale based on condition damage so the more condition damage you have, the more damage per second per stack you will do. Different conditions have unique coefficients with which they scale and every condition has a base value meaning that if you have zero condition damage they will still do some damage
Condition Damage is very similar to power. Damaging conditions scale based on condition damage so the more condition damage you have, the more damage per second per stack you will do. Different conditions have unique coefficients with which they scale and every condition has a base value meaning that if you have zero condition damage they will still do some damage
![]() Expertise calculates into
Expertise calculates into ![]() Condition Duration which is capped at 100% meaning any extra past that point will have no effect. To get an extra 1% of condition duration you’ll need 15 expertise. Condition duration is very powerful for a number of reasons: it acts as a flat modifier for your conditions, if they last twice as long they’ll deal twice the damage; it also affects debilitating conditions giving access to extra long
Condition Duration which is capped at 100% meaning any extra past that point will have no effect. To get an extra 1% of condition duration you’ll need 15 expertise. Condition duration is very powerful for a number of reasons: it acts as a flat modifier for your conditions, if they last twice as long they’ll deal twice the damage; it also affects debilitating conditions giving access to extra long
Concentration
![]() Concentration similarly increases your
Concentration similarly increases your ![]() Boon Duration by 1% per 15 points and is capped at 100%. It’s quite uncommon to have a support class that just heals in Guild Wars 2, in fact, the strongest part of support builds is the great boon access. If you are planning a healing build you’ll be looking to pick up boon duration too. However supports in Guild Wars 2 can be very aggressive too, a classic example would be the Condition Quickness Firebrand which often employs concentration combined with condition damage and expertise.
Boon Duration by 1% per 15 points and is capped at 100%. It’s quite uncommon to have a support class that just heals in Guild Wars 2, in fact, the strongest part of support builds is the great boon access. If you are planning a healing build you’ll be looking to pick up boon duration too. However supports in Guild Wars 2 can be very aggressive too, a classic example would be the Condition Quickness Firebrand which often employs concentration combined with condition damage and expertise.
Healing Power
![]() Healing Power simply increases all outgoing healing. Healing skills and boons have base healing value and healing power multiplier (which is not visible in the tooltip), total healing done by the skill or an effect is simply sum of base healing and your
Healing Power simply increases all outgoing healing. Healing skills and boons have base healing value and healing power multiplier (which is not visible in the tooltip), total healing done by the skill or an effect is simply sum of base healing and your ![]() Healing Power multiplied by that healing power multiplier value.
Healing Power multiplied by that healing power multiplier value. ![]() Healing Power.
Healing Power.
Toughness & Vitality
![]() Toughness starts at a base value of 1000 and each point of toughness is equivalent to one point of armor. Your
Toughness starts at a base value of 1000 and each point of toughness is equivalent to one point of armor. Your ![]() Armor value is defense on armor pieces + toughness. As toughness rises the initial armor difference becomes less significant compared to the total armor value, this means that just because you have light armor it doesn’t prevent you from being a tank. Raid bosses will fixate players with the highest Toughness, making it a key attribute when playing a tank.
Armor value is defense on armor pieces + toughness. As toughness rises the initial armor difference becomes less significant compared to the total armor value, this means that just because you have light armor it doesn’t prevent you from being a tank. Raid bosses will fixate players with the highest Toughness, making it a key attribute when playing a tank.
![]() Vitality, each point in vitality increases your
Vitality, each point in vitality increases your ![]() Health by 10, everyone starts off with 1000 vitality (10000 extra health), you might have noticed that that doesn’t quite add up, this is because professions in Guild Wars 2 also have one of three base HP values,
Health by 10, everyone starts off with 1000 vitality (10000 extra health), you might have noticed that that doesn’t quite add up, this is because professions in Guild Wars 2 also have one of three base HP values,  Warrior
 Necromancer
 Revenant
 Engineer
 Mesmer
 Ranger
 Elementalist
 Thief
Thief Guardian
Defense & Weapon Strength
While it’s not the part of attributes shown on your hero panel, Defense on armor pieces and Weapon Strength on weapons are two attributes that exist in the game but don’t play a role when it comes to choosing your gear.
Defense on armor pieces is calculated with Toughness to add up to the total ![]() Armor of your character, and Weapon Strength on a weapon is a range of min and max possible base damage that’s calculated with the character’s
Armor of your character, and Weapon Strength on a weapon is a range of min and max possible base damage that’s calculated with the character’s ![]() Power and various other variables on every single hit.
Power and various other variables on every single hit.
If you play a lot of games with weapons having damage range like this or armor having attributes like defense, it might be deciding factor when choosing them over others.
This is not entirely the case in Guild Wars 2, here both Defense and Weapon Strength only play an important role when choosing new items during leveling, but high-level items have those values set in stone for each level and each item quality, so you don’t have to worry about it later in the game.
Attribute combinations
Equipment attributes in Guild Wars 2 come in specific combinations where each attribute combination has a name attached to it (e.g. Berserker’s, Soldier’s). Sadly this naming convention isn’t streamlined for every item meaning you will have to look at the attribute combinations instead of trusting the naming of items.
Gear quality will make each specific attribute combination give more stats of each attribute that specific combination uses. Choosing the correct attribute combinations for your build is essential to success: trying to do damage with Nomad stats or trying to support with Carrion stats is more or less the same as not wearing any gear at all.
Attribute combinations are split into Core Tyria and Expansion-specific combinations. Core Tyria stats are available to every player (including Free-to-Play accounts) and are generally cheaper and easier to acquire. Expansion stats require the player to have access to the content (either living story or expansion) that introduced the stat before they can use them.
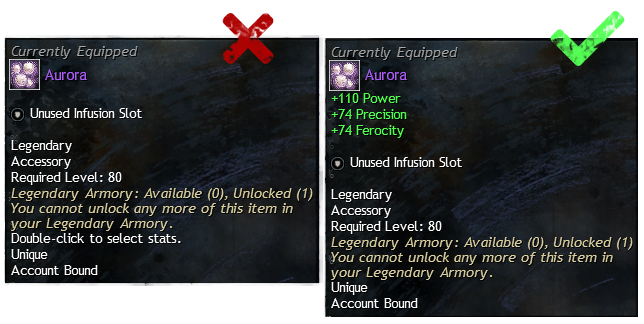
Oftentimes, gear will have no attributes on it by default, allowing the player to instead choose the attribute combination themselves by right-clicking and selecting Customize.
Items with this ability will have access to multiple attribute combinations. Certain ascended equipment will come with one of the following names: Assaulter’s, Defender’s, Healer’s, and Malicious. These names will determine which type of attribute combinations will be offered by the gear (Assaulter’s gear will offer a selection of attributes based on the Power stat, Defenders on Toughness, Healer’s on Healing Power, Malicious based on Condition enhancing stats).
Attribute combinations with more unique attributes have more total attribute points but often they are more spread out making their overall value go down. There are also attribute combinations that have the same unique attributes but differ in their primary attribute distribution for example Berserker’s gear will have the most attribute points in Power and Assassin’s gear will have their main attribute points in Precision.
For a full list of each attribute combination in the game click on the Wiki.
Runes, Sigils, and Infusions
Upgrades are different types of magical items designed to enhance your armor (Runes), weapons (Sigils), and both of those plus trinkets of at least ascended quality (Infusions).
Adding an upgrade to an equipment piece is a very simple process of simply dragging and dropping it in.
Removing one, however, is a bit more complicated. You will get your upgrades back if you salvage gear (exotic or worse quality gear with a  Black Lion Salvage Kit
 Ascended Salvage Kit
You can also use an  Upgrade ExtractorInfusion Extraction Device
Runes
Runes are magical items that are slotted into your armor. They are upgrade components giving you more stats and extra bonuses depending on how many of the same rune you have slotted into your armor, meaning that you want to slot multiple of the same rune to gain their respective bonuses.
Runes come in 4 qualities:
- legendary – “quality of life” rarity, has the ability to swap to any superior rune in the game and is useable on all characters via the legendary armory system
- superior – require armor at level 60, has six bonuses with the 6th one being strongest, and often having a build-defining impact causing mixing different runes to be very ineffective
- major – require armor at level 39, has four bonuses
- minor – can be used in any armor piece with rune slot, has two bonuses
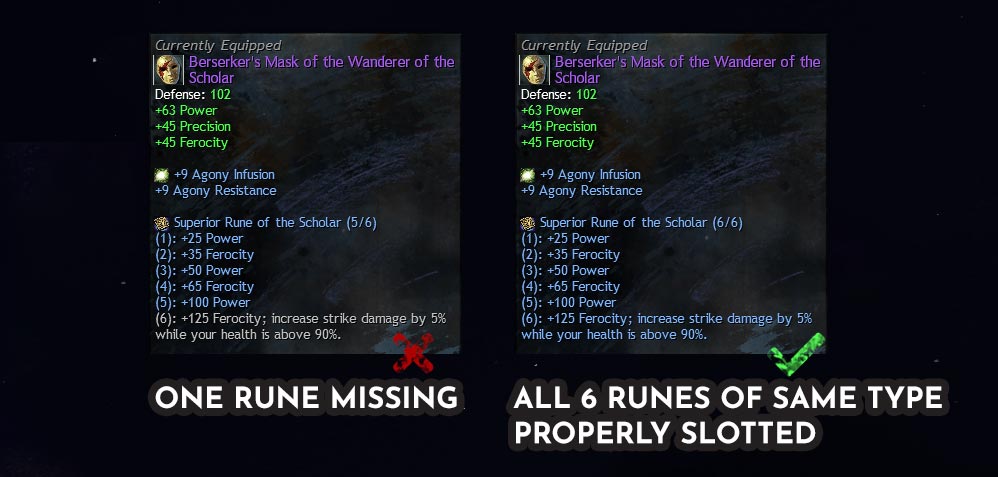
Runes will give you more bonuses for every Rune of the same type slotted in your armor pieces – making our goal to equip 6 of the same type of Rune.
There are several ways of acquiring runes:
- Most can be bought from the trading post.
- The majority of the tradeable ones are crafted by Tailors, Leatherworkers, and Armorsmiths. The recipes are either sold on the trading post, by master craftsmen, or by Pact Supply Network Agents.
- Some runes are craftable but account-bound, with their recipes available on the trading post (usually for a few coppers).
- Each dungeon has its own unique rune, purchasable with dungeon tokens and also slotted in each piece of dungeon armor.
Check the complete list of all the runes in the game.
Sigils
Sigils weapon upgrades. Each one-handed weapon can hold a single sigil, while two-handed weapons can hold two sigils.
Unlike runes, sigils do not have a stacking effect and they don’t stack with themselves or share internal cooldowns making the use of the same sigils on the same weapon set pointless.
Sigils can have bonuses that activate when you are doing an action like  Dodging
 Weapon Swapping
- legendary – “quality of life” rarity, has the ability to swap to any superior sigil in the game, and is useable on all characters
- superior – require a weapon at level 60 or above
- major – require a weapon at level 39 or above
- minor – has no level requirement
In terms of sigils acquisition, it’s identical to runes, with the only difference being the crafting disciplines required, which for sigils are Weaponsmith, Huntsman, Artificer, and Scribe.
Check the complete list of all the sigils in the game.
Infusions
Infusions are magical items that can be slotted into infusion slots on ascended and legendary gear. There are a total of 18 slots when fully upgraded.
Unlike runes and sigils, they provide no unique bonuses but instead a small attribute increase like agony resistance or power. This means that infusions are mostly intended for use in high-level fractals to get to 150 ![]() Agony Resistance to counter
Agony Resistance to counter
However, acquiring infusions for your favorite classes can also be a nice endgame grind to get those extra 90 stats.
Here you can read more about Infusions in terms of Fractals gameplay:
Gear acquisition
Since there are multiple ways of getting the proper equipment, we created separate guides for it, including getting entry-level items for instanced PvE, as well as end-game ascended gear, and even short guide for getting your first legendary armor set.
If you need to know what attributes, runes, and sigils combination would be right for your profession, make sure to take a look at our builds for each type of content.


