
Game systems and mechanics
Guild Wars 2 can be overwhelming for new players, with lots of different currencies, events happening all around, multiple AoEs (Area of Effects) colors on the ground, and unique systems like downstate or heart quests.
Here we’ll attempt to explain all those systems to you, starting with basic concepts and diving deeper with each section. The scope of the game is too wide to cover everything in one short guide so we’ll focus on things important for new players, with the end-game in mind, be that Open World meta events, instanced PvE, PvP, or WvW.
Before we dive in, here is a quick rundown of important similarities to and differences from other MMORPGs:
- There is no “kill stealing”. Loot and experience are rewarded individually to all participants of every activity.
- Gem store items are all Quality of Life or cosmetic items. The exception to this is expansion content, where maps, professions, and story elements are gated behind purchasing these expansions in Steam or in the Gem store.
- There is no vertical progression, meaning there is a cap to stats you can obtain.
- All systems in the game associated with the expansions are included with those expansions. For example, gliding is included with the Heart of Thorns expansion, and do not require additional purchase.
- You will return to early-level maps and starting zones; these areas never become “dead”. Collections and events will bring max-level players back to these areas.
- Map instances are created dynamically once a map fills up, so there are no server issues due to overpopulation on a single map. During crowded events, it may be difficult to join your group’s instance.
- There are no queues to log into the game.
- Rewards are relatively generalized; you can reach most of your goals by playing your favorite content.
This guide is an extension of the game basics guide, where we cover not only the process of choosing a race and profession but also must-know info about your character, inventory, and other systems, so be sure to check that guide out first.
Wiki
We can’t overemphasize how good the Guild Wars 2 Wiki and associated integration is.
To use this integration, type /wiki and Shift+Click something to paste it into chat and open up the associated wiki page.
There are some common phrases you can search for as well. For example, /wiki et will bring up an event timer page with countdowns to all meta events on a global timer.
Game modes
Guild Wars 2 has three independently balanced game modes: Player vs Player (PvP), World vs World (WvW), and Player vs Environment (PvE).
PvP consists of multiple game modes where two teams of two, three, or five players square off. Of these modes, 5v5 Conquest is the main structured option with ranked, unranked, and Automated Tournament games. PvP has an associated legendary backpack, legendary armor, and legendary amulet.
In WvW, three servers fight each other to capture map objectives and control a variety of maps. WvW has an associated legendary backpack, legendary armor, and legendary ring.
PvE encompasses all content where players fight NPCs. This includes instanced 5- or 10-player content and open world PvE.
5-player content consists of Dungeons, where players strategically move and
10-player squads are organized to complete Raids–discrete stories that progress the players through boss encounters and events. Raids have an associated legendary armor and legendary ring. Additionally, 10-player squads are used to tackle Strike Missions, single boss encounters that range from the easiest introductory encounters to the hardest challenge modes in the game.
Finally, PvE includes the Open World. This consists of exploration, the Personal Story, and group Meta Events where entire maps face group events and powerful enemies on a set world timer.
Account systems
Expanding on the explanations of the user interface laid out in the game basics guide, we’ll discuss the account-wide systems here. GW2 is a very alt-friendly game, meaning multiple things in the game are automatically (or manually) shared across characters on the same account. This includes end-game weapons, trinkets, and armor of ascended or legendary rarity. In particular, legendary items are huge Quality of Life items, as these are essentially account-wide unlocks available at will.
Note: Early game items are usually soul-bound, meaning they are tied to a specific character. However these are often only bound once used by a character or once its stats have been selected.
We’ll start with the account unlocks that are happening in the background: the Wallet system.

Your Wallet automatically stores all currencies, including ![]() Gold,
Gold, ![]() Karma, map-specific currencies, raid tokens, strike shards, and dungeon currency. There are no capacity limitations to the Wallet. To check what is in your Wallet, click on the stacked coins icon in the lower left of your inventory.
Karma, map-specific currencies, raid tokens, strike shards, and dungeon currency. There are no capacity limitations to the Wallet. To check what is in your Wallet, click on the stacked coins icon in the lower left of your inventory.
![]() Gold is the only tradeable currency in GW2. This is used to purchase items from vendors or from other players via the Trading Post. If you’re in a generous mood it can also be mailed directly to other players. Other currencies are non-tradeable, and can only be used to purchase items from specific vendors. Of these,
Gold is the only tradeable currency in GW2. This is used to purchase items from vendors or from other players via the Trading Post. If you’re in a generous mood it can also be mailed directly to other players. Other currencies are non-tradeable, and can only be used to purchase items from specific vendors. Of these, ![]() Karma is the most common currency across the base game and expansions. This is earned by doing basically any activity in the game and is taken by Renown Heart NPCs and other vendors.
Karma is the most common currency across the base game and expansions. This is earned by doing basically any activity in the game and is taken by Renown Heart NPCs and other vendors.

The Account Vault (Bank) is another account-wide system, accessible via interacting with Bank NPCs (![]() ) on any of your characters. Additional “Bank Tabs” can be purchased from the Gem Store to expand from your default Bank size.
) on any of your characters. Additional “Bank Tabs” can be purchased from the Gem Store to expand from your default Bank size.
When accessing your Bank you will notice two additional tabs: Material Storage and Wardrobe Storage.
Material Storage stores materials dropped by enemies, found in chests, or salvaged with items like  Basic Salvage Kit
The Wardrobe lists all skins in the game and which of these you have unlocked. You can’t directly deposit or withdraw skins in and from Wardrobe; instead, it exists solely so you can see what you have unlocked. The Wardrobe also allows you to preview locked skins, which can be helpful when you’re looking for that perfect new scarf for your beloved toon.
Note: new skins are stored by soul or account binding an item. Items are bound by equipping them, salvaging them, or manually unlocking them by right-clicking the item and selecting “Unlock Skin” from the context menu. Unlocking a skin manually automatically soul or account binds the associated item.
One last important part of your inventory is the Shared Inventory Slot section. While the rest of your inventory is character-bound, these shared slots are accessible to all characters. Typically, players use these to store quality-of-life items such as salvage kits and teleport items. Slots are gained when purchasing expansions or can be bought with gems directly.
Finally, let’s discuss cross-character support and account-wide progression.
While leveling, you’ll gain  Tomes of Knowledge
Achievements and Masteries are the most noticeable account-wide progression systems. Achievements do not differ much from other games. You’ll get AP (Achievement Points) left and right from completing tasks in-game.
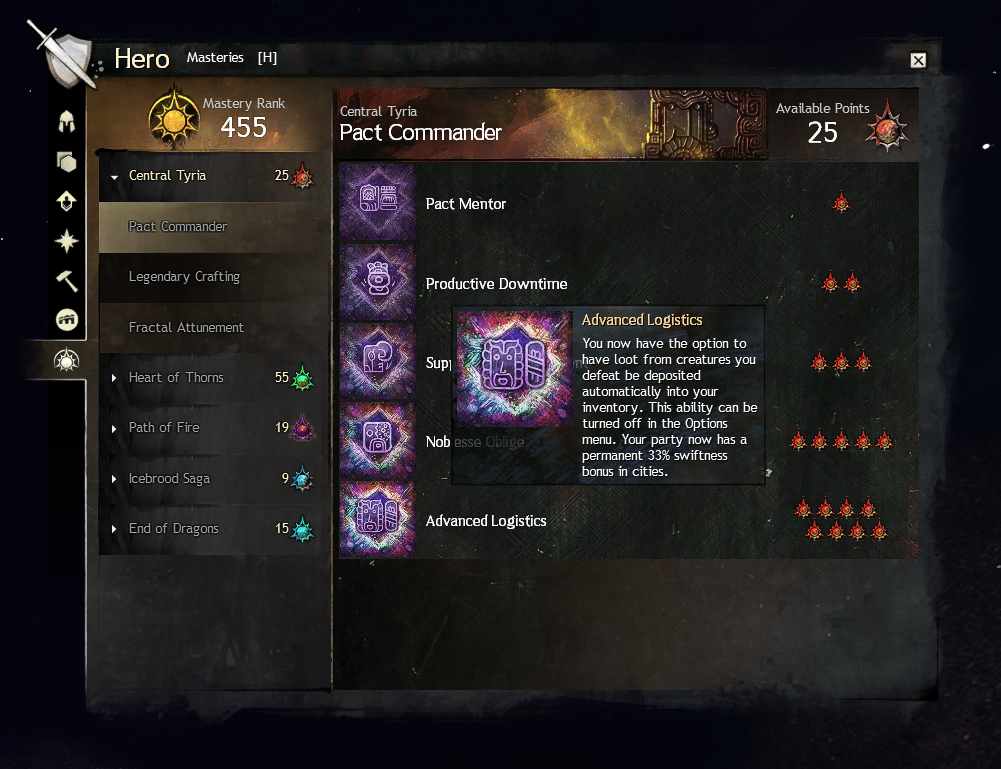
Masteries are a more impactful progression system, unlocking quality-of-life and mechanical perks. Once you’ve reached the max level, leveling experience will change to increase your Mastery progression.
Masteries are split between expansions and you can only level up expansion mastery on maps from the associated expansion. For example, to progress the Pact Commander Mastery track you must gain experience in the core maps.
In order to advance your Mastery, you’ll have to earn Mastery points (![]() ) in addition to Mastery experience. These points can be found in the world or obtained by completing achievements or the Personal Story. Once you’ve obtained enough Mastery experience you’ll need some number of Mastery points to actually unlock the perk.
) in addition to Mastery experience. These points can be found in the world or obtained by completing achievements or the Personal Story. Once you’ve obtained enough Mastery experience you’ll need some number of Mastery points to actually unlock the perk.
While you’ll eventually want to unlock all the Masteries we recommend you start with the Pact Commander Mastery track to obtain the Advanced Logistics Mastery. This requires 19 Mastery points![]() in total and gives you the ability to automatically pick up items from fallen enemies.
in total and gives you the ability to automatically pick up items from fallen enemies.
Unique Equipment
Remember soul-bound equipment? In the end-game, most equipment is account-bound instead of soul-bound. This means that you can transfer it between your characters, which is a huge quality of life improvement. However, not all account-bound equipment behaves the same way. Sometimes you’ll encounter Rings, Accessories, or Weapons that are described as “Unique” in their tooltips.
Unique items simply can’t be equipped in multiple slots simultaneously. For example, while you may own two copies of Dagnar’s Badge, you can only equip one at a time. Before purchasing multiple items be sure to check if they are Unique or not!
While this property is mostly associated with ascended items, it’s not exclusive to that rarity.
Boons, Conditions, and other effects
One can’t really start explaining GW2 without explaining Boons and Conditions first as they are arguably the most impactful mechanics in the game. Not only they can be game-altering, but also everything else will link to them somehow, weapon attacks and skills will give boons or apply conditions, equipment upgrades will apply them or extend the duration of them, etc.

There are different types of effects in the game, they are all manifested above your skill bar (and for enemies – below their health). Some have their own icons, like
There are also two general categories of effects shown as blue icons (positive effect) or purple icons (negative effect). For example
But as stated at the start, the most important types of effects are Boons which have positive effects (buffs) and use orange icons (like
In the endgame content, groups are built to provide all the most impactful Boons at the highest uptime possible:
- Offensive ones: 25 stacks of
, permanent , , - Easily stacked defensive
, , and - And when needed boons like
, , , to counter crowd control or some attack or condition pressure
Boons are not only important in end-game instanced PvE, but they are also extremely impactful in Open World too, if you can provide yourself with a set of offensive boons, you can easily do double damage. Not to mention Open World Meta events where some foes are very powerful and dealing with them faster and safer will always be your goal.
Organized groups in WvW are also set up to have a high generation of both offensive and defensive Boons and cleansing Conditions to counter opponents’ pressure and be able to punish them in return. PvP builds are created around the concept of Boons and Conditions or condition cleansing too, offensive ones for damage spikes, and defensive ones to counter the pressure or be able to escape the fight.
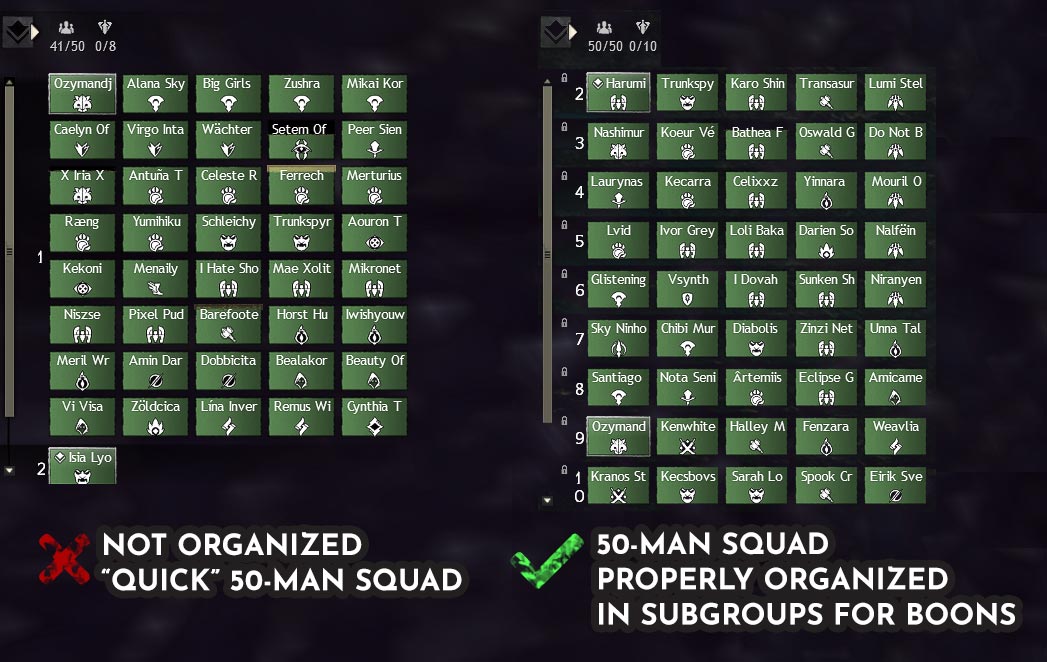
Note: While this is not directly tied to Boons themselves, it’s very important to know skills granting Boons to allies are limited to 5 targets (including the caster) and will prioritize party members over others. That’s why you should always assign 5-man parties within a squad with proper support classes in each of those groups to maximize damage.
Conditions are counterparts to Boons, they are negative effects applied to you or by you:
- Some deal damage over time:
, , , , - Other increase damage taken or decrease damage done:
, - There are also ones used to control the enemy:
, , , , ,
Damaging conditions are base for “Condition builds”, specializing in dealing damage over time with one or more damaging conditions instead direct damage like in the case of “Power builds”.
Parties and Squads
There are two types of groups in Guild Wars 2.
Party is a 5-man group, you can use /join character name to join someone’s party or /invite character name to invite someone (which you can also do from right-click context menu or from party menu accessible with “P“). Party is used in content like Dungeons, Fractals, and Personal Story, a similar interface is also automatically created for teams in PvP matches (with a colored background to indicate team you are in).
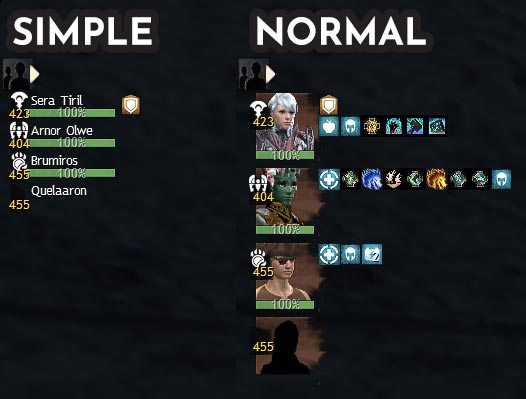
In default party UI you see avatars with a health bar below and effects on the right in 3 rows: boons, other effects, and conditions.
You can simplify that view and compress the party view into simple health bars with one row or boons and conditions (shown in that order).

In both views, you’ll see players’ profession or specialization icon and their mastery level (when in Fractals of the Mists, their Agony Resistance instead).
Use /p to switch to party chat and talk to your teammates (in PvP you have to use team chat, which is accessible with /t).
Squads are bigger more advanced groups, with a limit of 10 (also called “raid mode”) or 50 players. A squad can be taken over and organized by Commanders (![]() ) but any player can create a squad with minor limitations (inability to place squad markers, move players to organize subgroups, post squad broadcasts, and limitation to only a 10-man squad option).
) but any player can create a squad with minor limitations (inability to place squad markers, move players to organize subgroups, post squad broadcasts, and limitation to only a 10-man squad option).
You can start a squad by pressing “P” and selecting “Create Squad” from the menu that pops up, to join a squad just use /sqjoin character name, or if Commander (![]() ) is on your map, right-click on them (clicking on the tag on the map or minimap also works) and select “Join Squad”.
) is on your map, right-click on them (clicking on the tag on the map or minimap also works) and select “Join Squad”.
 Squad UI only limited info (name, profession/specialization, health) with the addition of colored border indicators for some mechanics.
You can switch to view your subgroup like a party by pressing “P” and unchecking “View as Grid”, that’s useful for example, if you need to see when to cleanse conditions from your group.
Players with Commander Tag unlocked will have more options to control their squad, they can start “Ready Check” to see who is AFK (away from keyboard) which is used in Raids and Strikes as a “go” check before engaging the boss.
Having the ability to organize subgroups is very important, as we mentioned in the Boons section, all skills granting boons to others used by healers and supports will target 5 players prioritizing the caster’s subgroup/party.
Note: Every player in squad have the ability to move themselves in proper subgroups even without Commander tag.
Any player can also mark a target with Ctrl+T placing the target icon (![]() ) above their head, and others in the same party or subgroup (it is not squad-wide) can press T to select this target. This also works in parties.
) above their head, and others in the same party or subgroup (it is not squad-wide) can press T to select this target. This also works in parties.
The topic of subgroups, commanding, markers, and broadcast messages is complex, so without going into further detail here, we recommend you to read the commanding in open world guide, which will be useful for all players, not only commanders:
Combat
One of the most unique aspects of Guild Wars 2 in comparison to other MMORPGs is its combat, very action-oriented and dynamic fights with amazing animations and lots of visual effects yet with key attacks clearly visible and well telegraphed.
In order to play effectively, you need to know how combat works, how to properly execute your “burst” (high damage combo), and full “rotation” (chain of skills and actions to achieve the highest possible DPS), how to use the terrain to your advantage, but also how to avoid damage.
Weapons
Let’s start from the basics, with dealing damage.
Each profession will be able to use different weapon types, and each of those weapons will give a different set of skills to that profession. Additionally, some weapons are only available to the profession when playing with specific elite specialization (for example Axe is only usable by  Guardian
 Firebrand
That means your playstyle will be centered not only around your Traits (talents) but around your weapons and proper stats (attributes) supplementing weapon skills damage type and player’s general role in the group.
For example, Guardian


 Revenant


All professions can use two weapon sets and swap between them freely out of combat, most professions can also  Weapon Swap
 Engineer
 Elementalist Weapon Swapping
Some weapon skills will provide Boons and Heal, those are of course support players’ picks, some will apply Conditions while others will deal more Physical damage. Selecting the proper weapon should always be matched with other Utility skills, your general role, and your Traits to create synergy and interactions between Skills, Traits, and stats.
Every main-hand or two-hand weapon has its auto-attack, which is the #1 skill, most weapons have  Ranger
 Ricochet
 Groundwork Gouge
This might be a lot to take in, that’s why you should simply take it slow, read the tooltips, and try to theorycraft a perfect build for yourself, or simply use our Builds database and pick a build for yourself.
Skill bar
Guild Wars 2 is known for neatly packing lots of information in different subtle forms in one place, that is very much the case with your skills, you should get yourself familiar with it and learn to read it, to perform best in every game mode.

Your skill bar consists of weapon skills and profession mechanics on the left, a health orb in the middle, and 1 heal, 3 utility skills, and 1 elite skill on the right side.
Health orb informs you of your current health and gained barrier, which is extra temporary health some skills can provide (later in the game you will also see some other effects and numbers on some professions, which will be covered in profession-specific guides).
Just above the health orb, you have your endurance bar, you have 100 endurance and by default split into two possible  Dodges Dodge
Most information thought will be packed on your skill icons, depending on the skill type, its range, usage, and your settings, you can get some useful information from it.
Most subtle, and arguably one of the most important information is out of range indicator which is displayed as a small red bottom border if your skill is out of range to your target.
Each key bound to a specific slot will be displayed just below the skill’s icon, and if the skill can be ground-targetted, around this key binding indicator will be the red target mark.
When a skill is used, it will go on cooldown, it will be visible by it going black and slowly uncovering the icon again with an additional countdown. Some skills can have “ammunition”, meaning they can be used in short succession, and the cooldown starts with the first use and is happening in the background.
This ammunition count (how many times you can use “ammunition” type skill) is displayed in the top-right corner of the skill’s icon, and the cooldown running in the background is displayed as a white, slowly-filling border around the skill.
Finally, if you have “Disable Skill Highlighting” unchecked in your general options, some skills will have a slight white glow around their icons. Those are either combo finisher skills that can be activated to create a combo if you are standing in a combo field or Crowd Control skills dealing defiance damage if targeting an enemy with an active Defiance Bar.
Combos
Combos offer unique interactions between different skills (and often different players).
The Combo works by using two skills with distinct properties to create an additional effect.
One skill with Combo Field: Type in the skills’ tooltip (for example  Medic Gyro
 Electro-whirl
The final effect is based on both Field and Finisher types.
Most popular Combos in PvE are for example Fire field with Blast finisher producing AoE
In PvP, it’s not uncommon to see group
Defense and Dodging
Combat is not only dynamic offensively, but also defending yourself from attack comes not from damage mitigation (although it might help in some cases), but from avoiding the damage in multiple ways.
The most powerful tool at your disposal is Dodge
A well-timed dodge can save you from a deadly attack, and pre-set animation tied to it will ignore movement-impairing conditions like
Each Dodge Dodge
Dodge Blurred Frenzy
 Shock Shield
 Renewed Focus
Boons will also help you avoid or mitigate some damage, powerful
There is also an effect called Barrier in GW2, displayed as a yellowish health overlay, Barrier will absorb incoming damage prior to actual health being reduced.
Arguably strongest tool after Dodge
In Guild Wars 2 enemy AoE (Area of Effect) attacks are telegraphed by dark orange (red in some cases) areas in the shape of the cone, line, or circle on the ground.
Sidestepping those fields is often the easiest way to avoid the damage, it’s often better than Dodge
Some mechanics even require you to jump over them in order to avoid damage (expanding shockwaves during some Open World and end-game PvE fights).
There are of course Stats like Vitality or Toughness, damage reduction effect from skills, traits, and even food, but your goal number one will always be avoiding the damage.
Area of Effects
Like in every other game, there are attacks or effects cast on larger areas commonly known as AoEs. Generally, there are positive AoEs, negative AoEs from enemies attacks, in some encounters deadly AoEs, and sometimes AoEs requiring two or more players to stack in them.
Most Area Effects are not instant, they’ll show up on the ground or will stick to a player until expanded fully (or to some radius marked with a secondary circle), at which point they’ll for example explode or leave damaging AoE on the ground, those are commonly referred to as timed AoEs.
Here are some examples of different dangerous AoEs: cone attack, AoE causing expanding wave, timed AoEs requiring group to spread, AoEs spawning damaging areas after timing out.
While green AoEs usually require you to stack inside them, some will punish you for having too many players inside when they’ll time out.
Those punishing green mechanics are only present in end-game instance PvE content like Strike Missions, in Open World you don’t have to worry about overstacking people in green AoE.
While the game unified them mostly, there are some variations per encounter (usually in instanced PvE content), and there is no better way to know what they do other than experience it. If you are struggling and don’t know what AoE does on some encounter like Raid or Strike mission, make sure to check our guides, where all attacks are explained in detail.
Downstate
In Guild Wars 2 depleting your health doesn’t mean death, players will go downstate first, with a chance to return to play.
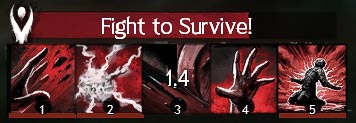
You will be unable to move, with only a few skills at your disposal.
While skills 1-3 are different for each profession, they can be categorized in a similar way, and skills 4-5 are used by all professions.
- Basic damage skill
- Crowd Control skill or escape skill (used to interrupt enemy player finishing you)
- Profession-specific, usually damaging skill
- Bandage: self-heal, easily interruptable with any damage, and on relatively high cooldown (with End of Dragons mastery unlocked, this skills has additional resurrect capabilities in form of Jade Bot helping you resurrect in Open World).
- Channeled Agony: unlocked with masteries, AoE knockback usable in Open World
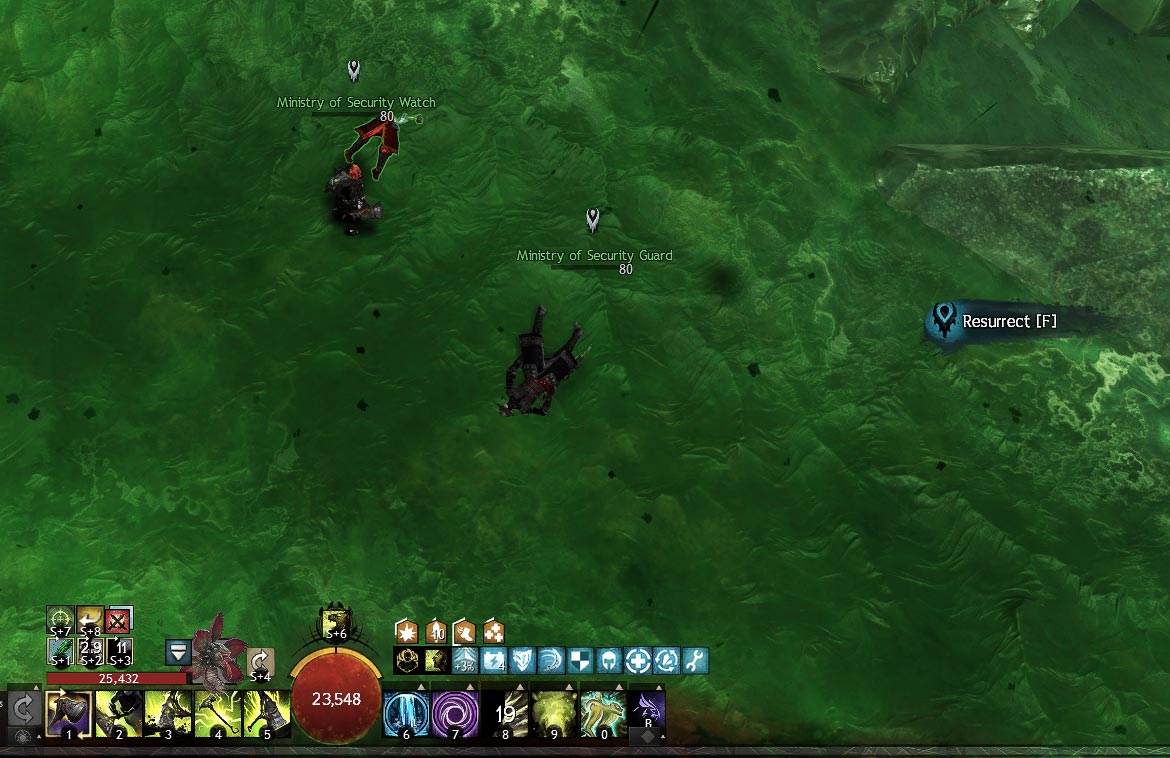
Enemy players in a downed state (this is usually only visible in competitive game modes as most monsters do not have downstate) are marked with![]() on the map, while friendly players will be marked with
on the map, while friendly players will be marked with![]() .
.
Those icons mean you can either finish off a downed enemy or help review a friendly player when in proximity by using the interaction key (“F” by default).
In addition, you can review fully dead NPCs and players )fully dead players can be resurrected only in Open World).
“Pressing F” to help your friends is not always the best solution, sometimes enemies will pressure you and you might also go down in the process, or you are simply alone, and there is no one to help you.
In those cases you might want to utilize Rally system, allowing downed players to get back to the fight once one of the enemies they were attacking was killed.
In fact, there are not many situations where manually resurrecting players is better than rallying them by killing their opponent.
Note: Multiple professions in Guild Wars 2 have access to powerful “rez” abilities, which will review downed allies, sometimes even teleporting them to the caster. This is often referred to “downstate manipulation” and is often used to allow less experienced groups to make more mistakes and don’t be punished as much for making them.
Crowd Control & Defiance
Similar to most RPG games, there are CC (Crowd Control) effects, categorized into two general groups: Hard CC and Soft CC.
Soft CCs come from movement-impairing conditions like
Hard CCs are strong effects like 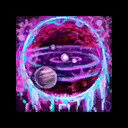 Gravity Well

Enemies in competitive modes and weaker monsters are susceptible to Crowd Control, stronger enemies like Champions, some Elites, Veterans, and of course Legendary opponents won’t be affected by CC.
They will instead have Defiance Bar under their health. This bar can be broken with enough Defiance Damage, that’s applied by Crowd Control effects.
Hard Crowd Control will deal Defiance Damage indicated in the tooltip, and Soft ones will deal Defiance Damage over time.
Once Defiance Bar is broken, the enemy will usually be in weakened state, but the actual effect differs from enemy to enemy, some will be Dazed for a moment, some will be Knocked down briefly, and others (all bosses in Fractals of the Mists for example) will get
Having good access to CC skills is very important in all game modes, even when playing solo in Open World without good CCs will be significantly harder.
Stats (attributes)
First, you need to know what basic stats are in the game, so for starters let’s shamelessly rip off the Wiki:
 Power: Increases outgoing strike damage.
- Precision: Increases Critical Chance.
- Toughness: Increases Armor, some Raid bosses will fixate player with the highest Toughness, making it a key attribute when playing a tank.
- Vitality: Increases Health.
- Concentration: Increases Boon Duration.
- Condition Damage: Increases the damage done by inflicting conditions.
- Expertise: Increases Condition Duration.
- Ferocity: Increases Critical Damage.
- Healing Power: Increases all outgoing healing.
Above stats are the main attributes in the game, based on those, others (like Critical Chance, Armor, and Health) are calculated. Those attributes create predefined, named stat combinations.
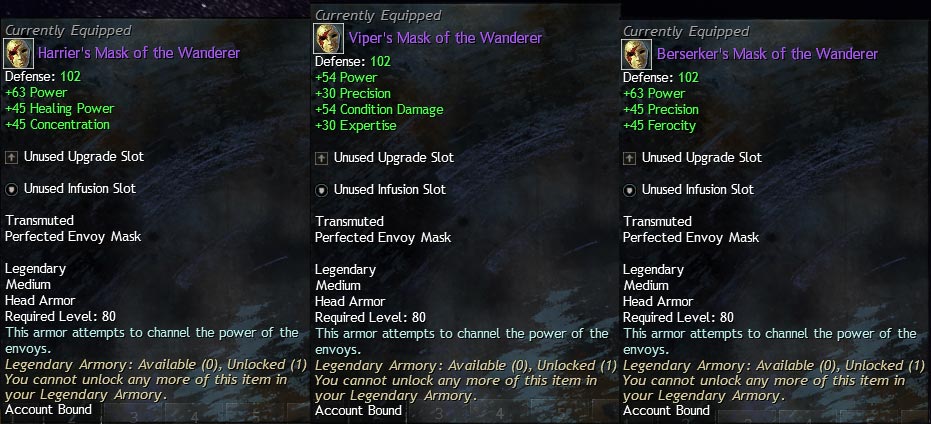
In early levels, you’ll be finding single stat items or items with only two attributes, but in the end, each stat combination will have a specific balance of attributes you’ll slowly get to know as the whole community is using those prefix names every day.
For example, Berserker’s for power builds, Viper’s for condition builds, and Harrier’s for healers.
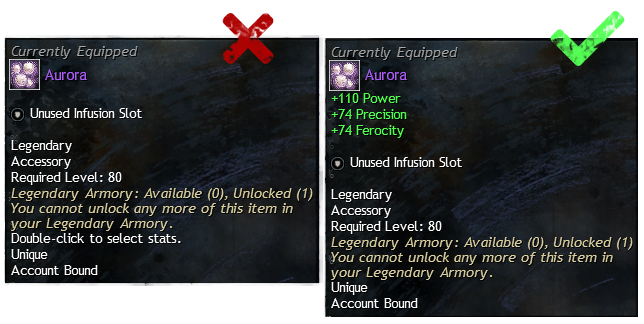
Now that you know the basics about prefixes, you’ll better understand how selecting your stats works. As explained in Creating your first character guide, you might notice some items don’t have any stats by default.
That means you are able to select the prefix you need from the list by right-clicking and selecting Customize.
Remember that most items have a limited pool of prefixes to select from, that’s determined by the method of acquisition, item’s origin (expansion), etc.
Note: At first, Power supplemented with Precision and Ferocity should be your go-to stats as monsters die way too fast for condition-based builds, and defensive attributes won’t be that helpful, and if you will struggle in any content, it’s always best to first adjust your build and utilize your profession mechanics before changing your items.
Your go-to prefix for new player could be Berserker’s for full power builds, or Celestial (offering all stats equally distributed, also awarded as part of Level 80 boost) for more hybrid builds.
Items will have their maximum possible attributes based on their quality, from top to bottom is the list of most stats offered to least (excluding unusable junk items):
- legendary / ascended (end-game gear)
- exotic (good starter gear for instanced content)
- rare
- masterwork
- fine
- basic
Gearing and proper stats combinations can be hard to grasp for new players, that’s why you should take a look at our builds for each type of content to know what stats to on what build. And if you want to learn more about acquiring your starter equipment, or even endgame legendary items, make sure to read our gearing guides:
Upgrades
Your items can be further upgraded depending on the level. Low-level items can only be enhanced with minor boosts in the form of jewels like  Garnet Pebble
 Minor Rune of the Pack
 Minor Sigil of Strength
With higher-level upgrades, you’ll need to have higher-level items to be able to slot them.
Runes & Sigils
Your main upgrades are Runes for armor and Sigils for Weapons. Those are always selected based on general build idea, damage type, and role.
Sigils (example:  Superior Sigil of Force
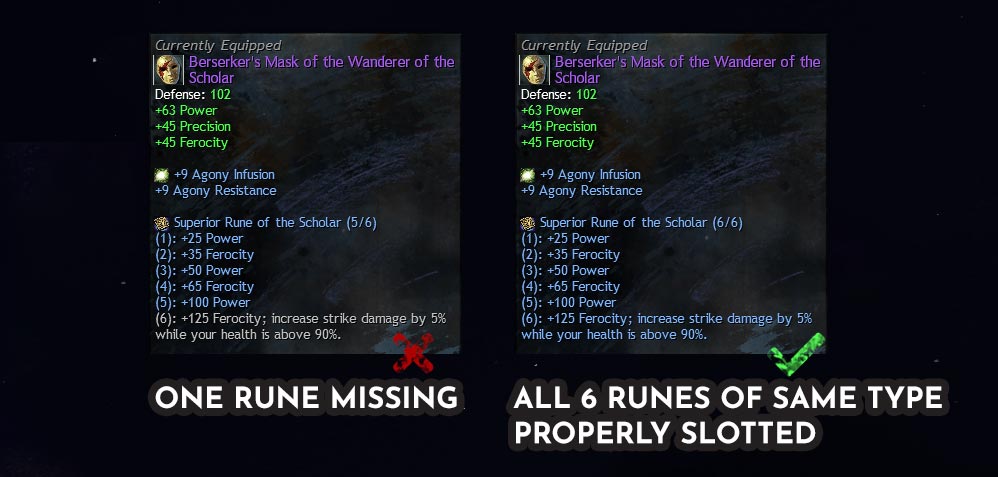
Runes will give you more bonuses for every Rune of the same type slotted in your armor pieces.
Your goal should always be reaching the last bonus in Superior Runes by having 6 of the same type Runes equipped.
Infusions
Infusions are yet another type of upgrade usable for players, those require a specific infusion slot available only in ascended and legendary items.
Originally, Infusions like  +9 Agony Infusion
With time, new types of infusions were added, namely “stat infusions” like cheap  Mighty WvW Infusion
 Mighty +5 Agony Infusion
 Mighty +9 Agony Infusion
Each stat infusion offers a +5 single stat increase and it can be inserted in 18 slots total in ascended or legendary gear for an extra 90 attribute points. It’s worth mentioning that you only have 13 infusion slots in your ascended gear, your back item and rings will have to undergo an infusing process, and your rings additional attuning in order to gain up to 5 extra infusions slots for a total of 18.
Note: Stat Infusions are considered end-game and are not required for most of the content, the ones giving you Precision, Concentration or Expertise in order to reach 100% Critical Chance, Boon or Condition duration can be considered slightly more useful, but still not required for average player.
Traits
Talent system in GW2 is based on traits, which are enhancements to your character, skills, and actions offering increased stats or additional effects to some actions.
You are offered up to 3 trait ines (known as specializations) to pick, starting with one at a time at level 21, two after level 45 and finally three at a time at level 71.
Each of the specializations will offer 3 Minor traits and an option to choose (activate) one major trait in three separate groups (known as adept, master, and grandmaster).
Example Elementalist Fire
Fire
Once you pick your traits, you’ll have 3 additional major traits active, which are usually more impactful and often have an active element to them, while minor traits are mostly passive enhancements:
Only the last row in the Build panel can slot an Elite Specialization, a powerful traitline tied to expansion purchase that will change the mechanics of your profession and allow you to use an additional weapon type tied to that specialization and a new type of utility skills.

Just to paint a picture of how much impactful elite specialization can be, here’s an example of  Mesmer
 Virtuoso
It will allow you to use the Dagger main-hand weapon and new Psionic skills. Your Clones change into Blades which you can “spend” when using Shatters, which are changed to Bladesongs now.
For some recommendations of good first skills to unlock for each profession, and what the first specialization to unlock for new players, check the Build and Training section of the Game basics guide, and if you want to know what traits to pick for the best effect on your favorite profession, check our builds section.
Heart Quests
Renown Hearts is the system that was designed to replace traditional “accept > complete > return” quests, Hearts are fixed areas on most maps where you need to complete different tasks to fill up the progress bar visible in the Content Guide in the top-right corner of your screen.
Hearts are part of map completion and their progress is character-bound like map completion. You’ll see Heart Quests everywhere with exception of cities and a few maps (for example all Heart of Thorns maps), in addition, most Hearts in maps added during (and after) Living World Season 3 will have repeatable versions of Hearts resetting daily.

Those regional tasks will show up in your content guide once you enter the area where they can be completed, description will offer you hints on how to complete the Heart.
The most interesting fact is, that you have multiple ways of progressing such quest, most actions in the area will fill the progress bar, killing enemies, resurrecting allies, performing specific actions like fixing water leaks, or even capturing monsters and bringing them to cages.
While each Renown Heart will have a corresponding NPC (marked with ![]() ), you don’t have to interact with it in order to start the quest, but you might be interested in talking to that NPC after completing Heart Quest, as they often sell different wares, usually for
), you don’t have to interact with it in order to start the quest, but you might be interested in talking to that NPC after completing Heart Quest, as they often sell different wares, usually for ![]() Karma, which is great currency to spend, especially at early levels due to it being awarded for most activities in the game.
Karma, which is great currency to spend, especially at early levels due to it being awarded for most activities in the game.
Dynamic and Meta Events
Dynamic Events will add more character to your adventures to supplement static Renown Hearts. Events show up in predefined areas when triggered by talking to an NPC or on set timer or internal cooldown.
Each event will often progress into another one, even after failing, branching out to create a unique experience.
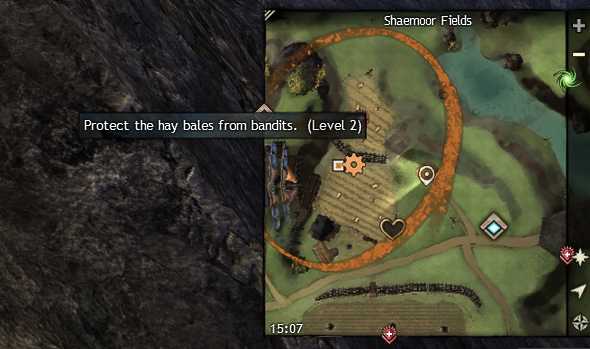
Events are marked with orange markers on the map, some will have orange shapes indicating a rough area where the event is happening.
Orange icons will indicate different tasks, for example:
 – collection point of items from the area
- – an enemy to be defeated
- – objective to be protected or destroyed
Completing the Event will usually award you with experience, ![]() Karma, and
Karma, and ![]() Gold, in some cases they will unlock charmable animals and open access to otherwise inaccessible areas or spawn reward chests with some items.
Gold, in some cases they will unlock charmable animals and open access to otherwise inaccessible areas or spawn reward chests with some items.
On most maps, a specific chain of 5-20 Dynamic Events is part of Meta Event, which are designed to define the state of the map and tell the story of the area in an immersive way.
Some Meta Events will include fights with powerful foes and very lucrative rewards like materials needed for crafting legendary items, unique ascended weapon drops, or even very rare, very expensive cosmetic infusions reaching thousands of gold on Trading Post.
The community found a way to create the most profitable way of chaining those Meta Events together to create “Meta Train“, organized multiple times every day. A single 6-hour long Meta Train can reward you with over 100![]() , leaving you with around 15
, leaving you with around 15![]() –20
–20![]() per hour.
per hour.
If you are interested in joining Hardstuck groups in Open Word farming, make sure to check out events and join our discord, and of course check out the ultimate Meta Event guide for our Meta Train:
Jumping Puzzles
And to add a cherry on top of the Guild Wars 2 cake, we can’t end the guide without mentioning the amazing system of Jumping Puzzles.
Those fun mini-games don’t have any indication of where they start.
You’ll simply encounter a place that is needed for map completion and it will not be accessible any other way but with a series of jumps on multiple different platforms, or you’ll see a suspicious ledge and after checking it, you’ll discover there is a secret passage there.
Some Jumping Puzzles will reward you with the chest at the end, some will unlock an achievement, but all of them will reward you with a great test of your patience tho!
Completion of Jumping Puzzles is often required for legendary items collections.


