Vale Guardian

Enrage: 8 minutes. When Enraged, Vale Guardian will deal 200% more damage.
Tank: Toughness
Requires: Condition Damage, Boon Removal
Vale Guardian takes increased power damage, similar to Keep Construct, due to its lower Toughness compared to other raid bosses. At least two players in the squad, however, must deal condition damage in order to defeat the Red Guardian in the Split Phases, so a mix of DPS types is ideal for this encounter.
This encounter requires a source of boon removal on a player that is not assigned to the Red Guardian. Condition Scourges (with  Devouring Darkness
 Banish Enchantment
 Superior Sigil of Nullification
While Vale Guardian aggros on a Toughness tank, any support build will suffice for this role. The encounter does have high healing pressure, however, so sources of large burst healing or preventative
 Recommended
Mace & Warhorn




 Weapon Mastery
Dagger & Warhorn



Mechanics
The fight with the Vale Guardian comprises three DPS phases, with two split phases at 66% and 33% of its health remaining. The boss will periodically spawn three different chromatic mechanics around the field, and starting at 66%, will occasionally gain a breakbar.
Unstable Magic Spike
Known as: blues, teleports
Every 10 seconds, Vale Guardian will summon blue electric fields at the feet of the five closest entities (including pets and illusions). When under 33% HP, ten fields will be summoned instead.
After two seconds, these fields will activate, dealing moderate damage and teleporting players to a random position in the arena—and away from the squad’s support players.
Blues can be side-stepped,  dodged
Any players standing in a Blue will see a yellow border on the edge of their screen and hear a sound cue. During the fight, the sound will only play for a second or two before the fields activate—a lengthened version can be heard here:
This is the most pernicious mechanic in this encounter, as it forms deadly combos with almost every other mechanic on offer. The tank must take extra care to not get teleported as the boss will move to their new position and throw the entire fight off-kilter otherwise.
Seekers
Seekers are red elementals that do very high damage in a small area around themselves—standing near multiple Seekers can one-shot a player.
Seekers will spawn in the center of each third of the arena and will last for 20 seconds before being replaced by a new set.
 Glyph of the Tides
 Magnetic Shield
 Magnetic Inversion
 Tidal Surge
If playing Druid, alternating between  Glyph of the Tides
 Entangle
 Entangle
 Vine Surge
 Natural Convergence
 Glyph of the Tides
Distributed Magic
Known as: greens
About every 15 seconds, Vale Guardian will spawn a green circle on the ground that slowly contracts.
After about 5 seconds, unless four players are standing inside the circle at the time of detonation, the Green will explode and deal damage to each squad member equal to 80% of their maximum HP.
This damage cannot be  evaded
Most groups avoid sending players to Greens, and instead outheal the damage the moment the circle explodes. This is mainly due to the heavy DPS loss from having four players away from the boss, and in later phases of the encounter, the possibility of Greens spawning in the lit-up portions of the arena.
If doing the outheal strategy, healers should be looking out for detonations. The squad should be at max health before the Green detonates, and healers should have burst heal skills available to recover health after the detonation. The explosion will do the same damage to a player with and without
Magic Storm
Known as: CC, breakbar
After the split phases, and every 30 seconds afterwards, Vale Guardian will gain a defiance bar and spawn damaging balls of energy. During this attack, the Vale Guardian will not move and Greens will not spawn.
Note: Any Green that has spawned before the defiance bar unlocks will detonate, so be remember to get the squad topped up before Magic Storm causes issues.
Generally, the defiance bar should be broken as fast as possible, however, if players are downed, focus on resurrecting and restabilizing over breaking the bar. Be careful with which skills you use to break the bar—a misplaced
Pre-Event
Upon entering Spirit Vale, players will see three chromatic Guardians in a line. When engaged, each of these Guardians will spawn one of the three chromatic mechanics mentioned above. When each Guardian is brought to 0% health, players must break a defiance bar to fully defeat it.
- The Red Guardian summons Seekers. It has extremely high Toughness, so condition damage is the only way to meaningfully damage it.
- The Blue Guardian summons Greens. It also can gain
 Blue Pylon Power, an effect that nullifies all incoming damage but can be stripped as if it was a boon.
 - The Green Guardian summons Blues.
Boss Encounter
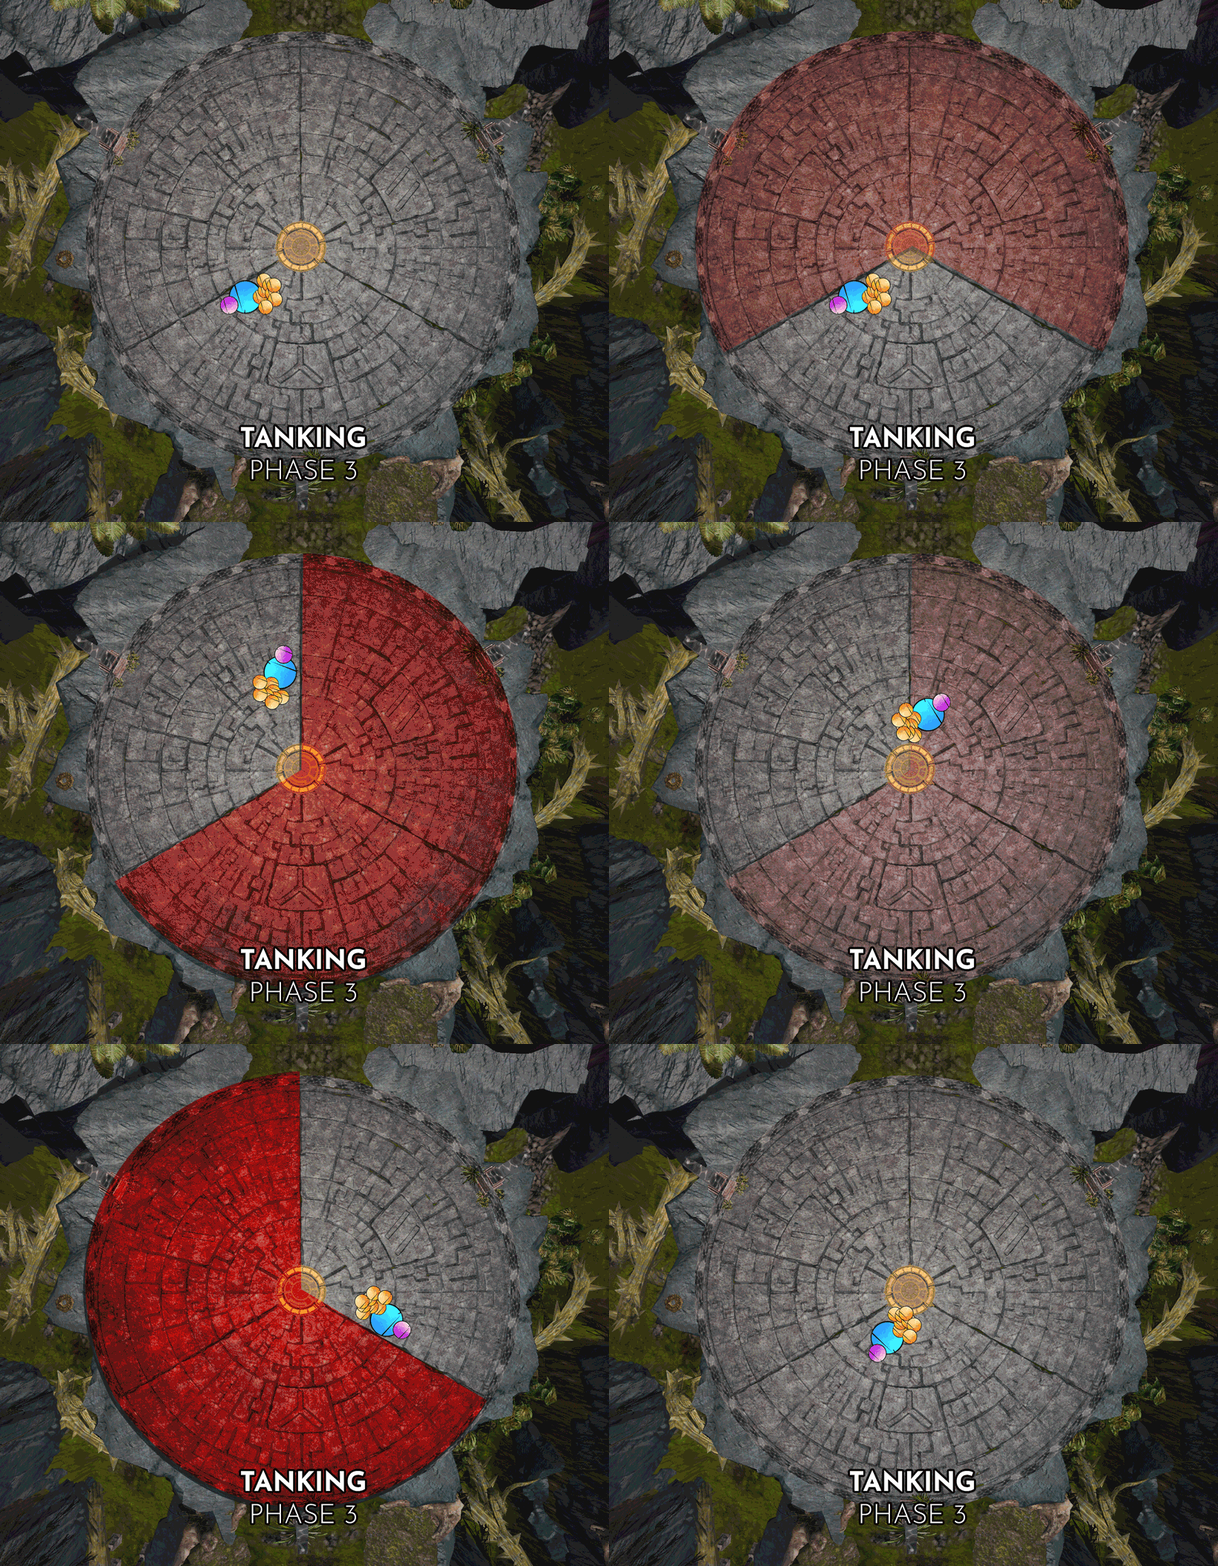
The arena is divided into three sections. Starting at 66% HP remaining, one section of the arena will light up and pulse damage onto any players standing on it. At 33% HP remaining, two sections of the arena will light up. The tank should limit the movement required by the squad while avoiding the arena floor damage.
Phase 1
Two tanking strategies exist: edge tanking and center tanking. The center tanking strategy is used in very organized groups; most groups tank on the edge in the first and second phase. When edge tanking, start at the southeastern edge of the arena. Regardless of which strategy your squad is using, make sure you are inside the confines of the arena when the encounter is started.
Even in Phase 1, the squad will have to deal with all of the chromatic mechanics mentioned above: Greens, Blues, and Seekers. Be prepared for the first set of teleports, which spawn immediately when Vale Guardian is engaged.
The tank should make sure the boss is faced away from the rest of the squad. When tanking the boss on the edge, the tank must always  dodge
dodge
Split Phases
 At 66% and 33% HP remaining, Vale Guardian will split into the three chromatic Guardians from the pre-event, albeit with less HP. After a short delay, players will get a Pylon Attunement symbol above their head corresponding to the section of the arena they are in: a player in a section of the arena that they’re not attuned to will take moderate ticking damage.
Note: Before splitting into groups, check if there is a Green mechanic on the platform. If there is, everyone should wait in place for it to explode (if you chose to ignore the mechanic) and heal to 100% before going to their respective pylons.
Two or three condition damage dealers should be sent to engage the Red Guardian while the rest of the squad moves to the Blue Guardian. Be sure to have a source of boon strip in the Blue Guardian’s group to remove ![]() Blue Pylon Power.
Blue Pylon Power.
Because all of the chromatic Guardians aggro on the closest player, one player at the Blue Guardian should pull the Green Guardian’s aggro onto the stack at the Blue Guardian. Once pulled, the squad should stack tightly to avoid covering Greens with teleports.
Often, it’s a healer’s responsibility to pull the Green Guardian. Make sure to heal the stack, especially if a Green Circle lines up with the split phase, then get Green Guardian’s aggro and return to the stack on the Blue Guardian. You will need to keep healing up throughout the phase, as players will be attuned to the Blue Guardian but will be standing in the Green Guardian’s AoE as well.
During the split phase, players should do the Green Circle mechanic as ignoring it will heavily pressure the Red Guardian group.
Phase 2
After the 66% split, return to the original tanking location. The northeastern (green pylon) section of the arena will light up, damaging any players standing on this section. Every 20 seconds the lit section will rotate clockwise, from green to blue to red – make sure to be standing just south of the split. When the northeastern section fades, move to just north of the split, as the southern section will be the next to light up.
At 33% HP remaining, the split phase will repeat once again (with no changes), after which you will progress to last part of the fight.
Phase 3
After the 33% split, two sections will light up. The southern (red pylon) section of the arena will be the first safe section. The safe section will again rotate clockwise around the area; to avoid being caught by the damaging floor the tank should constantly “chase” the furthest safe edge as shown in the Phase 3 animation.


